15
290/350 Operator and Parts Manual V13.1210
BATTERY CHARGING
CAUTION
Always use the automatic battery charger provid-
ed by the manufacturer of this machine to charge
the batteries of this machine. It is designed to
charge the batteries at the appropriate rate. If
you must use a different charger, disconnect the
batteries before charging to avoid damage to the
electronic speed controller.
CHARGER SPECIFICATIONS
OUTPUT VOLTAGE OF 24 VOLTS.
OUTPUT CURRENT OF 36 AMPS MAX.
INPUT VOLTAGE OF 110 VOLTS/60 HZ.
AUTOMATIC SHUT OFF CIRCUIT.
MADE FOR DEEP CYCLE BATTERIES.
WARNING
Explosive hydrogen gas forms when batteries are
charging. An open flame or spark can cause this
gas to explode. Serious personal injury or property
damage could occur. Only charge the batteries
in this machine in a well ventilated area. Leave
access panel open when charging!
1. TRANSPORT MACHINE TO A WELL VENTILAT-
ED AREA FOR CHARGING.
2. TURN THE MACHINE OFF.
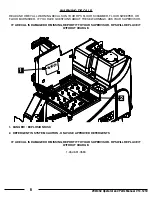
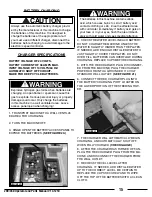
3. HINGE OPEN THE BATTERY ACCESS PANEL TO
EXPOSE THE BATTERIES.
(SEE FIGURE 20.)
WARNING
The batteries in this machine contain sulfuric
acid, which causes burns to skin. If battery acid
contacts clothing or skin, rinse the effected area
with cold water immediately. If battery acid gets on
your face or in your eyes, flush the area immedi-
ately with cold water and seek medical attention.
4. CHECK THE WATER LEVEL IN EACH BATTERY.
DO NOT CHARGE THE MACHINE UNLESS THE
WATER IS SLIGHTLY HIGHER THAN THE PLATES.
IF NEEDED, ADD ENOUGH DISTILLED WATER TO
JUST SLIGHTLY COVER THE PLATES. DO NOT
OVER FILL. BATTERIES CAN OVERFLOW DURING
CHARGING. REPLACE CAPS BEFORE CHARGING.
5. WITH THE RED CHARGER PLUG DISCONNECT-
ED FROM THE MACHINE, PLUG THE CHARGER
POWER CORD INTO A GROUNDED 110 VOLT
STANDARD WALL OUTLET.
(SEE FIGURE 21.)
6. CONNECT THE RED CHARGER PLUG INTO
THE BATTERY CHARGING PORT LOCATED ON
THE LOWER PORTION OF THE STEERING TOW-
ER.
7. THE CHARGER WILL AUTOMATICALLY BEGIN
CHARGING, AND AUTOMATICALLY SHUT OFF
WHEN FULLY CHARGED
(CHECK GAUGE)
8. AFTER THE CHARGER HAS TURNED OFF, UN-
PLUG THE RED CHARGER PLUG FROM THE MA-
CHINE AND DISCONNECT THE CHARGER FROM
THE WALL OUTLET.
9. RECHECK THE CELL LEVEL AFTER
CHARGING. IF NEEDED, ADD DISTILLED WATER
UP TO THE CORRECT LEVEL. BE CERTAIN TO
REPLACE THE CAPS SECURELY AND TO WIPE
OFF THE TOP OF THE BATTERIES WITH A CLEAN
CLOTH.
FIGURE 20.
FIGURE 21.
Содержание 290 Series
Страница 2: ......
Страница 26: ...290 350 Operator and Parts Manual V13 1210 26...
Страница 32: ...290 350 Operator and Parts Manual V13 1210 32 FRAME TOP CENRTAL COMMAND II CENRTAL COMMAND PAGE 27...
Страница 33: ...33 290 350 Operator and Parts Manual V13 1210 PAGE 28 FRAME TOP...
Страница 38: ...290 350 Operator and Parts Manual V13 1210 38 STEERING TRACTION ASSEMBLY PAGE 33...
Страница 39: ...39 290 350 Operator and Parts Manual V13 1210 PAGE 34 STEERING TRACTION ASSEMBLY...
Страница 50: ...290 350 Operator and Parts Manual V13 1210 50 CENTRAL COMMAND II PAGE 45...
Страница 51: ...51 290 350 Operator and Parts Manual V13 1210 PAGE 46 CENTRAL COMMAND II...
Страница 53: ......

