background image

29

QWIC Electric bicycles Manual

Содержание I am Electric

Страница 1: ...MANUAL ELECTRIC BICYCLES MANUAL...

Страница 2: ...of this manual are copyright of QWIC We reserve the right at any time and from time to time to modify or discontinue temporarily or permanently our product manual or any part thereof with or without n...

Страница 3: ...ll always feel some extra support With the reliable durable and user friendly pedal assistance riding your bike will no longer be a hassle but something you enjoy There is a big chance that you have n...

Страница 4: ...sistance 3 Battery 8 3 1 Range optimum range 3 2 Removing and taking out the battery 3 3 Charging the battery 3 4 What you should know about your battery 4 Pedal assistance 12 4 1 What is pedal assist...

Страница 5: ...ing calliper brakes 10 Tires 18 10 1 Desired tire tension 11 Gears 19 11 1 Switching gears 12 Bike lock 20 12 1 Lock instructions 13 Maintenance 21 13 1 Gettingyourbicycleserviced y 13 2 General maint...

Страница 6: ...8 Menu display 9 Menu symbols 1 2 Menu s Press SET button 2 and use the arrows button 3 and 4 to choose from one of the menus The display will show the following menus fig 1 1 S SET 1 2 3 4 5 6 7 8 9...

Страница 7: ...ngine will start As soon as you release the UP button the Powerlaunch will be turned off 1 5 Display lights Press the ON OFF button to switch the display lights on Press ON OFF again to switch off 1 6...

Страница 8: ...utton 1 1 ON OFF 2 Battery indicator 3 Adjust pedal assistance 4 pedal assistance programme 2 2 Adjusting the pedal assistance Use the mode button button 3 to choose from 3 assistance programmes The 3...

Страница 9: ...ttery pack is also influenced by battery voltage while being discharged A single display of 10 Ah does not say anything about the capacity of the battery and is misleading The best way of comparing ba...

Страница 10: ...es Amount of Wh Expected optimum range 216 40 en 60 kilometer 360 60 en 100 kilometer The most important thing is to realise which factors may influence the optimum range You personally influence the...

Страница 11: ...and battery 3 2 Removing and taking out the battery On the left hind side of the battery a battery lock is located Using this you may lock the battery To unlock the lock Put the key into the lock and...

Страница 12: ...fully charged Warning Remove the charger when battery is fully charged This prevents the life cycle from being decreased Warning The battery may be damaged when not being used for a longer period of t...

Страница 13: ...evement will decrease at low temperatures The battery pack will last about 1000 1200 times of full charging under ideal circumstances The achievements will decrease over a matter of time and the batte...

Страница 14: ...the engine is high to it is easier to drive off Switching the pedal assistance on and off When switching the control board on the pedal assistance is on its last used level Using the arrows the degree...

Страница 15: ...ssistance has been legally limited to a speed of 25 km h This means that when a speed of 25 km h is reached the pedal assistance will slowly decrease to zero The radius of the bike depends on environm...

Страница 16: ...k seat post clamp fig 5 1 fig 5 2 and fold in the frame 4 Unlock clamp in head tube fig 5 3 fig 5 4 and fold the steer in front of the saddle until it leans against the right side of the bike provide...

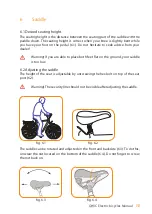
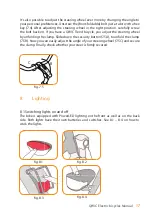
Страница 17: ...rom your dealer 6 2 Adjusting the saddle The height of the seat is adjustable by unscrewing the hex bolt on top of the seat post 6 2 The saddle can be rotated and adjusted on the front and backside 6...

Страница 18: ...f the dealer 7 2 Adjusting the steer Adjusting the height 7 1A the depth 7 1B and the heeling angle 7 1C creates the opportunity to tune the steer in any posture fig 7 1 fig 7 2 fig 7 3 fig 7 4 A B C...

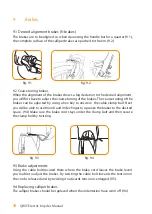
Страница 19: ...bicycle you adjust the steering wheel by unfolding the clamp Slide down the security button 7 5A to unfold the clamp 7 5B Now you can easily adjust the angle of your steering wheel 7 5C and secure th...

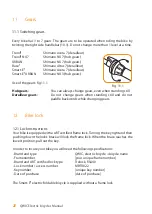
Страница 20: ...d by using a hex key to unscrew the cable clamp bolt Next you will be able to use thumb and index finger to squeeze the brakes to the desired space 9 4 Make sure the brake cord stays under the clamp b...

Страница 21: ...o use a bike pump equipped with a tire pressure indicator when inflating your bike To replace the calliper brakes you need to twist the cable bolt inwards causing the tension on the brake cable to be...

Страница 22: ...leur gears Do not change gears when standing still and do not paddle backwords while changing gears 12 Bike lock 12 1 Lock instructions Your bike is equipped with a ART certified frame lock Turning th...

Страница 23: ...bike will improve its life span Be careful not to use excessive amounts of water in the battery area The sensor near the crankshaft should be clean from dirt Never use a high pressure sprayer 13 4 Tre...

Страница 24: ...nstructions for use Check for damage Assemble all parts steer mudguards pedals luggage rack saddle Make sure all adjustable parts are tuned Adjust tire pressure Adjust brakes symmetrically making sure...

Страница 25: ...Check headtube for backlash Check steering pen and if necessary adjust Greasing Clean chain and grease with Teflon spray or silicone spray Electric system Charge battery for 5 hours clean paddle senso...

Страница 26: ...initials 1 Date Milage Mechanic __ __ ____ 2 Date Milage Mechanic __ __ ____ 3 Date Milage Mechanic __ __ ____ 4 Date Milage Mechanic __ __ ____ 5 Date Milage Mechanic __ __ ____ 6 Date Milage Mechan...

Страница 27: ...maximum height Is the angle of the steer and saddle comfortable Is my steer lined to the front weal Are my handles still secured Is there enough tension on the spokes Are any spokes broken or bent Ti...

Страница 28: ...ike Do not clean your bike using a high pressure sprayer as this may cause damage to the electronic parts of the bike Your warranty will expire Inappropriate use of the bike may cause damage to you or...

Страница 29: ...27 QWIC Electric bicycles Manual Warranty card Please fill out your warranty card at www qwic nl garantiekaart...

Страница 30: ...e Gel Gel Leather Gel Leather Sprung seatpost Sprung front fork LED lighting lightweight aluminum frame ART certified frame lock Sizes F 48 F 48 F 48 F 55 F 55 M 54 M 54 M 64 F 48 F 55 M 54 n v t Colo...

Страница 31: ...29 QWIC Electric bicycles Manual...

Страница 32: ...Korte Papaverweg 15 1032KA Amsterdam E info qwic nl www qwic nl Your dealer...

Отзывы: