Quintic LIVE GigE Скачать руководство пользователя страница 4


Quintic Consultancy Limited 

www.quintic.com         E-mail: [email protected]  

PO Box 2939, Coventry, West Midlands, CV7 7WH, United Kingdom.          

Tel. +44 (0)1676 530730      Fax +44 (0)1676 529045 

Registered in England and Wales No. 3943644.  VAT Reg. GB

776 4721 94


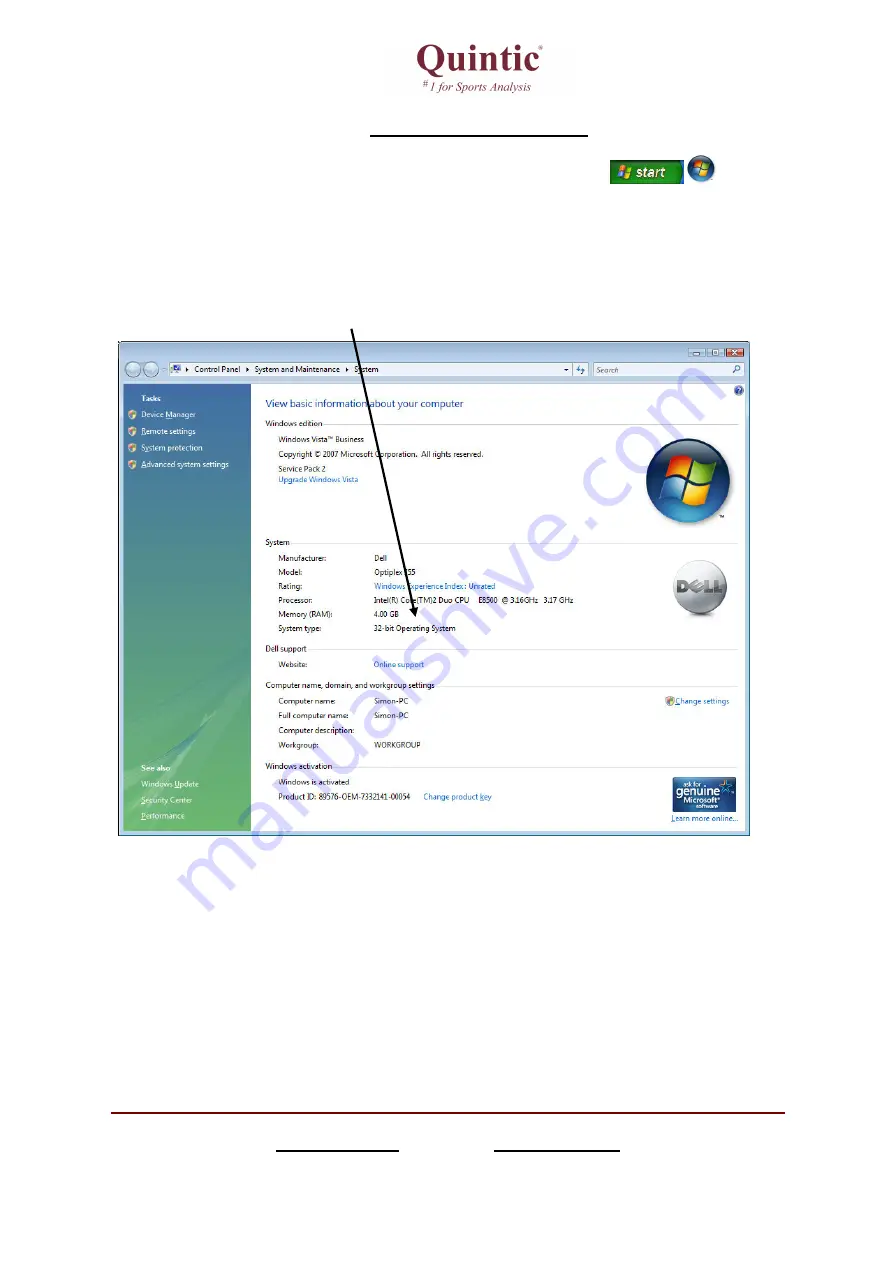
System Type 32 or 64bit 


Click on the Start menu in the bottom left hand corner of your screen or press the 


start button on your keyboard. 
 
Highlight the ‘

Computer’

 or 

‘My Computer’

 option, right click and select 

Properties

 this will open the computer 

system window. 
 
The system type will be illustrated within this window, if you system is 32bit please use the 32bit Quintic High-Speed 
Camera Driver Installation, if your system is 64bit please use the 64bit Quintic High-Speed Camera Installation. If the 
wrong installation is used the camera may not work. 


Once the operating system has been identified please begin the Quintic Camera Installation, please see the next page for 
detailed installation instructions. 


1

Содержание LIVE GigE

Страница 1: ......

Страница 2: ...e Tab gain boost d Size Tab video size area of interest e Using the Camera f Other Functions 4 USB2 Configuration Quintic LIVE High Contents Page ation Set up ation Set up Speed Capture Up Parameters...

Страница 3: ...a comes with Tripod Mount with options for either a fixed 12mm or zoom 8 48mm C Mount lens 12mm Fixed lens Ideal for filming human movement from a range of 3 to 6 metres Various additional C Mount len...

Страница 4: ...rd Highlight the Computer or My Computer option right click and select Properties this will open the computer system window The system type will be illustrated within this window if you system is 32bi...

Страница 5: ...to My Computer Open CD Rom Drive Double click on QuinticHighSpeedCaptureSetup exe on the CD to install the program Please note if you are using Quintic Ball Roll Software please ignore this stage 3 Go...

Страница 6: ...6 The software will now install at the default location C Program Files IDS uEye if you wish to install the program in a different location click on the Change button to continue the installation cli...

Страница 7: ...t is advisable to conne the internet at this stage to obtain the latest Microsoft drivers for the USB2 port Alternatively you can search the CD Rom supplied for the necessary USB2 driver for your Oper...

Страница 8: ...Coaching Biomechanics v21 Windows XP Vista Seven The UI 5220RE is a GigE camera with Aptina CMOS sensor in Wide VGA resolution 752x480 pixels The camera comes with a tripod mount as standard see middl...

Страница 9: ...u in the bottom left hand corner of your screen or press the start button on your keyboard Highlight the Computer or My Computer option right click and select Manage this will open the computer manage...

Страница 10: ...ernet cards any slower will cause the camera not to run at full speed Gigabit PC Card for Laptops with a PC card port check laptop specs for connectivity Gigabit Ethernet PCI Card for Desktops with a...

Страница 11: ...rd Highlight the Computer or My Computer option right click and select Properties this will open the computer system window The system type will be illustrated within this window if you system is 32bi...

Страница 12: ...ter Open CD Rom Drive Double click on QuinticHighSpeedCaptureSetup exe on the CD to install the program Please note if you are using Quintic Ball Roll Software please ignore this stage 3 Go to My Comp...

Страница 13: ...tware will now install at the default location C Program Files IDS uEye if you wish to install the program in a different location click on the Change button to continue the installation click Next 7...

Страница 14: ...e stating hardware compatibility all of the uEye software is compatible with Windows XP Vista and Seven Please click on the Continue Anyway option 9 Installation has now completed and the following sc...

Страница 15: ...e installation has completed the Quintic GigE camera needs to be configured Please connect the camera to the computer via the Ethernet port and plug the camera into the mains power Inbuilt Ethernet po...

Страница 16: ...44 0 1676 529045 Registered in England and Wales No 3943644 VAT Reg GB776 4721 94 To start the configuration click on the camera manager icon via the desktop or quick start menu This will launch the...

Страница 17: ...an internal PCI E Ethernet port and express card Ethernet port For this example the Quintic GigE High Speed camera will be configured with the express card port Highlighted on illustration All other...

Страница 18: ...f user s choice Once an IP address and an IP subnetmask have been allocated click on the Apply Changes button A window will now appear asking if you wish to assign a static IP address click on YES A c...

Страница 19: ...ct Automatic ETH Configuration this will automatically configure the camera Once the ETH configuration has been competed the following window will appear click on OK The status the camera can be seen...

Страница 20: ...pening the camera through Quintic After the Firmware update is completed please reopen the Camera Manager and select Automatic ETH configuration again To view detailed instructions on using the camera...

Страница 21: ...High Speed Video Capture 3 Single High Speed Capture a Camera Set Up Parameters b Camera Tab frame rate exposure c Image Tab gain boost d Size Tab video size area of interest e Using the Camera f Oth...

Страница 22: ...e icon on the computers desktop to open the Quintic software Click on the Camera tab in the Main window and select Single High Speed Capture The camera window will open in standby mode The high speed...

Страница 23: ...option from the drop down menu this will open the properties window Any settings that are changed within the properties window will be saved and reloaded next time the camera is opened Parameters can...

Страница 24: ...st Pixel Clock Rate This will improve increase the maximum frame rate at which the camera can capture at Timing Camera Peak Bandwidth is the maximum required bandwidth in MB sec Peak If the bandwidth...

Страница 25: ...rate if the pixel clock changes Max when this box is selected the camera will record at the maximum rate that is possible frame rate depends on the capture resolution and the Pixel clock Auto This op...

Страница 26: ...ilable exposure time depends on the pixel clock setting and the frame rate A low frame rate setting allows long exposure times where as a high frame rate reduces the maximum possible exposure time Hol...

Страница 27: ...e proportional to the amount of incident light is output at the sensor To increase image brightness and contrast this signal can be amplified by an analogue gain and offset before the digitising proce...

Страница 28: ...Quintic LIVE High Speed Video Capture Click on the Gain Boost option within the Image tab to automatically increase the brightness and contrast of the image...

Страница 29: ...nd position of the Area of Interest AOI AOI sets the camera so that only data included within the specific area is captured The smaller image enables the camera to work at a higher frame rate Selectin...

Страница 30: ...s the user to reduce the image resolution by the selected factor Using the binning factor will also increase maximum frame rate e Using the Camera To start capturing video footage click on the button...

Страница 31: ...re will now capture video until the Stop button is selected or the video reaches the maximum frames if selected or the maximal size MB To play the video within the Quintic software the capture window...

Страница 32: ...click on the button Once the Set New AOI tool has been selected click on the video and hold the left mouse button down now drag a window over the area of interest on the screen a white grid will appea...

Страница 33: ...g at a max frame rate of 87fps USB2 Max frame rate GigE 100fps at 752 x 480 To set the area of interest click and hold the left mouse button down and drag over the desired area you wish to set as the...

Страница 34: ...click on the button to exit out of full screen mode click on the Esc button 1 B in order to use this function Direct X 3D may need to be installed Scale the video preview to the window size To fit the...

Страница 35: ...o preview screen click on the area of the screen where you want the text to appear and use the keyboard to type the desired text Screenshot When using the preview screen a screenshot can be captured a...

Страница 36: ...Quintic LIVE High Speed Video Capture 4 USB2 Configuration Maximum Speed fps...

Страница 37: ...amera runs at 200fps when the Quintic system is used please follow these instructions Connect the camera to the computer and then double click on IDSProIdleConfig see below icon which can be found on...

Отзывы: