Page 3
For technical questions, please call 1-888-866-5797.
Item 64915 64916
Operation
Read the ENTIRE IMPORTANT SAFETY INFORMATION section at the beginning of this document
including all text under subheadings therein before set up or use of this product.
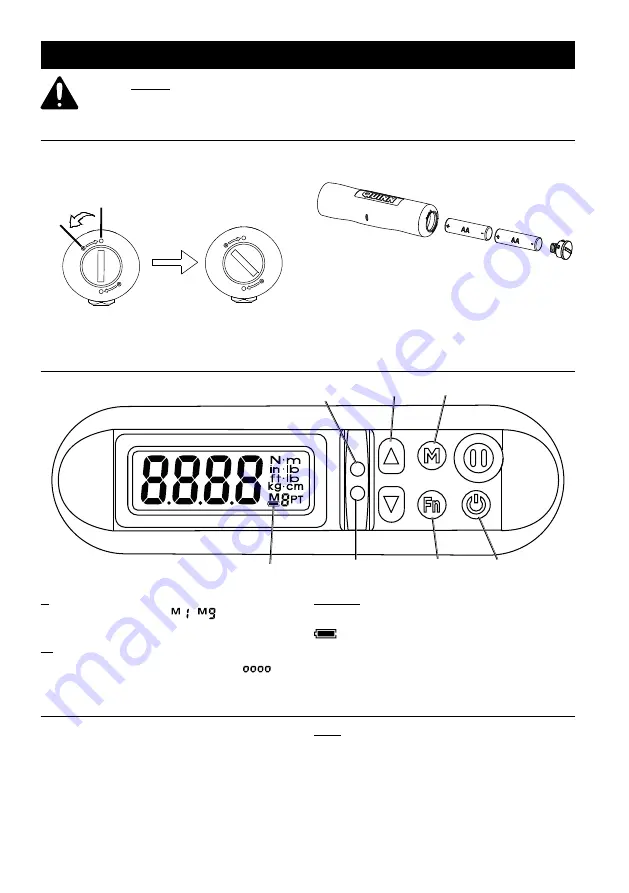
Battery Installation
1. Use a coin to twist the Battery Cap at the
base of the Wrench until the slot in the
Cap lines up with the empty circles
○ on
the housing and remove the Cap.
Figure A: Opening Battery Compartment
2. Insert two AA batteries with their
po ends first.
Figure B
3. Align the slot in the cap with the filled circles
○
on the housing and press it back in place.
Use a coin to twist it until the slot
lines up with the filled circles
●
.
Controls
Red Target
Reached LED
Green Near
Target LED
Battery Icon
Up/Down Memory
Function/
Unit
Power/
Clear
M
- Memory Button: Cycle through the
saved presets, indicated by
-
on
the lower right corner of the display.
Fn
- Function/Unit Button: Cycle through
measurement units for the selected preset:
N-m, in-lb, ft-lb, kg-cm, and angle (flashing
).
Up/Down
- Up/Down Buttons:
Adjust torque/angle target value.
- Battery Icon: This indicates that the battery
power is low. Replace the batteries before
further use to prevent inaccurate readings.
Turning on the Wrench
1. The Wrench automatically resets its angle
and torque range when it is turned on.
2. Leave the Wrench in its case, or laying
horizontally on a stable surface while turning on.
If the Wrench is moved or its anvil turned when
first turned on, readings may be inaccurate.
Note:
The Wrench will automatically turn off
after about 2 minutes of inactivity.


