background image

QUATRO


Air Technologies Inc. 

Fresh Air Purifiers

-----------------------------------------------------------------------------------------------

Engineers Of Clean Air


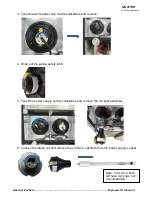
7.  Insert the new UV-C lightbulb [#E718] into the power supply socket; secure by hand 

tightening the clamp nut to create an interference fit.  


8.  Insert the UV light assembly into the mounting ring.  

Note: Make sure to observe alignment slots on the mounting ring, allowing for an easy fit.  


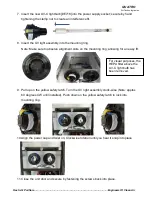
9.  Pull up on the yellow safety latch. Turn the UV light assembly clock-wise (Note: approx. 

60 degrees CW until installed). Push down on the yellow safety latch to lock into 

mounting ring.  


10. Align the power cap and twist on; Clockwise rotation until you hear it snap into place. 


11. Close the unit door and secure by fastening the screws back into place. 

For visual purposes, the 
HEPA filter above the 
UV-C light bulb has 
been removed. 

Содержание AF Series

Страница 1: ...ntenance Keep all fastening hardware tight to ensure that the unit is in good working condition Familiarise yourself with the way in which filters are removed installed and serviced All filters must b...

Страница 2: ...ited if airflow is obstructed c Insert male end of cord into the correct voltage circuit Control will emit 3 beeps and 4 LEDs will flash along with those beeps d Press Power button and adjust airflow...

Страница 3: ...ust be taken not to damage the exposed portions of the new HEPA filter DO NOT bend aluminium separators as this will obstruct airflow j RESET Service Filter s Light see section 8 6 8 3 Optional CHEMIC...

Страница 4: ...ptimum efficiency ensure all casters are tightly fastened The motor is equipped with electric motor grade double shielded ball bearings and a special lubricant assuring long life and quiet operation N...

Страница 5: ...Remote Control subD 9 pin connector can purchase an optional foot pedal switch part AA175 to turn unit on off remotely Also pins 1 and 2 can be wired to any dry contact switch for remote on off capabi...

Страница 6: ...not plugged into receptacle o Check breaker box o Replace fuse o Plug unit in Excessive noise o Blower wheel contacting cone o Fan isolators loose or off o Realign replace wheel o Replace isolator Ins...

Страница 7: ...on system complete with adjustable inlet grill and adjustable discharge grills installed If it is desired to operate as a negative pressure system the 6 AF1000 or the 10 AF2000 discharge collars will...

Страница 8: ...he cutting drilling process If you decide not to replace the HEPA filter you must place something on top of the filter to protect against the metal shavings dropping into the filter Step 2 Remove the...

Страница 9: ...he unit Step 7 Use the self tapping screws to fix the plate on to the top of the unit permanently For units built with serial numbers greater than 75288 the 3 black grills will be mounted on a separat...

Страница 10: ...re is a kill switch that serves this function as an extra safety precaution Note UV C light bulbs should be replaced annually Visible blue light is not an indication of UV C output UV C wavelength is...

Страница 11: ...r cap counter clockwise and remove 4 Slide out the yellow safety latch 5 Twist the power supply counter clockwise and remove the UV light assembly 6 Loosen the clamp nut and remove the old UV C lightb...

Страница 12: ...alignment slots on the mounting ring allowing for an easy fit 9 Pull up on the yellow safety latch Turn the UV light assembly clock wise Note approx 60 degrees CW until installed Push down on the yel...

Отзывы: