March 26, 2020
7039-804B
10
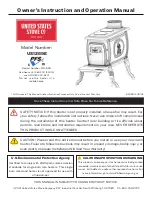
Figure 10.1
Burn Rate
Air Control
Automatic
Combustion
Control (ACC)
High
setting
Low
setting
HIGH
MED
LOW
HIGH
MED
LOW
Figure 10.2
Over rides timer & opens rear air to open locked
position
Open rear air medium air
flow
Engages timer push knob towards HI then back to any point within dotted line
Open rear air medium-low
air flow
Closes front and rear air
2. Second Stage
The next stage of burning, the secondary stage, is the
period when the wood gives off flammable gases which
burn above the fuel with bright flames. During this
stage of burning it is very important that the flames be
maintained and not allowed to go out. This will ensure
the cleanest possible fire. If the flames tend to go out,
it is set too low for your burning conditions. The air
control located at the upper right hand corner is used
to adjust for burn rates. This is called the Burn Rate Air
Control
(Figure 10.1)
.
3. Final Stage
The final stage of burning is the charcoal stage. This
occurs when the flammable gases have been mostly
burned and only charcoal remains. This is a naturally
clean portion of the burn. The coals burn with hot blue
flames.
It is very important to reload your appliance while
enough lively hot coals remain in order to provide the
amount of heat needed to dry and rekindle the next
load of wood. It is best to open the Burn Rate Air and
Start-Up Air Controls before reloading. This livens
up the coal bed and reduces excessive emissions
(opacity/smoke). Open door slowly so that ash or
smoke does not exit appliance through opening. You
should also break up any large chunks and distribute
the coals so that the new wood is laid on hot coals.
Air quality is important to all of us, and if we choose
to use wood to heat our homes we should do so
responsibly. To do this we need to learn to burn our
appliances in the cleanest way possible. Doing this
will allow us to continue using our wood appliances for
many years to come.
D. Air Controls
Users will need to find their preferred setting between
high and low based on desired heat output, installation
configuration, and fuel type.
1. Burn Rate Air Control
This air supply enters at the upper front of the firebox,
near the top of the glass door. This preheated air
supplies the necessary fresh oxygen to mix with the
unburned gases, helping to create second, third and
fourth combustions. This air is regulated by the Burn
Rate Air Control. When the control is moved all the way
up it is on the High setting and when moved all the way
down it is on the Low setting
(Figure 10.1)
.
2. Automatic Combustion Control System (ACC)
To engage the Automatic Combustion Control (ACC)
timer system push the lever towards the back of the
appliance to the “HI” position, then pull forwards
towards the front of the appliance until the knob stops.
The timer will slowly close in about 25 minutes. Use
this feature when reloading fuel or if you want more air
supplied to the fire
(Figure 10.2)
.