Quadra-Fire 3100 Series Скачать руководство пользователя страница 22

OPERATING INSTRUCTIONS (cont.)

BURNING GUIDELINES (cont.)

MEDIUM:  

After a wood load has been burning on high for at least 15 minutes (longer for very large pieces or wet

wood), close (pull out) the primary control (on the right side of the stove).  Leave the secondary control (under the
ashcatcher) open (pushed in).

LOW:  

After a wood load has been burning on high for at least 15 minutes (longer for very large pieces or wet wood),

close (pull out) the primary control.  Then close down the secondary control, gradually making sure to maintain flames in
the stove.  It is very important to maintain flames in your stove during the first few hours of a low burn, to avoid exces-
sive air pollution.

BUILDING A FIRE

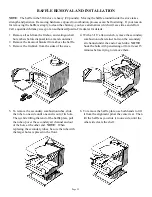
Before lighting your first fire in the stove, make certain that the baffle is correctly positioned.  It should be resting on the
rear baffle support so that the hole in the baffle lines up with the baffle locating pin (see page 25 for baffle installation
instructions).  Also refer to care and cleaning of plated surfaces section on page 23 before lighting your first fire.

There are many ways to build a fire.  The basic principle is to light easily-ignitable tinder or paper, which ignites the fast
burning kindling, which in turn ignites the slow-burning firewood.  Here is one method that works well:
1.

Place several wads of crushed paper on the firebox floor.

2.

Lay small dry sticks of kindling on top of the paper.

3.

Open primary and secondary controls fully.

4.

Make sure that no matches or other combustibles are in the immediate area of the stove.  Be sure the room is adequately
ventilated and the flue unobstructed.

5.

Light the paper in the stove.  NEVER light or rekindle stove with kerosene, gasoline, or charcoal lighter fluid; the
results can be fatal.

6.

Once the kindling is burning quickly, add several full-length logs 3” (76mm) or 4” (102mm) in diameter.  Be careful
not to smother the fire.  Stack the pieces of wood carefully:  near enough to keep each other hot, but far enough away
from each other to allow adequate air flow between them.

7.

When ready to reload the stove, add more logs.  Large logs burn slowly, holding a fire longer.  Small logs burn fast
and hot, giving quick heat.

8.

Adjust the primary and secondary air controls; the more you close down the controls, the lower and slower the fire
will burn.  The more open the controls, the more heat will be produced.

As long as there are hot coals, repeating steps 7 and 8 will maintain a continuous fire throughout the season.

NOTE: The special high temperature paint that your stove is finished with will cure as your stove heats.  You will notice
an odor and perhaps see some vapor rise from the stove surface; this is normal.  We recommend that you open a window
until the odor dissipates and paint is cured.
NOTE:  On a cold start-up, you may see a small amount of smoke coming from the underside of the stove until chimney
draft is established.  This is normal, and will stop when the loading door is closed.

WOOD SELECTION AND STORAGE

Dry and well-seasoned wood will not only minimize the chance of creosote formation, but will give you the most effi-
cient fire.  Even dry wood contains at least 15% moisture by weight, and should be burned hot enough to keep the chim-
ney hot for as long as it takes to dry the wood out - about one hour.  It is a waste of energy to burn unseasoned wood of
any kind.  Dead wood lying on the forest floor should be considered wet, and requires full seasoning time.  Standing dead
wood can be considered to be about two-thirds seasoned.  To tell if wood is dry enough to burn, check the ends of the
logs.  If there are cracks radiating in all directions from the center, it is dry.  If your wood sizzles in the fire, even though
the surface is dry, it may not be fully cured.  Splitting wood before it is stored reduces drying time.  Wood should be
stacked so that both ends of each piece are exposed to air, since more drying occurs through the cut ends than the sides.
This is true even with wood that has been split.  Store wood under cover, such as in a shed, or covered with a tarp, plastic,
tar paper, sheets of scrap plywood, etc., as uncovered wood can absorb water from rain or snow, delaying the seasoning
process.

Page 22

Содержание 3100 Series

Страница 1: ...unit to a chimney flue already serving another appliance 10 Comply with all minimum clearances to combustibles as shown in this manual for this appliance 11 Build fire on brick firebox floor Do not us...

Страница 2: ...h removal system installation 18 Ash removal system operating and cleaning 19 Operating instructions 20 Burning process 20 Primary and secondary air systems 20 Blower operating instructions 21 Operati...

Страница 3: ...3100 SAFETY LABEL found on back of stove Page 3 Manufactaured by Model Quadra Fire 3100 Serial No...

Страница 4: ...24 1 2 622mm 9 229mm 21 1 2 546mm 2 1 4 57mm 23 584mm DIMENSIONS Page 4 FIGURE 1b FIGURE 1a 20 1 2 521mm 9 229mm 24 1 2 622mm 2 1 4 57m m 23 584mm 26 3 8 670mm LEG MODEL PEDESTAL MODEL...

Страница 5: ...m 4 5 16 110m m 24 5 8 626m m 25 635m m 9 229m m 2 13 16 72m m 21 1 2 546m m STEP TOP LEG MODEL 13 11 16 348m m 4 5 16 110m m 26 5 8 676m m 23 7 8 606m m 2 13 16 72m m 24 5 8 626m m 20 1 2 521m m 21...

Страница 6: ...For installations with a preexisting class A chimney system a listed stainless steel chimney liner should be installed or the existing chimney examined by a chimney sweep for acceptable further use N...

Страница 7: ...all at least one smoke detector on each floor of your home to ensure your safety They should be located away from the heating appliance and close to the sleeping areas Follow the smoke detector manufa...

Страница 8: ...p of the stove after one hour of operation at each burn setting NOTE These are guidelines only and may vary somewhat for individual installations Your Quadra Fire stove was designed for and tested on...

Страница 9: ...the spaces where the chimney passes through floors and or ceiling Figure 5 The chimney must have a fire clay flue liner or equivalent with a minimum thickness of 5 8 16mm and must be installed with r...

Страница 10: ...hest point where it passes through the roof and at least 2 610mm higher than the highest part of the roof or structure that is within 10 3048mm of the chimney measured horizontally Figure 7 Remember t...

Страница 11: ...imbles must be strictly followed to assure the safety of the system Be sure to maintain the designated clearances to combustible materials A BRICK CHIMNEY THIMBLE ASSEMBLY Construction of the brick th...

Страница 12: ...mm long section of prefabricated listed solid pack chimney to use as a thimble Purchase a wall spacer trim collar and wall band that are manufactured to fit the chimney section you purchase Cut out a...

Страница 13: ...eyond the edge of the chimney flue lining Apply high temperature furnace cement to the end of the chimney section and install it over the connector through the wall band and through the wall spacer Ti...

Страница 14: ...ll an exterior chimney that runs up the outside of the residence Figure 13 This method of installation requires at a minimum a wall pass through device a wall support package insulated T section and r...

Страница 15: ...ved grounding device 6 Refer to clearance to combustibles section page 6 for listing to combustibles 7 Seal all wall floor inlets to prevent air or moisture penetration Check periodically to insure th...

Страница 16: ...w ash lip with two 20 mounting screws 2 Mount rear air intake cover plate with two mounting screws 3 Install each side cover with two 8 32 screws 4 Floor installation Cut a 3 76mm minimum hole in the...

Страница 17: ...tective pad or pallet 3 Bolt cover piece onto mounting brackets using outer two mounting holes 4 Slip washers onto bolts then bolt legs onto mounting brackets 5 Screw leg assembly onto adapter on bott...

Страница 18: ...ly stand stove up and place in desired location 8 Slip wooden decorative strips onto pedestal edges 9 Open door of stove and check to insure firebricks and kaowool blanket are in their proper location...

Страница 19: ...stem grate into the drawer below If there are large pieces in the ashes you can remove the grate before cleaning the ash into the drawer Be sure to replace the grate before operating the stove 3 Relea...

Страница 20: ...ained and not allowed to go out This will insure the cleanest possible fire If you are adjusting your stove for a low burn rate you should close down the air to the point where you can still maintain...

Страница 21: ...um of 15 minutes 2 Regulate burn rate heat output by using the secondary control center under ashcatcher The primary control on the right is mainly for initial start up reloading or high burns 3 Heat...

Страница 22: ...to allow adequate air flow between them 7 When ready to reload the stove add more logs Large logs burn slowly holding a fire longer Small logs burn fast and hot giving quick heat 8 Adjust the primary...

Страница 23: ...on removable film on inside of glass Overfiring voids warranty NOTE Replace with ceramic glass only CARE AND CLEANING OF PLATED SURFACES Clean 24 karat gold plated surfaces with vinegar or a glass cle...

Страница 24: ...rame pieces over the fiberglass tape on the edges of the glass Be sure glass is centered in the opening i e same space top and bottom left and right sides 6 Reinstall screws and glass tabs tight enoug...

Страница 25: ...ve the firebrick from the sides of the stove 4 With a 3 16 allen wrench remove the secondary combustion tube retainer bolts on the secondary air channel under the end of each tube NOTE Soak the bolts...

Страница 26: ...2 through 7 in reverse Be sure that the hole in the baffle is on its alignment pin on the rear shelf 7 Keep the baffle tilted as you lift it out the door BAFFLE REMOVAL AND INSTALLATION cont Page 26...

Страница 27: ...r this unit is adjusted at the factory and should not require further adjustment When the speed control is turned clockwise it will click on to high speed Turn the speed control clockwise to decrease...

Страница 28: ...S clips to the upper edge of the outer wall of the stove 3 Set top heat shield on stove and push down into S clips 4 Install chimney pipe through hole in top heat shield NOTE SEE PAGE 6 FOR REDUCED CL...

Страница 29: ...32 1911 Trim door 832 0031 Gold door 831 1670 Ash removal system SERVICE PARTS 832 0420 Kaowool blanket 832 3010 Firebox brick set clay 3100 Unibody 3100 ARS 832 0550 Individual brick clay 832 0360 Ba...

Страница 30: ...NOTES Page 30...

Страница 31: ...NOTES Page 31...

Страница 32: ...for any alteration to the unit which causes sooting that results in damage to the interior or exterior of the building in which this appliance is installed This warranty is void if the stove has been...

Отзывы: