
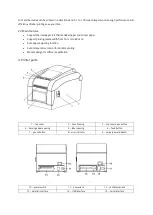
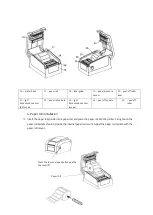
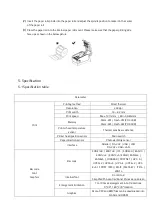


6.4 Media installation
To install the sticker paper and label
roll, please refer to chapter 4 “Paper roll installation”.
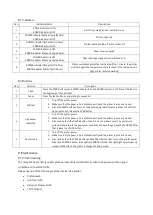
7. Power on utilities
There are five power-on utilities to set up and test printer hardware. These utilities are activated by pressing
FEED button and PAUSE button.
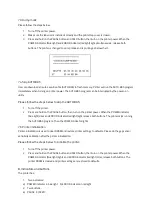
7.1 Self-test
To start the printer self-test, please follow the below steps:
1.
Turn off the printer power.
2.
Make sure that the paper roll is installed correctly and the printer top cover is closed.
3.
Press the FEED button and turn on the printer power simultaneously. When the self-test paper
comes out, release the FEED button.
7.2 Gap sensor calibration
Gap sensor sensitivity should be calibrated at the following conditions:
1.
A brand new printer.
2.
Label stock changed.
3.
Printer initialization.
This function is to reset the label gap sensor sensitivity when the printer is turned on. User needs to start the
calibration of the gap sensor sensitivity after loading a different type of label roll or when the printer has been
initialized.
Please follow the steps below to calibrate the gap sensor:
1.
Turn off the printer power.
2.
Make sure the label roll is installed correctly and the printer top cover is closed.
3.
Press and hold on the PAUSE button, then turn on the printer power. The printer will automatically
calibrate the gap sensor sensitivity and save the gap length into DRAM. Then release the PAUSE
button.