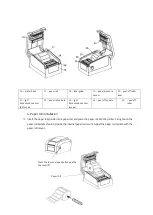
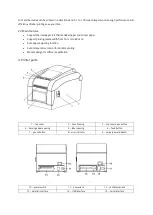
Qoltec 50242 Скачать руководство пользователя страница 5


16 

 printer head 

17 

 paper roll 

18 

 label guide 

19 

 paper presence 

sensor 

20 

 peel-off roller 

lever 

21 

 light 

transmission sensor 
light source 

22 

 paper roll spindle  23 

 light 

transmission sensor 
receiver 

24 

 peel-off spindle 

25


 peel off 

roller 

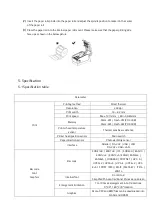
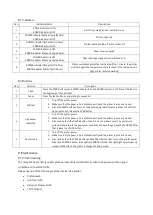
4. Paper roll installation 

1.


Insert the paper roll spindle into a paper roll, and place the paper roll into the printer. Fixing tab on the 
paper roll spindle should be inside the internal paper roll mount. Adjust the paper roll spindle with the 
paper roll mount. 


(1) Press the top cover open buton 

and the top cover lift 

Paper 

roll 


Press the top cover open button and the 
top cover lift. 

Содержание 50242

Страница 1: ...USER GUIDE THERMAL PRINTER MODEL 50242 www qoltec com...

Страница 2: ...ication 6 5 1 Specification table 6 6 Setting up the printer 7 6 1 Unpacking 7 6 2 Power cable connection 7 6 3 Data cable connection 7 6 4 Media installation 7 7 Power on utilities 8 7 1 Self test 8...

Страница 3: ...printer when it is out of order This may cause a fire or and electrocution Always hold the plug not the cord when connecting or disconnecting the plug Keep the desiccant out of children s reach Use o...

Страница 4: ...printing media width from 16 mm to 82 mm Auto paper adjusting function Auto temperature control for durable printing Module design for different application 3 Printer parts 1 top cover 2 base housing...

Страница 5: ...spindle 25 peel off roller 4 Paper roll installation 1 Insert the paper roll spindle into a paper roll and place the paper roll into the printer Fixing tab on the paper roll spindle should be inside...

Страница 6: ...P 330B Dram 4M Flash 4M XP 350B Printer head temperature sensor Thermal sensitive resistance Printer head position sensor Micro switch Paper direction sensor Photoelectricity sensor Interface Parallel...

Страница 7: ...ist If any parts are missing or damaged please contact the customer service of your reseller or distributor 6 2 Power cable connection 1 Make sure that printer power switch is in OFF position 2 The pr...

Страница 8: ...ED button 7 2 Gap sensor calibration Gap sensor sensitivity should be calibrated at the following conditions 1 A brand new printer 2 Label stock changed 3 Printer initialization This function is to re...

Страница 9: ...s and hold on the PAUSE button then turn on the printer power When the POWER indicator blue light dims and ERROR indicator red light light release both buttons The printer skips running the AUTO BAS p...

Страница 10: ...wer 2 Make sure that the paper roll is installed correctly and the printer top cover is closed 3 Press the FEED button and turn on the printer power simultaneously When the self test paper comes out r...

Страница 11: ...t with water dampened cloth Interior Use a vacuum cleaner or blower brush to remove the dust Note Always turn off the printer before cleaning the printer Do not touch printer head by hand Tweezers is...

Отзывы: