


2SHUDWLQJWKH
)ROGHU6WDSOHU
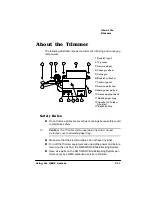
4064'2&%RRNOHWPDNLQJ6\VWHP8VHUV*XLGH
5
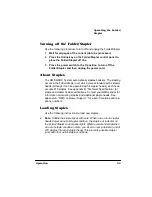
Remove any of the old staples remaining in the stapler head.
6
Insert a new unit of 210 staples.
»
Note:
Be careful that the unit of staples is placed in the stapler
head correctly so that the staple unit can be shifted up or down
without obstruction after the new staples are added.
35qdoc.eps
Содержание QDOC
Страница 1: ...k k 3 k bk p p...
Страница 9: ...QWURGXFWLRQ Q 7KLV KDSWHU Introduction on page 1 2 Standard Product Documentation on page 1 5...
Страница 21: ...ERXW WKH 406 8VLQJ WKH 4 2 6 VWHP 26 RQQHFWLRQ 2 RQH LOWHU QWHUIDFH 3DQHO RQQHFWRU RQQHFWRU REAR...
Страница 32: ......
Страница 46: ......
Страница 122: ......
Страница 129: ...7URXEOHVKRRWLQJ WKH ROGHU 6WDSOHU 7URXEOHVKRRWLQJ 1 Turn off the power to the Folder Stapler 2 Open the cover RYHU...
Страница 140: ......
Страница 141: ...2SWLRQV Q 7KLV KDSWHU Introduction on page 7 2 Stapler Head on page 7 2...
Страница 143: ...6WDSOHU HDG 2SWLRQV 3 Open the cover RYHU...
Страница 147: ...406 XVWRPHU 6XSSRUW Q 7KLV SSHQGL Sources of Support on page A 2 QMS World wide Offices on page A 5...
Страница 154: ......
Страница 171: ...406 4 2 RRNOHWPDNLQJ 6 VWHP 8VHU V XLGH QGH 8 Using the control panel Folder Stapler 2 7 Waste paper tray Emptying 3 13...
Страница 172: ......


