English
2
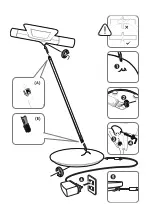
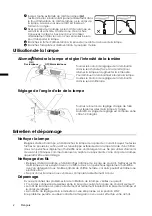
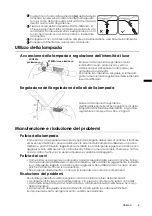
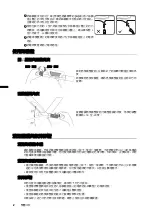
Insert the other end of the lamp pole (
(A)
, the end
without insulation tape) all the way into the lamp pole
installation hole on the lamp body. Make sure that
the pole is inserted at an angle.
Secure the lamp body on the lamp pole by tightening
the grub screw using the supplied hex L-key. Save the
hex L-key for future use in case you need to transport
the lamp.
Connect the power plug to the power socket on the
base of the lamp.
Plug the power adapter into a wall power outlet.
Using the Lamp
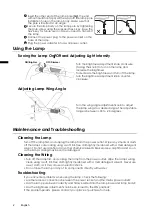
Turning the Lamp On
/
Off and Adjusting Light Intensity
Adjusting Lamp Wing Angle
Maintenance and Troubleshooting
Cleaning the Lamp
Turn off the lamp first, and unplug the lamp from the power outlet. Wipe any smears or dusts
off the lamp's outer casing using a soft, lint-free cloth lightly moistened with a mild detergent
solvent. Do not use alcohol or any other chemical solvents like kerosene, naphtha and so on,
as the lamp's casing may become damaged.
Cleaning the Wiring
• Turn off the lamp first, and unplug the lamp from the power outlet. Wipe the lamp's wiring
clean using a soft, lint-free cloth lightly moistened with a mild detergent solvent. Never use
a wet cloth, as it may cause an electric shock.
• Do not rinse the lamp or any of its components directly with water.
Troubleshooting
If you encounter problems when using the lamp, check the following:
• Are there loose connections between the power socket and the mains power outlet?
• Has the lamp pole been correctly and firmly inserted into the lamp base and lamp body?
• Has the brightness adjustment knob been turned to the ON position?
If the problem persists, please contact your place of purchase for help.
3
4
5
6
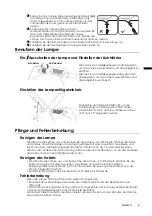
Turn the brightness adjustment knob clockwise
(facing the knob) to turn on the lamp and
increase the brightness.
To decrease the brightness and turn off the lamp,
turn the brightness adjustment knob counter-
clockwise.
Turn the wing angle adjustment knob to adjust
the lamp wings to a desired angle. The adjustable
range is b30 to -20 degrees.
ON/Brighter
OFF/Dimmer
Содержание BD10 D
Страница 1: ...English Deutsch Fran ais Italiano Seagull Light LED Table Lamp BD10 _D User Guide...
Страница 2: ......
Страница 15: ...1 LED LED WA 24E 12FU 100 240V AC 50 60 Hz B 1 L 1 1 1 1 1 1 1 2...
Страница 16: ...2 2 A L L 3 4 5 6 30 20...
Страница 17: ...3 www QisDesign com BD10 _D DC 12V 2A 14W 0 C 40 C x x 575 x 230 x 630mm 30 575 x 230 x 480mm 20...
Страница 18: ...1 LED LED WA 24E 12FU 100 240V AC 50 60 Hz B 1 L 1 1 1 1 1 1 1 2...
Страница 19: ...2 A L L 3 4 5 6 30 20...
Страница 20: ...3 www QisDesign com BD10 _D DC 12V 2A 14W 0 C 40 C x x 575 x 230 x 630mm 30 575 x 230 x 480mm 20...
Страница 21: ...1 LED WA 24E 12FU 100 240V AC 50 60 Hz B x 1 L x 1 x 1 x 1 x 1 x 1 x 1 1 2...
Страница 22: ...2 A L L 3 4 5 6 30 20...
Страница 23: ...3 www QisDesign com BD10 _D DC 12V 2A 14W 0 C 40 C x x 575 x 230 x 630mm 30 575 x 230 x 480mm 20...
Страница 24: ...Memo P N 4J 16K01 001...

