78
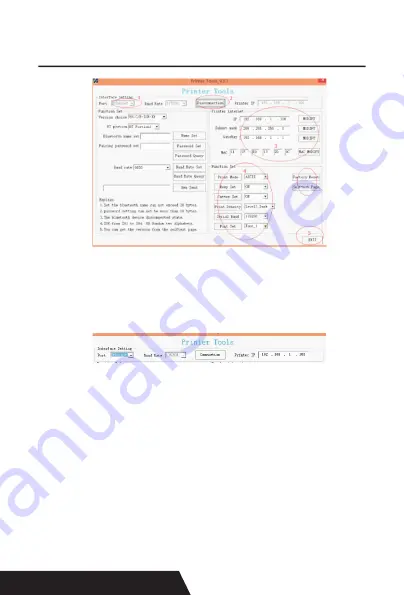
Paso 1: Seleccione el puerto “Ethernet” y obtenga la IP de la
impresora desde la página de autocomprobación.
(la dirección IP predeterminada es 192.168.1.100)
Paso 2: Haga clic en “Conexión”, si tiene éxito, se mostrará
“Desconexión”.
Paso 3: Se puede modificar el parámetro relevante de impre
-
soras (IP, máscara de subred, puerta de enlace, MAC), des
-
pués de todo el ajuste hecho, apague y reinicie la impresora.
Paso 4: Acerca del “conjunto de funciones” de la impreso
-
ra, puede configurar el modo de impresión (chino / ASCII), el
conjunto de pitidos (activar / desactivar), el conjunto de corte
Содержание DAYIN80
Страница 16: ...16 2 Select Add Port we can see below image 3 Click Next and enter into the printer IP address...
Страница 17: ...17 4 Next and choose Generic Network Card then click Next 5 Then you can check the image as below...
Страница 18: ...18 6 Click Finished and we can check the added ports as below image...
Страница 20: ...20 5 2 3 Serial Port Connecting If your desired port is Serial 1 Following Printer Properties Ports as below...
Страница 22: ...22 3 Back to General and try Print Test Page...
Страница 24: ...24 4 if you can see screen as below then the device is sear ching the bluetooth printer please wait...
Страница 40: ...40 4 Select the way of communication of printers Bluetooth or WIFI...
Страница 42: ...42 7 If above steps are successful then you can print text to have a test...
Страница 47: ...47...
Страница 51: ...51...
Страница 69: ...69 3 Regrese a General y haga clic en Imprimir p gina de prueba...
Страница 88: ...88 4 Seleccione la forma de comunicaci n Bluetooth o WIFI...
Страница 90: ...90 7 Si los pasos anteriores son exitosos puede imprimir tex to para realizar una prueba...
Страница 96: ......


