background image

QSTC201/211 IP-CAMERA USER MANUAL 


32 


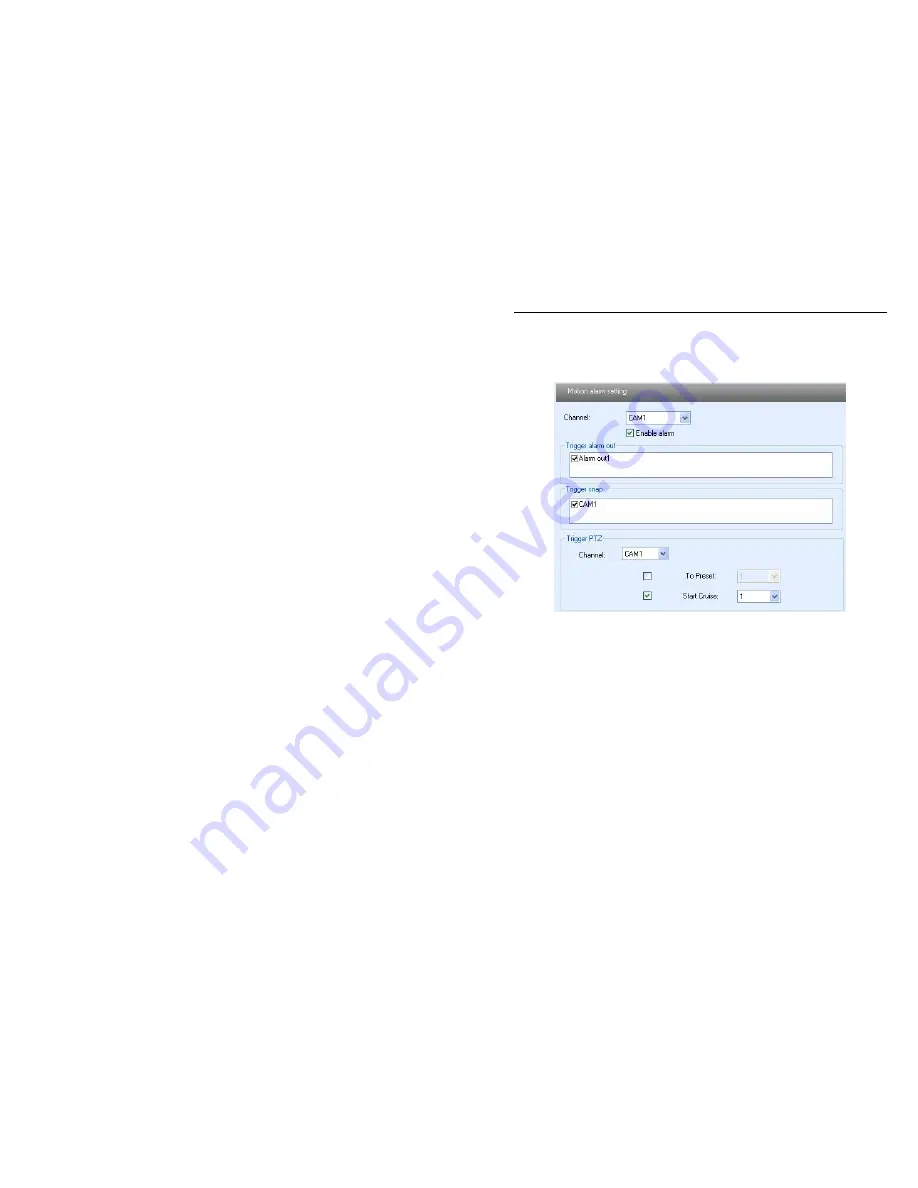
will be triggered when there was an alarm. 

5.  Select  the  matched channel  in  “Trigger  PTZ”  text  box,  select  “To  preset” or 
“Start cruise”, when motion detection triggers alarm, the PTZ install stand of the 
device will move to corresponding preset point or cruise line.


6. Press the "Save" button to save the settings. 


Fig 5-8 alarm configuration—motion alarm interface 

5.4.3 

Motion Schedule 

Enter into “Alarm configuration"-- "Motion schedule", refer to Figure 5-19: 

Weekly schedule 

User can set the record time from Monday to Sunday for recording everyday in 
one week. 
1. Select the channel which needs to be setup on the "Channel” pull down list. 

Note: The length bar is for each day of the week divided into the 24 hours 
of  a  day.  You  can  use  the  mouse  to  click  on  the  pane  to  set  the  record 
hours. Green means area is selected. Blank means area is not selected. 

2."Add": add the schedule record for a holiday   
3."Delete": delete holiday schedule 

Day schedule 

User can set recording time for specific time of a special day, such as a holiday. 
1. Select a special date at the "Date" pull down list, press "Add" button to add 
that date to the list box on the right side, and move the scroll bar to set the record 
schedule for that day. 
2.  Select a  date  in  the  list  box  on  the  right side,  press  "Delete"  to  remove  the 
schedule for that day. 

Содержание QSTC211

Страница 1: ...QSTC201 211 IP Camera User s Manual Q see Products 8015E Crystal Dr Anaheim CA 92807 Website http www q see com Phone 877 998 3440 x 538 Rev082009...

Страница 2: ...al and keep it handy for later use This manual provides product instructions but we do not warranty the contents We reserve the right to amend typographical errors and the product may change due to so...

Страница 3: ...N 18 3 2 WAN 20 4 Remote Preview 22 4 1 The remote viewing interface is shown below 22 4 2 Configuration Video Stream Enable Audio 23 4 3 Using 2 Way Audio 25 5 Remote Live Surveillance 26 5 1 Main Me...

Страница 4: ...2 5 7 Notification configuration 44 5 8 Advanced configuration 45 5 8 1 Upgrade 45 5 8 2 Security configuration 45 5 8 3 Default configuration 46 5 8 4 Reboot device 46 6 Video Search 47 7 Mobile Surv...

Страница 5: ...software CMS allows you to view and control multiple devices via internet or LAN and establishes a sound surveillance system with unified management and remote operation for all the devices in one net...

Страница 6: ...sing the product 4 CD CD ROM with software and manual 5 Alarm box Connect to alarm 6 Cable 1 Connect device to the alarm box Cable 2 Connect the IP CAMERA to the Internet 7 Audio line Connect to MIC H...

Страница 7: ...of of of of IP IP IP IP CAM CAM CAM CAMERA ERA ERA ERA Item Name Description 1 AUDIO IN OUT Connect to MIC Headphones 2 ALARM IN OUT Connect to external alarm box 3 RESET Restore default settings 4 L...

Страница 8: ...of IP IP IP IP CAM CAM CAM CAMERA ERA ERA ERA 2 Installation 2 1 Attach IP CAMERA to Ethernet network The connection of the digital video server is show below Video input devices audio input devices a...

Страница 9: ...nstallation 2 2 Step 2 Transfer line 2 connects to MIC and Headphones Step 3 Internet line connects to Internet broadband modem or router Step 4 Connect power cable to a power outlet 2 2 IP CAM hardwa...

Страница 10: ...the IP CAMERA starts to work user can see a circle of lights around the LENS of IP CAMERA which allow the user to view images clearly in the dark After the power is on the IP CAMERA starts to work 2 3...

Страница 11: ...Vista DirectX 10 c Computer hardware requirements Please make sure the system is running well and the computer is compatible Recommended PC Specifications 4 channels Item Specification CPU Intel Penti...

Страница 12: ...me live view with CIF resolution 352x240 the max connection number is 16 on one computer If user wants to have real time live view with D1 resolution 704x480 the max connection number is 4 on one comp...

Страница 13: ...is C Program Files user can click Browse button to change it After selecting the destination click Next to enter the next step shown as Fig 2 6 Figure2 6 selects a folder to install in 4 Click Next to...

Страница 14: ...e Control Center icon on the desktop 7 Double click CMS icon to start the software the default user name is system and password is 123456 user can change it as shown in the corresponding chapter for d...

Страница 15: ...ew interface 8 Add device User can add video monitor device or sub region under the heading of add region Step 1 Enter into the System Configuration menu click Device Manager input the region name in...

Страница 16: ...n the right refer to Fig 2 12 Fig 2 12 Device search Note CMS and IP Tool can t run at the same time or the device information won t search and display Step 4 In the Channel Group dialog box select a...

Страница 17: ...7 Step 2 Clicking Device Manager enters into Device manager click icon add group name Refer to Fig 2 13 Fig 2 13 Add group Step 3 Select the channel in the Device list edit box click icon and add the...

Страница 18: ...are using IE browser above 6 0 versions as an example for operation using CMS please refer to CMS user s manual 3 1 LAN Step 1 Manually setup the IP address of the PC the network segment should be as...

Страница 19: ...Q4 of Chapter 9 Step 3 After downloading the Active X control the login dialog box will pop up as shown in figure 3 2 Fig 3 2 Login dialog box Step 4 Input user name and password in the login dialog b...

Страница 20: ...rk configuration Basic configuration setup the port numbers refer to Fig 3 4 Fig 3 4 Port setup Step 2 Enter into System Configuration Network configuration IP configuration change IP address refer to...

Страница 21: ...rt forwarding Step4 If the router is using a dynamic IP address and you want to use a dynamic domain name so you do not need to be concerned with the IP address constantly changing on you please apply...

Страница 22: ...enable two way talk Zoom in and out Return to normal view System Setup Search for video files Note Before doing audio talk users should make sure microphone and earphone connected with IP CAMERA and P...

Страница 23: ...l but it needs higher network bandwidth to run effectively Second stream has low frame rate max 3fps for every channel it requires lower network bandwidth Therefore users can select the stream accordi...

Страница 24: ...take multiple pictures select frames such as 3 tick off Title and Time capture title and time will display simultaneously Refer to Fig 4 4 Fig 4 4 Multiple snap 3 Click Browse to set location to save...

Страница 25: ...QSTC201 211 IP CAMERA USER MANUAL 25 4 3 Using 2 Way Audio Here are instructions on how to use the 2 way communication feature on the camera...

Страница 26: ...can also check the relative information of the server Setting steps 1 Click the Server configuration icon the System configuration interface will appear in the operation area 2 Click the Server basic...

Страница 27: ...1 Enter into system configuration Date Time refer to Figure 5 2 2 Choose the right Time Zone according to user s location 3 Select Modify Time user can setup time by select the Synchronize with NTP S...

Страница 28: ...details pictures can be stored on the SD card Fig 5 3 system configuration SD card interface 5 3 Channel configuration Channel Configuration includes four submenus basic configuration image configura...

Страница 29: ...guration Image configuration refer to Figure 5 5 2 Select the channel to be setup using the Channel Number list box 3 Press Load Default button to reset the default value of brightness contrast hue sa...

Страница 30: ...y pull down list 7 Press the Save button to save the settings Note this user manual is taking the single channel device as an example so user can choose one channel at the Channel pull down list only...

Страница 31: ...tivity scroll bar to setup the motion detection sensitivity 4 Select the Add option press the Ctrl button and move mouse to select the motion detection area select the Erase option move the mouse to c...

Страница 32: ...everyday in one week 1 Select the channel which needs to be setup on the Channel pull down list Note The length bar is for each day of the week divided into the 24 hours of a day You can use the mouse...

Страница 33: ...the Enable alarm check box all functions under this interface will be activated 4 Select the Alarm output in the trigger alarm out text box it will trigger alarm if the device connected to alarm is tr...

Страница 34: ...use to click on the pane to set the record hours Green means area is selected Blank means area is not selected 2 Add add the schedule record for a holiday 3 Delete delete holiday schedule Day schedule...

Страница 35: ...configuration Other alarm refer to Figure 5 12 2 Alarm type default is video loss 3 Select the channel which needs to be setup on the Channel Number pull down list 4 Select Alarm out in the Trigger al...

Страница 36: ...Meaning Alarm out The alarm equipment which is connected to the device Alarm holding time After triggered the holding time of the alarm output Name The name number of the alarm 5 5 Network configurat...

Страница 37: ...dialog box will pop up as shown in picture below press Next to continue After finishing the installation of configured components the UPnP icons will display Users can double click certain icons and...

Страница 38: ...IP address to device automatically 4 PPPOE users manually input the user name and password for the network connection that they get from their internet service provider 5 Select the Enable notifying...

Страница 39: ...PPoE PPPoE PPPoE User name User name for broad band connection Password Password for broad band connection Change IP address through IP TOOL Click the device then double click or click Net set button...

Страница 40: ...mask gateway IP and DNS service select use the following IP address user should manually input the IP address subnet mask gateway IP and DNS service Fig 5 17 network configuration wireless configurat...

Страница 41: ...tting UP DDNS Take myq see com as example NOTE Before you setup MYQ SEE DDNS make sure you are able to remotely view your DVR using your regular IP address 1 From a Computer that is on same network as...

Страница 42: ...xtbox only letters Note normal user and advanced user can preview live picture and playback files there is no difference between normal and advanced user on this system administrator not only can prev...

Страница 43: ...Figure 5 21 Fig 5 21 Modify user dialog box 3 Input original password of this user in the change password text box 4 Input new password in the New password and Confirmation text box 5 Input computer s...

Страница 44: ...et 5 7 Notification configuration Enter into notification mail configuration refer to Figure 5 22 1 From Email sender s e mail address 2 User name and password sender s user name and password 3 Server...

Страница 45: ...isconnect from PC or close the IP CAM during upgrade Fig 5 23 advanced configuration upgrade interface 5 8 2 Security configuration Enter into advanced configuration security configuration refer to Fi...

Страница 46: ...on default configuration refer to Figure 5 25 Fig 5 25 advanced configuration default configuration interface Click Load default button to restore all system settings to original value except for IP a...

Страница 47: ...ure 6 1 1 Select date in the calendar check motion detection and or sensor click search button the snapped pictures that triggered the alarm will display in the list box 2 Double click a file name in...

Страница 48: ...ported Windows Mobile 5 0 for Pocket PC Phone Edition supported Windows Mobile 5 0 for Pocket PC supported Windows Mobile 6 Standard not supported Windows Mobile 6 Professional supported Windows Mobil...

Страница 49: ...ones with Windows Mobile Pro Please use cell phones or PDAs with WinCE versions supported by this unit First activate the network access on the mobile phone and then run Internet Explorer STEP 1 Input...

Страница 50: ...Input the server s address ID and password respectively in the columns of Server User and Password Then click Go to login to the DVR It will show the picture if accessed successfully STEP 6 Camera 1...

Страница 51: ...rsion supported by this unit STEP 1 First enable the network access on mobile phone and then run Web browser STEP 2 Input the DVR server s IP address in a new built bookmark Click this bookmark to con...

Страница 52: ...QSTC201 211 IP CAMERA USER MANUAL 52 STEP 5 A Scam shortcut icon appears on the system menu after finished STEP 6 Run Scam program STEP 7 Click Options Settings to enter login interface...

Страница 53: ...AL 53 STEP 8 Input the server s address ID and password respectively Then click OK to login to the DVR STEP 9 It will show the camera after accessing successfully Note User name and password here are...

Страница 54: ...e software only supports iPhone os2 2 and above if phone firmware is lower than this version please upgrade it Below is the operation method for accessing from iPhones Step1 Enter into App Store funct...

Страница 55: ...01 211 IP CAMERA USER MANUAL 55 Step 3 Click SuperCam to enter into introduce interface and click FREE it will change into INSTALL Step 4 Enter into iTunes Store password click OK the below interface...

Страница 56: ...t have a Store account you will need to create one Step 5 Download the program and install it After installing the SuperCam icon will display Click this icon the program interface will appear Step 6 C...

Страница 57: ...QSTC201 211 IP CAMERA USER MANUAL 57 Step 7 Click Live View the default Cam1 picture will be displayed Click to capture picture Click to enter PTZ mode...

Страница 58: ...m interface to view the captured picture Click or to switch to next or previous picture Click to delete the current picture Method two Download SuperCam from iTunes and synchronize it to iPhone Step 1...

Страница 59: ...211 IP CAMERA USER MANUAL 59 the data cable When prompt message appears click Continue refer to below interface Input user s ID and password Step 2 Click iTunes Store on the left column search for Su...

Страница 60: ...rched SuperCam refer to below picture Step 4 Click GET APP an input box will pop up Enter user s ID and password then press Get It will download applicaton to the computer Step 5 Click your iphone dev...

Страница 61: ...ly in the lower right corner and wait for installation to finish Step 6 After installation finishes return to main interface of iPhone where the camera icon will be displayed Step 7 Click camera icon...

Страница 62: ...provider or being used by another device try using a different port number D If the above do not help try restoring default settings by pressing RESET button for 3 5 seconds Note default IP 192 168 11...

Страница 63: ...veX Please turn off anti virus programs and disable other plug ins using the Tools Manage add ons option After you install the ActiveX control you can turn the other plug ins back on until you find th...

Страница 64: ...ight click on it and choose Network setup and change the IP address and change the gateway to 192 168 1 1 7 Open Internet Explorer enter the camera IP which is 192 168 1 201 on the address bar 8 You w...

Страница 65: ...address of the camera in the Router There are complete instructions on how to do this in the manual 7 Q I can not connect to a wireless router what can I try A Check the status of the wireless router...

Страница 66: ...QSTC201 211 IP CAMERA USER MANUAL 66 9 Specifications...

Страница 67: ...QSTC201 211 IP CAMERA USER MANUAL 67...

Страница 68: ...r environment temperature humidity and lightening strike etc that cause equipment damage 3 Damage caused by acts of nature earthquake and fire etc 4 Equipment damage caused by the maintenance of perso...

Страница 69: ...211 IP CAMERA USER MANUAL 69 Customer Information Card User s Name Mr Mrs Company Name Postal Address Postal code Phone Number E mail Model Number of Product Serial Number of Product Purchase Date Dis...

Страница 70: ...e under continual improvement and we reserve the right to make changes without notice But no guarantee is given as to the correctness of its contents 2 We do not accept any responsibility for any harm...

Отзывы: