background image

30

31

CHAPTER 4  BASIC OPERA

TION

You cannot use Copy/Paste in 

Motion Detection

 because each channel will have a different 

display. Right-clicking will exit the screen and your settings will be saved. 

Sensitivity

 – The system supports six levels of sensitivity with Level 6 being the most 

sensitive.

VIDEO LOSS 

By default, this is enabled. In the event that the DVR detects a loss of signal from a camera, 
it will send out a notification or activate other functions based on your settings in the lower 
portion of the 

Detect

 window.

CAMERA MASKING

This is also enabled by default. If the system detects that something has covered a camera, it 
will respond based on your settings in the lower portion of the window.

EVENT RESPONSE

The lower portion of the 

Detect

 window determines what actions the DVR will initiate upon 

detection of one of the three event types. Responses to a specific type of event can be 
individually tailored to each camera, but the response to different types of events must be set 
independently of each other. (ie: The response settings for a motion detection event do not 
change the settings for a video loss event – even if you’ve set identical responses.)  

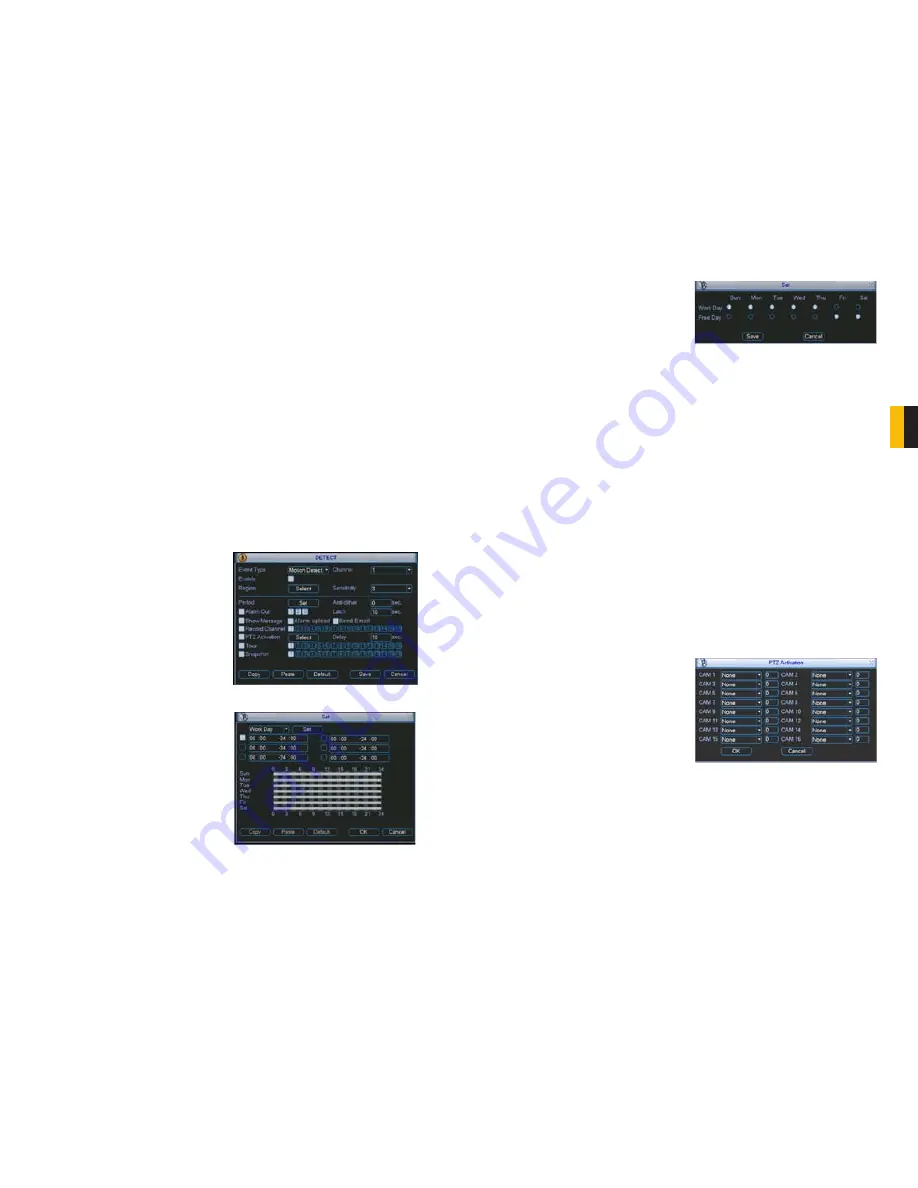
The 

Set

 button will appear when either 

Work Day

 or 

Free Day 

is selected in the 

drop-down. This allows you to arrange the 
schedule to reflect your business’ weekly 
schedule.

PICTURE 4-20

PICTURE 4-21

PICTURE 4-22

PICTURE 4-23

Period

 - This is where you set the schedule 

of when you want the DVR to record 
motion events. It operates in the 
same manner as the Schedule menu 
as described in 

Section 4.6 

with 

six blocks of time that can be laid out 
for recording to occur during a day. 
Not all blocks have to be configured 
or enabled. You can configure each 
day individually, or you can make 
separate schedules for week days 
and weekends. 

The 

Copy

 and 

Paste

 buttons allow you to duplicate a day’s settings on another day while the 

Default

 button returns the DVR to recording Motion Detection events 24/7. 

Once you have made your settings, select 

OK

 to save them and you will be returned to the 

Detect

 menu. Hitting 

Cancel

 or right-clicking to exit the menu will not save your changes.

Anti-Dither

 – This is the length of time that the DVR will delay before recording a motion 

event. The delay can be from 0 to 600 seconds.

Latch

 – This is the “hold time” that the system waits after a motion detection event ends 

before resuming motion detection searches. The delay can be set from 10 to 300 
seconds (5 minutes).

Alarm Out

 – To utilize this feature you must connect have at least one external alarm attached 

to the DVR. You may have up to three separate alarms.

Show Message

 – When this is enabled, the system will bring up the 

Alarm Status

 window 

whenever an event is detected. You can configure this to display when motion, video 
loss or masking is detected. 

Alarm Upload

 – The system can upload the alarm to the network including to an alarm 

monitoring service.

Send E-mail 

– E-mail notifications can be sent a single e-mail address. Please see 

Network


in 

Section 5.3 Setting Menu

 for instructions on how to set up the e-mail alerts 

including recipient address.

Record Channel

 – When one camera detects an event, you can set the DVR to activate 

recording on other cameras.

PTZ Activation

 – If you have Pan-Tilt-Zoom 

cameras connected to the DVR, you 
can cause them to be activated when 
the system detects an event. You can 
further instruct it to perform one of 
255 pre-set activities. You can also 
allow a delay of 0 to 300 seconds 
before the PTZ camera(s) activates. 
See 

Section 6.2

 for full instructions 

on programming these functions. 

Tour

 – This will cause the DVR to cycle 

through selected channels on the 
display in live view. It will not affect 
what is recorded.

Snapshot

 – The DVR is capable of taking still 

images which can be sent via e-mail 
or FTP (See 

Network

 in 

Section 

5.3

 Setting Menu for full instructions.)

Содержание QC40108

Страница 1: ...1 H 264 NETWORK DVR Variable CIF and D1 Recording Options User Manual MODEL QC40108...

Страница 2: ...registration form online In addition to warranty and technical support benefits you ll receive notifications of product updates along with free downloadable firmware updates for your DVR Register toda...

Страница 3: ...asking Detection 29 Motion Detection 29 Video Loss 30 Camera Masking 30 Event Response 30 4 8 Backup 32 5 MENUS 34 5 1 Main Menu 35 5 2 Info Menu 35 HDD Information 35 BPS 36 Log 36 Version 37 Online...

Страница 4: ...outside case of the DVR gently wipe using a lightly dampened cloth only use water do not use solvents n Do not operate this DVR without the cover securely in place Do not attempt to do any repairs to...

Страница 5: ...s system comes uses an BNC video out port to allow you to connect to a TV or computer monitor for viewing purposes User Friendly LCD Control Functions Side panel button control allows instant booting...

Страница 6: ...e of the DVR When the DVR is off pushing on the button will cause the DVR to initialize and power up When the DVR is operating briefly pressing the Power button will cause the screen to go to sleep un...

Страница 7: ...quality shielded RG59 cable RG6 cable should be used for runs exceeding 800 feet and fiber optic cable should be used when distances exceed 1 800 feet In circumstances requiring cameras to be position...

Страница 8: ...sed on the context of where they are used Some examples are LEFT CLICK Selecting an item Opening a menu Checking a box or motion detection status Selecting letters numbers or symbols on the virtual ke...

Страница 9: ...sumes normal playback Zoom out when in PTZ mode 6 Play Pause Will open Playback Search mode Begins playback of selected video or pauses current video Adjust Iris light level in PTZ mode 7 Previous Rec...

Страница 10: ...se functions in the same manner as one would use a mouse attached to a computer point click right click and etcetera In fields where data needs to be entered clicking on the field will bring up a virt...

Страница 11: ...iod of inactivity configurable in the General Setting submenu described in Section 5 3 the DVR will log users out This will require the current user to re enter their password MAIN MENU After logging...

Страница 12: ...each channel is shown by the filled circle under its number Each camera can only have one status at a time Changes take effect once the OK button is selected Manual The selected cameras will begin re...

Страница 13: ...0 A 12 10 00 M 13 00 00 R 14 00 00 R 15 00 00 R 16 00 00 R 17 00 00 R StartTime Type 1p 2p 3p 4p Files will be listed by their start time In addition when the DVR records a file it also indicates the...

Страница 14: ...ayback bar to the end of the section and press the Clip button again STEP 4 Press the Backup button to save the file to a USB drive connected to the USB back up port on the side of the DVR Back up Ind...

Страница 15: ...when triggered by an external device connected to one of the Alarm In ports see Chapter 7 for Alarm Setup and Alarm Activation A white filled box underneath a Record type indicates that it has been se...

Страница 16: ...allow you to duplicate a day s settings on another day while the Default button returns the DVR to recording Motion Detection events 24 7 Once you have made your settings select OK to save them and y...

Страница 17: ...top You can stop the process at any time by pressing the button again You can also right click out of the menu once the file transfer has begun to go on to other activities without cancelling the down...

Страница 18: ...are six submenus available Search Info Setting Advanced Backup and Shutdown Clicking on an icon will take you to that function or the submenu it represents The Search menu is covered in Section 4 5 Se...

Страница 19: ...u can search for activity in a similar manner to the file search This information can be backed up to an external USB drive and it will be saved as a text document VERSION This display shows system ha...

Страница 20: ...e DVR with a single remote this allows you to give each DVR a separate numerical ID Video Standard This DVR operates using the NTSC standard common to North America Auto Logout This sets the duration...

Страница 21: ...ty Only enabled when VBR is selected this can be set from 1 to 6 with 6 having the highest image quality Bit Rate KB S Configurable from 192 to 1024 kilobytes per second this is the maximum bit rate t...

Страница 22: ...on using the features in this window PAN TILT ZOOM Connecting and operating PTZ cameras with this DVR is covered in Chapter 6 Pan Tilt Zoom Snapshot In addition to taking video of an event the DVR can...

Страница 23: ...f groups available in each tour Deselecting a number means that this group of channels will be skipped during the tour Motion Tour Type If a motion detection event occurs and the Tour button is select...

Страница 24: ...start once you press OK to exit You cannot right click out of the menu ABNORMALITY This window allows you to set up alarms for disk and system disconnection errors as well as how these alarms are hand...

Страница 25: ...is only visible in this window Toggling the Reusable box allows more than one user to log in using this account Creating a group gives you the ability to set the access privileges for as many users a...

Страница 26: ...the PTZ camera must be connected to the ports highlighted in Picture 6 1 Multiple PTZ cameras can be connected to this port but you may require an expander port to do so STEP 2 Connect the other end o...

Страница 27: ...r the number you want to assign to this preset This preset can now be added to a tour Patrol STEP 1 Click the Patrol button in the Function list and enter the number of the preset you wish to add to i...

Страница 28: ...ically Page Switch returns you to the PTZ Control Panel Picture 6 5 Reset This ends the currently running function 1 2 3 4 NO C A B Rx Tx ALARM IN This DVR features connections for external alarms bot...

Страница 29: ...y parameters sheet carefully RS485 A B cable is for the A B cable of the PTZ camera 7 3 ALARM SETUP AND ACTIVATION Once external alarms are properly connected you can configure the DVR to activate the...

Страница 30: ...Tour When enabled this causes the DVR s display to cycle through selected Live View channels while maintaining the selected recording functions Instructions for configuring this feature are found in...

Страница 31: ...ore rapidly To determine the optimal capacity for your purposes the chart below to estimate the size of hard drive that you ll need VIDEO FORMAT RESOLUTION FRAME RATE FPS VIDEO QUALITY BIT RATE kbps S...

Страница 32: ...n c Upgraded program is not compatible d The recorded file has been overwritten e Record function has been disabled APPENDIX 8 Video is distorted when searching local records Possible Causes a Video q...

Страница 33: ...too long 19 Alarm signal cannot be disarmed Possible Causes a Alarm setup is not correct b Alarm output has been opened manually c Input device error or connection is not correct 20 Alarm function is...

Страница 34: ...xtreme environmental temperatures humidity lightning and sudden surges of electricity 3 Damage caused by acts of nature e g earthquake fire etc 4 Equipment damage caused by the maintenance of personne...

Страница 35: ...68 Digital Peripheral Solutions Inc 8015 E Crystal Drive Anaheim CA 92807...

Отзывы: