background image

7

Calibration

7.1

Fluorescent Polymer Calibration (Two-Point with Zero)

1. Rinse the main module sample cell three times with DI water. Fill the sample cell with DI water.

*

NOTE

*

In emergency, “non-Fluorescent Polymer” water, such as city water, may be

used, but re-calibrate using DI water for the zero step as soon as it is available.

2. Power on the SP-380P by pressing

. Allow 5–10 seconds for the SP-380P to stabilize.

3. The unit is actively reading and displaying both Fluorescent Polymer and PTSA. The values will be very

low if DI water is used; Fluorescent Polymer value should be near zero. A low non-zero value (e.g.
0.1 or 0.2, etc.) is not problematic.

4. Press

F-Cal

(

) to launch the

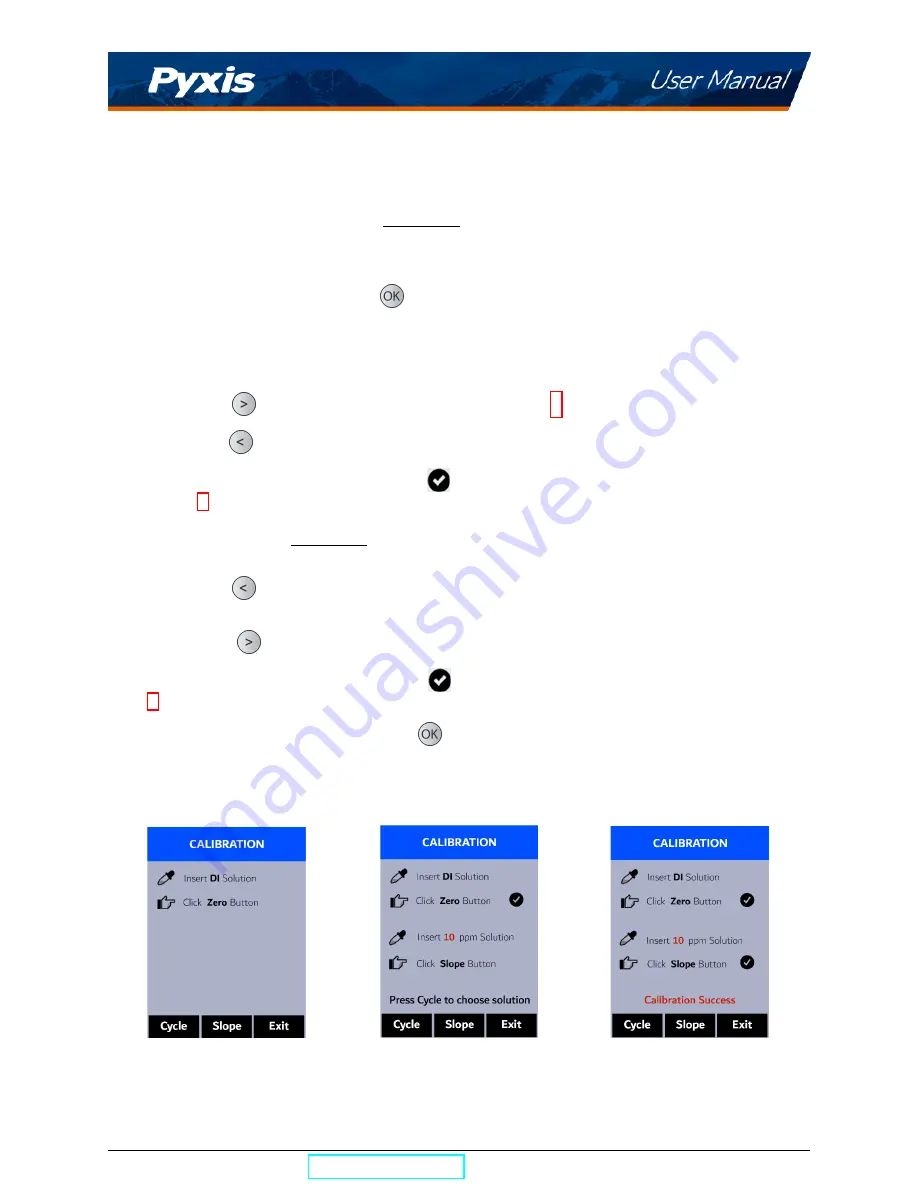
CALIBRATION

screen (Figure 3).

5. Press

Zero

(

) to start the zero (blank) calibration.

6. If the calibration succeeds, a checkmark (

) and instructions for the slope calibration will appear

(Figure 4).

7. Rinse the sample cell three times with the desired Fluorescent Polymer standard. Fill the sample cell

with the desired Fluorescent Polymer standard.

8. Press

Cycle

(

) to cycle between the Fluorescent Polymer standards 10 and 20 (it repeats). Ensure

the value selected matches the desired Fluorescent Polymer standard in the sample cell.

9. Press

Slope

(

) to start the slope calibration.

10. If the calibration succeeds, a checkmark (

), a ”

Calibration Success

” message will appear (Figure

5). Otherwise, a warning message is displayed.

11. Calibration is now complete. Press

Exit

(

) to return to measurement mode.

*

NOTE

*

If

Exit

is pressed before the second checkmark appears, the calibration will

not be completed and must be re-done.

Figure 3.

Figure 4.

Figure 5.

SP-380P User Manual

[email protected]

| +1 (866) 203-8397

6

Содержание 50402

Страница 1: ......

Страница 2: ...Handheld Fluorometer User Manual October 20 2020 Rev 2 00 Pyxis Lab Inc 1729 Majestic Dr Suite 5 Lafayette CO 80026 USA www pyxis lab com 2017 Pyxis Lab Inc Pyxis Lab Proprietary and Confidential...

Страница 3: ...libration Two Point with Zero 7 8 Device Information and Diagnosis 8 8 1 Sample Cell Cleanliness Check 8 8 2 Bluetooth Connection to Devices 9 8 3 Factory Reset 9 9 Use with uPyxis Mobile App 11 9 1 D...

Страница 4: ...elivery All service interventions are to be reviewed and authorized as correct and complete at the completion of the service by a customer representative or des ignate Pyxis warrants these services fo...

Страница 5: ...iated with the cuvette are eliminated Large color graphic screen that can be read in direct sunlight 2 Specifications Table 1 SP 380P Specifications Item Specification Part Number P N 50402 Fluorescen...

Страница 6: ...s 100 ppb PTSA Calibration Standard 500 mL 21001 Pyxis 200 ppb PTSA Calibration Standard 500 mL 21031 Pyxis 10 ppm Fluorescent Polymer Calibration Standard 500 mL 21054 Pyxis 20 ppm Fluorescent Polyme...

Страница 7: ...and negative terminal signs in the compartment bottom snap four new AA alkaline batteries firmly into the battery holder 4 Replace the battery compartment cover and ensure that the sealing O ring is l...

Страница 8: ...e the sample water to rinse the sample cell at least three times Allow 5 10 seconds for the SP 380P to stabilize Figure 2 For a sample containing 10 ppm Fluorescent Polymer the measured Fluorescent Po...

Страница 9: ...the zero blank calibration 6 If the calibration succeeds a checkmark and instructions for the slope calibration will appear Figure 4 7 Rinse the sample cell three times with the desired Fluorescent Po...

Страница 10: ...zero point 6 If the calibration succeeds a checkmark and instructions for the slope calibration will appear Figure 7 7 Rinse the sample cell three times with the desired PTSA standard Fill the sample...

Страница 11: ...n HST Heavy fouling will pre vent the light from reaching the sensor resulting in inaccurate readings It is suggested that the SP 380P be checked for fouling and cleaned on a monthly basis Heavily con...

Страница 12: ...evices follow the steps below 1 Power on the SP 380P by pressing 2 Press Info to launch the DEVICE INFORMATION screen 3 Press Diagnosis or to launch the SYSTEM DIAGNOSIS screen 4 Allow5 10secondsforth...

Страница 13: ...igure 15 appear and the user can choose one of three options a Press to start the factory reset or b Press Cancel to return to the HELP screen or c Press Exit to abandon the factory reset entirely 7 A...

Страница 14: ...e phone Do not pair the phone Bluetooth to the SP 380P Open uPyxis Mobile App Ensure that the SP 380P is discoverable by following the steps in the Bluetooth Connection to Devices section Once the app...

Страница 15: ...well as update the firmware of the SP 380P by pressing Check Update If a firmware update is available press Get Firmware Once the new firmware is downloaded press Upgrade Firmware NOTE The firmware up...

Страница 16: ...Net Framework 4 5 if not previously installed on the PC the USB driver for the USB Bluetooth adapter MA NEB the USB RS485 adapter MA 485 and the main uPyxis Desktop application Double click the uPyxis...

Страница 17: ...Desktop App will default to the System screen From the System screen users can upgrade the firmware by selecting an appropriate firmware file contact service pyxis lab com for these firmware files and...

Страница 18: ...og List and selecting the desired datalog these are separated by month The SP 380P will then populate any relevant log event from the selected datalog which can be viewed in more detail by clicking Re...

Страница 19: ...hout any further key presses if it has not powered off If there are no key presses for 20 seconds the screen will darken and after another 20 seconds without key activity will power down The press of...

Страница 20: ...onfirm that the SP 380P is clean Repeat the process as needed until the Cleanliness Check shows Clean 11 3 Storage Do not expose the SP 380P to an extreme high or low temperature condition such as lea...

Отзывы: