background image

User ’s Manual - page 3

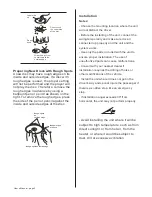
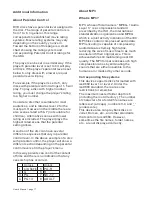
Preparing New Discs with Rough Spots

A new disc may have rough edges on its
inside and outside edges. If a disc with
rough edges is used, the proper setting
will not be performed and the player will
not play the disc. Therefore, remove the
rough edges in advance by using a
ballpoint pen or pencil as shown on the
right. To remove the rough edges, press
the side of the pen or pencil against the
inside and outside edges of the disc.

Rough spots
on
outside edge

Ball point pen
or pencil

Rough spots on inside edge

Notes:

- Choose the mounting location where the unit

will not distract the driver.

- Before the installing of the unit, connect the

wiring temporarily and make sure it is all

connected up properly and the unit and the

system works.

- Use only the parts included with the unit to

ensure proper installation. The use of

unauthorized parts can cause malfunctions.

- Consult with your nearest dealer if

installation requires the drilling of holes or

other modifications of the vehicle.

- Install the unit where it does not get in the

driver's way and cannot injure the passenger if

there is a sudden stop, like an emergency

stop.

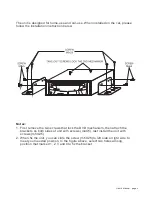
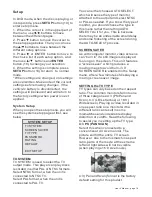
- If installation angel exceeds 30°from

horizontal, the unit may not perform properly.

- Avoid installing the unit where it will be

subject to high temperature, such as from

direct sunlight, or from hot air, from the

heater, or where it would be subject to

dust, dirt or excessive vibration.

Installation

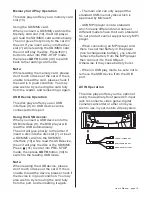
Label side
up

Do not
bend

Do not touch
the underside
of the disc

Wipe the disc from
center toward the
outside edge

Содержание PLD22

Страница 1: ...DIGITAL AUDIO OUT MULTI SUBTITLE LANGUAGES FUNCTION ELECTRONIC SHOCKPROOF ESP FUNCTION A V INPUT REMOTE CONTROL OWNER S MANUAL...

Страница 2: ...9 General Operation 10 CD MP3 Operation 11 DVD VCD Operation 15 Data Disc Play Operation 16 Memory Card Play Operation 16 USB Device Operation 16 AV In Operation 17 Additional Information 18 Setup 18...

Страница 3: ...ion Corporation and is intended for home and other limited viewing uses only unless otherwise authorized by Macro vision Corporation Reverse engineering or disassembly is prohibited This mobile DVD Pl...

Страница 4: ...and make sure it is all connected up properly and the unit and the system works Use only the parts included with the unit to ensure proper installation The use of unauthorized parts can cause malfunc...

Страница 5: ...remove the two screws that lock the DVD mechanism then attach the brackets on both sides of unit with screws m4X5 last install the unit with screws m5X25 2 When fix the unit you can slide the screw m...

Страница 6: ...er supply input IR Sensor If you need to mount the DVD player in a location which is inaccessible or where the line of sight between the remote control and the face of the player is interrupted connec...

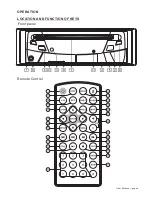
Страница 7: ...User s Manual page 6 OPERATION LOCATION AND FUNCTION OF KEYS Front panel Remote Control...

Страница 8: ...uttons served as cursor buttons to move to up down left right Confirm the Track Chapter selected with the numeric buttons or selected with the cursor buttons on TV screen 19 SETUP 20 TITLE PBC TITLE P...

Страница 9: ...If you are more than 30 away from being directly in front of the IR sensor the remote control may be unable to communicate properly The remote control is small lightweight precision device To avoid da...

Страница 10: ...urning Power On and Off Loading Removing a Disc Adjusting the volume level VOL VOL Input Source Select MODE CD VCD 18 seconds MP3 160 seconds DVD 6 seconds MPEG4 20 seconds GENERAL OPERATION Last Posi...

Страница 11: ...playback hen the button is pressed and then press button normal playback will resume Press button 31 twice and then press button to stop the playback and go back to first track Press button 28 during...

Страница 12: ...BC creates this disc directory on the fly if PBC has been enabled To turn PBC On press the PBC button 20 Please note that PBC does not accommodate the following features REPEAT RANDOM A B PROGRAM and...

Страница 13: ...a track or a chapter in the disc Press button 15 repeatedly to select different repeat modes 8 7 9 9 9 8 7 BACKWARD Repeat Play Paragraph Repeat Play 2 RPT NOTES REP 1 REP CHAPTER REP TITLE REP ALL RE...

Страница 14: ...rded Playing In Random Order On Screen Display Function RDM DISP DISP 1 TT 2 CH 3 4 C 5 T 6 T User s Manual page 13 7 C 8 GOTO ENTER Displays the total playback time for the current chapter Displays t...

Страница 15: ...een the audio tracks recorded on the disc The language number is different according to the disc Notes AUDIO Notes AUDIO Notes Switching the Audio Tracks Multi audio Language Function CHANNEL STEREO C...

Страница 16: ...c but it cannot be played The message REGION ERROR is displayed When I insert a DVD disc there is a window shown on the screen that requires entering 4 characters password why Frequently Asked Questio...

Страница 17: ...r inset a SD MMC card into the SD MMC interface 10 while read the USB device the unit will play the disc or the SD MMC Press 31 to enter into PRE STOP mode then press button 30 to switch to the readin...

Страница 18: ...ll show a different section depending on the parental control level set in the player s menu In this way parents can control the content of films and there is no indication that any censorship has occ...

Страница 19: ...al page 18 You can either choose AUTO SELECT which will sense the type of monitor attached to the output and select NTSC or PAL as needed If you know the type of monitor you should choose the type in...

Страница 20: ...upon shipment from the factory PASSWORD ENTER ENTER User s Manual page 19 3 Press or button to select then press button The restriction level parental level input display appears 4 Press button to se...

Страница 21: ...alization 2 DYNAMIC RANGE Change among FULL 6 8 4 8 2 8 OFF 3 DUAL MONO Change among STEREO MONO L MONO R MIX MONO AUDIO SETUP AUDIO OUT KEY EXIT SETUP DIGITAL SETUP OP MODE DYNAMIC RANGE DUAL MONO EX...

Страница 22: ...This is not a malfunction The disc format is not according to the TV set used PAL NTSC The disc format is not according to the TV set used PAL NTSC Ensure the disc label is upwards Clean the disc Che...

Отзывы: