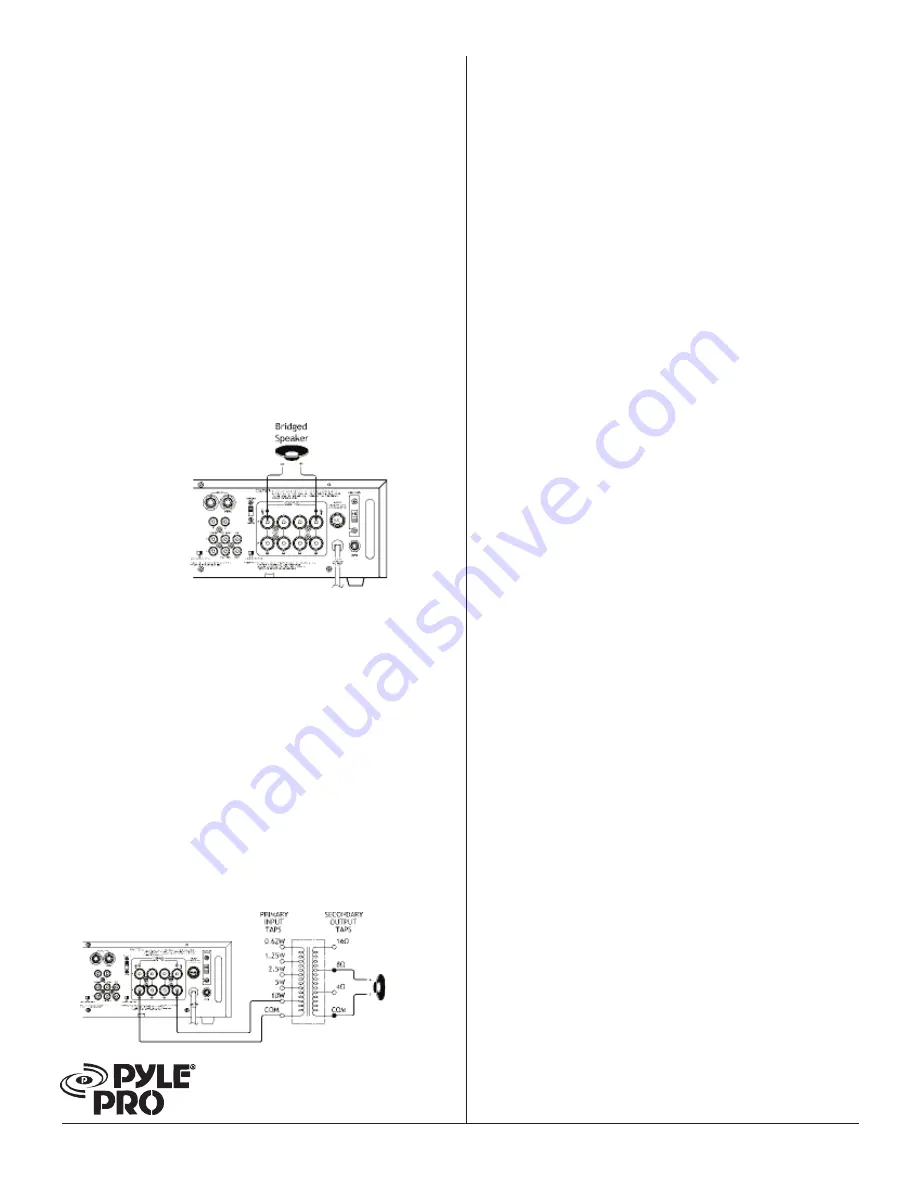
Bridged Connection,
Connecting The Speakers Without and With Transformers
IMPORTANT:
¥ For a bridged connection, DO NOT connect any speaker
wires to the BLACK SPEAKERS TERMINALS.
¥ Use only one set of connections when bridging. DO NOT
use both Channels A and B simultaneously. DO NOT mix
speakers with and without transformers simultaneously.
NOTE:
¥ SPEAKERS RIGHT (+) on the amplifier is used as a negative
(-) terminal for a bridged connection.
¥ Make sure STEREO/MONO is set to MONO.
A. Connecting The Speakers Without Transformers
Use this connection if you have high power speakers that
can handle a power output of 350 Watts.
1.Connect the speaker wires to the speaker's positive (+)
and negative (-) terminals.
2.Connect the other end of the speaker's positive (+) and
negative (-) wires to the amplifier's red SPEAKERS LEFT
and SPEAKERS RIGHT terminals.
B. Connecting The Speakers With Transformers (70V
Output Capability).
The PT-910 provides 70V output when connected to
speakers with 70V transformers.
1.Connect the speaker's (+) terminal to the transformer's
secondary tap that matches the speaker's total impedance.
Located on the opposite side of the transformer, these
secondary taps are outputs, and are rated in Ohms: 4,
8, or 16.
2.Connect the transformer's PRIMARY tap to the red SPEAKER
LEFT (+) on the amplifier. Before connecting the speakers,
please be sure the total wattage of primary tap you use
does not exceed the amplifier's maximum 300 WATT
POWER RATING. These primary taps are inputs and are
rated in Watts: 1, 2.5, 10, etc.
3.Connect the speakers' (-) terminal to the transformer's
COMMON tap on the secondary side.
4.Connect the transformer's COMMON tap on the primary
side to the red SPEAKER RIGHT (-) on the amplifier.
4 Ð PYLE PRO PT-910 Amplifier OwnerÕs Manual
POWER CONNECTIONS
To connect the amplifier to power, plug the attached power
cord into a standard AC outlet.
Your amplifier's fuse (located on the amplifier's back panel)
protects the amplifier from voltage surges. If the amplifier
does not work when you press POWER, check the fuse. If
it is blown, see "replacing the fuse" to replace it.
OPERATIONS
Follow these steps to use your amplifier
1.Start the input sound source.
2.Make sure LEFT and RIGHT on the front of the amplifier
are set to MIN.
3.Press in POWER to turn on the amplifier. The blue light
around the power switch and LEFT/RIGHT volume control
illuminate.
4.Rotate LEFT and RIGHT VOLUME to its mid-position.
5.One at a time, adjust MIC 1, MIC 2, MIC 3, MIC 4/PHONO,
and CD/AUX to the desired volume and balance.
NOTE:
If you hear feedback after you adjust these controls, turn
FEEDBACK FILTER clockwise until the noise disappears, see
"using the Feedback Filter".
5.Adjust LEFT and RIGHT VOLUME to the desired volume
level after you get the desired balance.
Monitoring The Sound Sources
To monitor the sound sources, plug a pair of mono or stereo
headphones (not supplied) with a 6.35mm (1/4-inch) plug
into the PHONES jack on the front of the amplifier. Using
headphones lets you easily check and adjust he sound
source's balance.
Listening Safely
To protect your hearing follow these guidelines when you
use headphones.
¥ Set the volume to the lowest setting before you begin
listening. after you begin listening, adjust the volume
to a comfortable level.
¥ Do not listen at extremely high volume levels. Extended
high-volume listening can lead to permanent hearing loss.
¥ Once you set the volume, do not increase it. Over time,
your ears adapt to the volume level, so a volume level
that does not cause discomfort might still damage your
hearing.


