background image

PUREGAS, LLC 


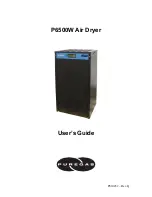
P6500W Air Dryer User’s Guide 


Page 3 of 88  

P010452 – Rev. Q 

1. Welcome & Congratulations 


Congratulations on your purchase of a new PUREGAS P6500W Air Dryer!  We here at 

PUREGAS are very proud of our products and we are committed to providing you with 

the best value and service possible. 


We are sure that you will be satisfied with your new air dryer and would like to thank you 

for choosing PUREGAS for your air dryer requirements.  We also hope that you will 

continue to choose us for your future air pressure and related product purchases. 


For information about this and other PUREGAS products, please visit us on the web at: 

www.puregas.com


2. Introduction 


PLEASE READ THIS USER’S GUIDE THOROUGHLY AND SAVE FOR 

FUTURE REFERENCE. 


This User’s Guide is provided for the benefit of our customers and contains information 

and direction specific to the PUREGAS P6500W Air Dryer.  It will cover topics 

including: safety, specifications, installation, registration, operation, testing, maintenance, 

replacement parts, service, and troubleshooting issues.  Observation and compliance with 

this User’s Guide will ensure the maximum life and efficiency of your air dryer. 


This User’s Guide should be read thoroughly prior to installing, operating, or servicing 

the air dryer in order to become familiar with the recommended procedures.  This will 

minimize the possibility of personal injury or damage to the unit due to improper 

operation or handling. 

Содержание P6500W

Страница 1: ...P010452 Rev Q P6500W Air Dryer User s Guide...

Страница 2: ......

Страница 3: ...us on the web at www puregas com 2 Introduction PLEASE READ THIS USER S GUIDE THOROUGHLY AND SAVE FOR FUTURE REFERENCE This User s Guide is provided for the benefit of our customers and contains infor...

Страница 4: ...tem Pressure 39 8 12 Setting the Static Pressure 40 8 13 Setting the Outlet Pressure 40 8 14 Engaging the Boost Transformer 41 9 Testing Your Dryer 44 9 1 Safety Warning Information 44 9 2 Measuring C...

Страница 5: ...3 10 High Cabinet Temperature Alarm 77 13 11 High Humidity 78 13 12 Can t Create a High Humidity Alarm Shutdown 79 13 13 Compressor Doesn t Operate 79 13 14 Compressor Won t Build Pressure 80 13 15 Co...

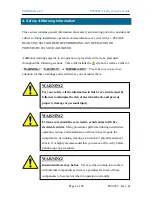
Страница 6: ...ion for these warnings and read them as you encounter them WARNING For your safety all the information in this User s Guide must be followed to minimize the risk of electrical shock and prevent proper...

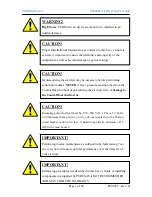
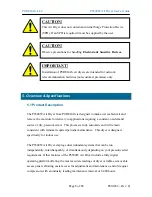
Страница 7: ...TANT Performing routine maintenance as outlined in the Maintaining Your Dryer section will ensure optimal performance over the lifecycle of your air dryer CAUTION Incoming power to dryer must be 190 2...

Страница 8: ...dependently interchangeably or simultaneously depending on your pressurized air requirement Other features of the P6500W Air Dryer include a fully digital operating platform offering the most accurate...

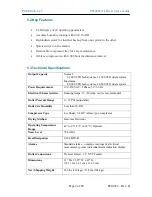
Страница 9: ...4 000 SCFD single system Power Requirements 190 230 VAC 1 Phase 50 60 Hz Electrical Characteristics Running Amps 15 20 Amp service recommended Outlet Pressure Range 0 15 PSI adjustable Outlet Air Hum...

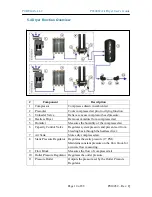
Страница 10: ...ir 5 Humitter Measures the humidity of the compressed air 6 Capacity Control Valve Regulates system pressure and prevents air from bleeding back through the heatless dryer 7 Air Tank Stores dry compre...

Страница 11: ...elry before performing any procedures WARNING Internal surfaces may be hot Use care when coming into contact with internal components as there is a potential for some of these components to become hot...

Страница 12: ...d and free from abrasive dust or chemicals 6 2 3 2 Ambient temperature is between 40 and 85 F optimal NOTE Higher temperatures will decrease component lifespan 6 2 3 3 Meets the following power requir...

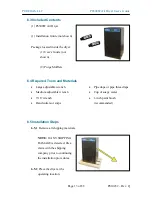
Страница 13: ...quired Tools and Materials Large adjustable wrench Medium adjustable wrench 7 16 wrench Band cutters or snips Pipe dope or pipe thread tape Cup of soapy water 1 inch paint brush recommended 6 5 Instal...

Страница 14: ...4 Check for loose parts hoses or wiring NOTE If ANY SHIPPING DAMAGE is detected file a claim with the shipping company prior to continuing the installation procedures 6 5 5 Remove the shipping block...

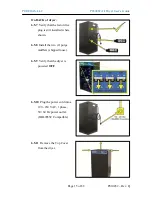
Страница 15: ...ify that the red orifice plug is still installed where shown 6 5 8 Install the two 2 purge mufflers shipped loose 6 5 9 Verify that the dryer is powered OFF 6 5 10 Plug the power cord into a 190 230 V...

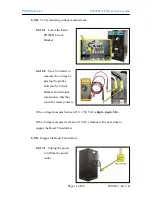
Страница 16: ...measure the voltage by placing the probes between the Circuit Breaker and terminal insulation so that they touch the metal contacts If the voltage measures between 210 230 VAC skip to step 6 5 14 If...

Страница 17: ...Locate the Main Power Lead quick disconnects in the top section of the dryer 6 5 13 3 Unplug the Main Power Lead quick disconnects 6 5 13 4 Plug both of the Boost Transformer Lead connectors into the...

Страница 18: ...the dryer power ON NOTE Both system compressors and heatless dryers will start creating air flow through the red outlet pressure orifice 6 5 16 Set the System Pressures System 1 System 2 are adjusted...

Страница 19: ...he knob until the reading on the pressure gauge is 50 PSI 6 5 16 3 Push the knob in to lock 6 5 17 Let the dryer run until the Humidity drops under 2 on both System 1 and System 2 may take up to 15 mi...

Страница 20: ...plug System may be pressurized PUREGAS recommends using Installation Kit P011752 to connect your dryer to the air supply line See section 11 6 for detail 6 5 20 Turn the dryer ON 6 5 21 Set the Static...

Страница 21: ...essure Regulator knob out 6 5 22 3 Turn knob until Outlet Pressure OUTP reading is at the desired setting 6 5 22 4 Push knob in to lock 6 5 23 Check for air leaks NOTE This is a general procedure that...

Страница 22: ...ing or hose connection to be tested If air bubbles appear at the connection this indicates that air is leaking from the connection If any leaks are detected take steps to seal them off as necessary Ti...

Страница 23: ...ing requirements o Well ventilated o Free from abrasive dust or chemicals o Ambient temperature is between 40 and 85 F optimal Operating Power is between 210 230 VAC Shipping block removed from compre...

Страница 24: ...the Limited Warranty on your product Once you register you are eligible to receive free technical support as well as updates concerning your PUREGAS products Register Online at www puregas com registr...

Страница 25: ...It is highly recommended that you remove all jewelry before performing any procedures WARNING Internal surfaces may be hot Use care when coming into contact with internal components as there is a pote...

Страница 26: ...t plugs System may be pressurized PUREGAS recommends using Installation Kit P011752 to connect your air dryer to the air supply line See section 11 6 for detail 8 3 Powering the Dryer ON OFF 8 3 1 POW...

Страница 27: ...ches 00 00 One system will be Online ON and the other in STANDBY BOTH Runs both System 1 and System 2 simultaneously SYSTEM 1 ONLY Runs only System 1 and leaves System 2 in Standby SYSTEM 2 ONLY Runs...

Страница 28: ...nformation screens unless the HOLD button has been pressed 8 4 5 1 Tank Screen TANK Air Tank pressure fluctuates between 20 50 PSI OUTP Outlet Pressure regulated by the Outlet Pressure Regulator FLOW...

Страница 29: ...em LAST RUN How many minutes the System compressor ran during the last Air Tank pressurization cycle TOTAL HR How many hours the System compressor has run since the last Total Hour Reset 8 4 5 4 Syste...

Страница 30: ...an one 1 minute Default setting is 6 5 PSI See section 13 7 for troubleshooting information 8 5 3 High Flow Alarm Occurs when the Flow Rate FLOW rises above the alarm set point for more than one 1 min...

Страница 31: ...set point for more than one 1 minute Default setting is 10 0 If this alarm is present for one 1 minute or more the air dryer will go into SHUTDOWN mode to prevent saturated air from being delivered t...

Страница 32: ...application Reference Appendix Section 14 2 for Limits and Defaults Press the Up Arrow Button to access the Set Point Adjust screens Press the Up Down Arrow Buttons to navigate through the available...

Страница 33: ...lue of the selected digit 8 6 2 4 Press the Right Arrow Button until the underscore disappears This will lock in the new setting value 8 6 3 Low Outlet Pressure Alarm Set Point default setting is 6 5...

Страница 34: ...elected digit 8 6 4 4 Press the Right Arrow Button until the underscore disappears This will lock in the new setting value 8 6 5 Excessive Compressor Run Time Alarm Set Point default setting is 3 00 m...

Страница 35: ...clock time is 8 00 am will cause the dryer to cycle at exactly 8 00 am each day 8 6 6 1 Press the Right Arrow Button to access the Change Value Screen 8 6 6 2 Press the Right Left Arrow Buttons to mo...

Страница 36: ...Alarm Delays Set Point The Alarm Delay allows an alarm condition to be present for up to one 1 minute before signaling the alarm This allows the dryer to come out of the alarm condition on its own wit...

Страница 37: ...he Top Cover off 8 7 2 Removing Front Panel 8 7 2 1 Depress the latches and pull the Front Panel out 8 8 Connecting to Common Alarm Terminals 8 8 1 Remove Top Cover see section 8 7 1 8 8 2 Connect the...

Страница 38: ...rnal wire pair to the specific alarm terminal 8 10 Depressurizing the Dryer 8 10 1 Remove Front Panel see section 8 7 2 8 10 2 Pull the ring handle on the Safety Relief Valve until all air pressure is...

Страница 39: ...System 1 System 2 are adjusted and set independently With Compressor running 8 11 1 Remove Front Panel see section 8 7 2 8 11 2 Pull the Capacity Control Valve knob out 8 11 3 Turn the knob until the...

Страница 40: ...Static Pressure Regulator knob out 8 12 3 Turn knob until the reading on the pressure gauge is 17 PSI 8 12 4 Push knob in to lock 8 12 5 Reinstall Front Panel 8 13 Setting the Outlet Pressure 8 13 1...

Страница 41: ...ulator knob out 8 13 4 Turn knob until Outlet Pressure OUTP reading is at the desired setting 8 13 5 Push knob in to lock 8 13 6 Reinstall Front Panel 8 14 Engaging the Boost Transformer 8 14 1 Turn t...

Страница 42: ...Locate the Main Power Lead quick disconnects in the top section of the dryer 8 14 5 Unplug the Main Power Lead quick disconnects 8 14 6 Plug both of the Boost Transformer Lead connectors into the Mai...

Страница 43: ...PUREGAS LLC P6500W Air Dryer User s Guide Page 43 of 88 P010452 Rev Q 8 14 7 Reinstall the Top Cover back the dryer 8 14 8 Plug the power cord back into the power outlet 8 14 9 Turn the dryer ON...

Страница 44: ...require the equipment to be running creating a situation for potential electrical shock It is highly recommended that you remove all jewelry before performing any procedures WARNING Internal surfaces...

Страница 45: ...e 1 System 2 Wire 8 9 2 3 Use an Amp Meter to measure the running amps With the compressor running the running amps should measure 4 0 amps or below 9 2 4 Reinstall Front Panel If the compressor measu...

Страница 46: ...be measured 9 3 3 Use a Voltmeter to measure the voltage between the Hot and Neutral wires by placing the probes in the openings in the power connector System 1 Wires 1 2 System 2 Wires 8 7 The volta...

Страница 47: ...hat they touch the metal contacts The voltage should measure 210 230 VAC 9 4 4 Reinstall Top Cover If the incoming voltage measures less than 210 VAC it is necessary to engage the Boost Transformer in...

Страница 48: ...e across the AC terminals Should measure 0 VAC 9 5 4 Use a Voltmeter to measure across the DC terminals Should measure 12 VDC With the System Compressor NOT running 9 5 5 Use a Voltmeter to measure ac...

Страница 49: ...e purge tubes from the System Heatless Dryer 9 6 3 Place your hand beneath the purge fittings to feel for purging air Air should Purge from Tower 1 side Purge from Tower 2 side 30 Seconds later Purge...

Страница 50: ...lve 9 7 3 Place your hand beneath the Unloader Valve fitting to feel for air flow Air should NOT flow from this fitting continuously Air should only be released in a short burst when the System compre...

Страница 51: ...ls from left to right 106VDC Left solenoid IN Incoming power 106VDC Right solenoid 9 8 3 Use a Voltmeter to measure the DC voltage across each set of 106VDC terminals Continue to measure for up to 45...

Страница 52: ...the Wiring Diagram section 14 1 Replace defective fan see sections 11 2 for part detail and 11 7 for ordering information 9 10 Testing Safety Relief Valve 9 10 1 Remove Front Panel see section 8 7 2...

Страница 53: ...re TANK reaches 50 0 PSI If the tank pressure TANK fails to reach 50 PSI see section 13 14 for troubleshooting information With Compressor s NOT running 9 11 4 Pull the ring handle on the Safety Relie...

Страница 54: ...2 9 12 2 Start timing when the compressor s turns on 9 12 3 Pull the ring handle on the Safety Relief Valve when necessary to keep the Tank Pressure TANK from reaching 50 PSI This prevents the compres...

Страница 55: ...BOTH Cycle Mode see section 8 4 2 for details on changing Cycle Mode Test one System at a time System System 1 or System 2 9 13 1 Remove Front Panel see section 8 7 2 9 13 2 Turn the System Circuit Br...

Страница 56: ...3 7 After three 3 minutes verify that a Humidity Alarm appears and System goes into SHUTDOWN mode 9 13 8 Replace the Humitter into the Humidity Block 9 13 9 Reinstall Front Panel 9 13 10 Turn the Syst...

Страница 57: ...5 1 appears on the display press the HOLD Button on the Front Panel to freeze that screen 9 14 3 Make a note of the current Outlet Pressure OUTP reading With Compressor s running 9 14 4 Pull the Outl...

Страница 58: ...the RESET Button to clear the alarm 9 14 9 Reinstall Front Panel If you are unable to create a High Outlet Pressure Alarm as described see section 13 6 for troubleshooting information 9 15 Testing Lo...

Страница 59: ...PSI After one 1 minute the Low Pressure Alarm should appear on the display 9 15 6 Turn Outlet Pressure Regulator knob clockwise until Outlet Pressure OUTP reading raises to the reading recorded in ste...

Страница 60: ...UR With Compressor s NOT running 9 16 1 Listen for any hissing sounds which may indicate a fitting or hose air leak With Compressor s running 9 16 2 Use a 1 inch paint brush to dab soapy water on the...

Страница 61: ...on about the specific procedure Please refer to these sections for detailed procedural information NOTE When operating at higher ambient temperatures it is recommended that maintenance be performed mo...

Страница 62: ...o check for any loose or disconnected wiring CAUTION SHUT DOWN IMMEDIATELY FOR REPAIRS if the air compressor s shows any evidence of overheating or presents excessive noise CAUTION Depressurizing the...

Страница 63: ...age must be 210 230 VAC 9 4 Test High Low Outlet Pressure Alarms 9 14 9 15 Set System Pressure 50 PSI 8 11 Set Static Pressure 17 PSI 8 12 Set Outlet Pressure 8 13 Test Consistent Heatless Dryer Cycli...

Страница 64: ...edure Section 8 000 16 000 24 000 32 000 40 000 Install 8 000 Hour Maintenance Kit P011813 11 6 Install 16 000 Hour Maintenance Kit P011814 11 6 Read Record Flow Rate FLOW 8 4 5 1 Measure Record Compr...

Страница 65: ...iption Part Number Quantity Recommend Spare Solid State Relay P010562 2 1 Terminal Block P010200 1 Front Panel Display Assembly P010478 1 LCD Display Only P012105 1 Circuit Breaker P010563 3 1 Discret...

Страница 66: ...Quantity Recommend Spare Boost Transformer P012772 1 Heatless Dryer Assembly See section11 3 for detail Pressure Gauge 0 30 PSI P011339 1 Static Pressure Regulator P013203 1 1 Adapter Plate 2 Flow Blo...

Страница 67: ...y Parts Description Part Number Quantity Recommend Spare Heatless Dryer P010196 1 Pressure Gauge P010695 1 Solenoid Valve In Kit P011813 See section 11 6 for detail Unloader Valve P010453 1 Cycle Time...

Страница 68: ...pt In Kit P011766 See section 11 6 for detail Air Compressor Assembly Left Side Right Side P013263 P013264 1 1 Compressor ONLY P010444 1 1 Spacer 8 Precooler P05663 2 Discharge Hose P05069 2 Capacitor...

Страница 69: ...88 P010452 Rev Q 11 5 Frame Section Parts Description Part Number Quantity Recommend Spare Top Cover 1 Front Panel 1 Air Intake Filter In Kit P011766 See section 11 6 for detail Purge Muffler In Kit...

Страница 70: ...x Month Maintenance Kit Includes air intake filter compressor mufflers and purge mufflers P011766 2 8 000 Hour Maintenance Kit Includes heatless dryer maintenance kits and compressor maintenance kits...

Страница 71: ...ct the PUREGAS Inside Sales Service department to order 800 521 5351 option 2 Fax 303 657 2205 sales puregas com parts puregas com IMPORTANT Instruction for the replacement of individual listed compon...

Страница 72: ...place desiccant o rings check valves springs and complete solenoid assembly o Test proper component operation Desiccant Tower Repack o Clean out tower and replace desiccant filter and o ring Circuit B...

Страница 73: ...egins with the most likely cause s of the issue Otherwise they start from the simplest possibilities and progress to more complicated ones This troubleshooting guide is designed to be easy to follow a...

Страница 74: ...ng the air dryer may be necessary before performing certain procedures NEVER remove pressure sensing tubes from the Control Board without depressurizing the air dryer first or damage to the Control Bo...

Страница 75: ...unning from the Control Board to the Display Screen is properly connected at both ends see section 11 1 for Control Board and Display Screen locations Plug in ribbon cable to Control Board and Display...

Страница 76: ...UTP reading is higher than the High Outlet Pressure Alarm set point above Replace Control Board section 11 1 if Outlet Pressure OUTP reading is over verified High Outlet Pressure Alarm set point for m...

Страница 77: ...t Pressure OUTP reading is under verified Low Outlet Pressure Alarm set point for more than 1 minute and fails to create an alarm 13 9 High Flow Rate Alarm Possible Cause Check Corrective Action Air l...

Страница 78: ...gh Humidity Alarm set point section 8 6 4 Over 10 not recommended Heatless Dryer not cycling between towers Verify consistent Heatless Dryer cycling section 9 6 Troubleshoot Inconsistent Heatless Drye...

Страница 79: ...ce Control Board if no alarm is created and system does not shut down section 11 1 13 13 Compressor Doesn t Operate Possible Cause Check Corrective Action Defective compressor Measure voltage to compr...

Страница 80: ...s between compressor and Air Tank for air leaks section 9 16 Connect tighten or replace leaking component 13 15 Compressor Excessive AMP Draw Possible Cause Check Corrective Action Restriction in air...

Страница 81: ...Alarm Possible Cause Check Corrective Action Low System Pressure Verify System Pressure section 8 11 Adjust System Pressure to 50 PSI section 8 11 High Flow condition Verify Flow Rate FLOW reading is...

Страница 82: ...set point by 1 minute or more and fails to create an alarm 13 19 Compressor Rapid ON OFF Cycling Possible Cause Check Corrective Action Defective Solid State Relay Measure voltages at Solid State Rel...

Страница 83: ...ted all of the potential problems and solutions covered in the Troubleshooting Your Dryer section and you still require further assistance to correct a problem contact PUREGAS Technical Support 800 52...

Страница 84: ...PUREGAS LLC P6500W Air Dryer User s Guide Page 84 of 88 P010452 Rev Q 14 Appendix 14 1 Wiring Diagram...

Страница 85: ...rm 1 19 9 6 5 PSI High Humidity Alarm 3 0 15 0 10 0 YES Excessive Compressor Run Time Alarm 60 00 59 59 180 00 Seconds 14 2 3 System Operations Description ON Value OFF Value Default Value Unit of Mea...

Страница 86: ...by the user and the user in turn should file any damage claim against the carrier All warranty items are F O B Broomfield Colorado Freight charges are the responsibility of the user This warranty sha...

Страница 87: ...do 80020 800 521 5351 303 427 3700 Fax 303 657 2233 info puregas com www puregas com 16 2 Sales 800 521 5351 option 2 Fax 303 657 2205 sales puregas com parts puregas com 16 3 Service 800 521 5351 opt...

Страница 88: ..._____________________________ ________________________________________________________________________ ________________________________________________________________________ ________________________...

Отзывы: