background image

 
When the power is switched on, the projector automatically starts to run the programmes of 
self test. After finishing these, the projector is ready for operation. 
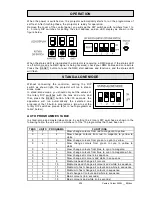
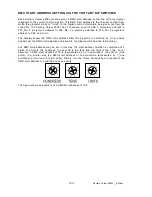
Remove the cover of the control panel, you will see the DIP switches with numbers from 1 to 
4, 3 rotary DIP switches for setting the start address and an LED display as shown in the 
figure below. 


When the status LED is illuminated the projector is receiving a DMX signal. If the status LED 
is off which means no DMX signal is being received, check your DMX cables and connectors. 
Press the   RESET   button to reset the DMX start address and functions, and the status LED 
will flash. 

 
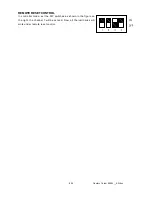
Without connecting the controller, setting the DIP 
switch as shown right, the projector will run in stand-
alone mode.  
In stand-alone mode, you should only set the values of 
the rotary DIP switches with the tens and units, and 
then press the  RESET  button. After 30 seconds, the 
apparatus will run automatically the selected one 
program of the 15 built-in programmes. (How to set the 
rotary DIP switches, please refer to “auto programmes 
table” below.) 

 
AUTO PROGRAMMES TABLE 

In stand-alone and master/slave mode, by setting the 2 rotary DIP switches as shown in the 
following table, the unit will run whichever of the 15 programmes that have been se

t. 


TENS UNITS PROGRAMS

FUNCTIONS 

Slow change colours from red to magenta to yellow 

Slow change colours from red to magenta to yellow to 
white 

Slow change colours from green to cyan to yellow 

Slow change colours from green to cyan to yellow to 
white 

Slow change colours from blue to cyan to magenta 

Slow change colours from blue to cyan to magenta white 

Slow change all colours in sequence 

Slow change all colours and white in sequence 

Medium-speed change all colours  

10 

Medium-speed change all colours and white in sequence 

11 

Medium to fast change all colours and white in sequence 

12 

Medium to fast change all colours in sequence 

13 

Fast change all colours and white in sequence 

14 

Basic colours (in 6 seconds) 

15 

Basic colours and white (in 6 seconds) 

STAND-ALONE MODE 

OPERATION 


5/14

Century Colour 2500L     EN.doc

Содержание CENTURY COLOUR 2500L PR-2001

Страница 1: ...formation about the safe installation and use of this projector Please read and follow these instructions carefully and keep this manual in a safe place for future reference PR LIGHTING LTD No 571 Yin...

Страница 2: ...e the unit Any damage caused by improper use will not be assumed by the manufacturer and or dealer ACCESSORIES THESE ITEMS ARE PACKED TOGETHER WITH THE PROJECTOR Power cord 1 PCS Barndoors 1 SET XLR p...

Страница 3: ...personnel Before installation ensure that the voltage and frequency of power supply match the power requirements of the projector Only use the lamp with the specified type and rating It is essential t...

Страница 4: ...re tightened Note The MSI series are high pressure lamps with external igniters Care should always be taken when handling these lamps Always read the manufacturers Instructions for use enclosed with t...

Страница 5: ...in programmes How to set the rotary DIP switches please refer to auto programmes table below AUTO PROGRAMMES TABLE In stand alone and master slave mode by setting the 2 rotary DIP switches as shown in...

Страница 6: ...ry Colour accepts digital control signals in standard DMX512 1990 format 5 PIN AND 3 PIN CONVERSION Century Colour uses 3 pin XLR plug socket If your controller uses 5 pin XLR plug socket you should c...

Страница 7: ...inaires will run automatically and follow whichever one of the 15 automatic programs selected How to set the rotary DIP switches please refer to auto programmes table above You can easily differentiat...

Страница 8: ...ET CONTROL 8 14 Century Colour 2500L EN doc In controller mode set the DIP switches as shown in the figure on the right the channel 7 will be actived Now all the luminaires will work under remote rese...

Страница 9: ...te to magenta continuous change 5 Dimmer 0 255 0 100 Shutter to open continuous change 0 25 0 10 White 26 51 10 20 Cyan 52 77 20 30 Yellow 78 103 30 40 Magenta 104 129 40 50 Blue 130 155 50 60 Red 156...

Страница 10: ...display shows the DMX start address after the projector is switched on If you have already set the DMX start address and saved it the display will show the last setting Any DMX start address may be se...

Страница 11: ...LEAN To ensure the reliability of the projector it should be kept clean It is recommended that the fans should be cleaned every 15 days The dichroic colour filters should also be regularly cleaned to...

Страница 12: ...ted Lamp life 2000 Hours Protocol Standard DMX 512 Running mode Stand alone Master Slave and DMX Controller DMX channels 7 channels Colours 3 basic colours CYM continuous colours mixing white black ou...

Страница 13: ...ELECTRICAL DIAGRAM 13 14 Century Colour 2500L EN doc...

Страница 14: ...029 4 17HS1013L CYAN 090830001 4 DICHROIC COLOUR FILTER MAGENTA 090830002 4 DICHROIC COLOUR FILTER YELLOW 090830003 4 DICHROIC COLOUR FILTER MAIN PCB 230030260 1 CONTROL PCB 230030261 1 POWER PCB 2300...

Отзывы: