background image

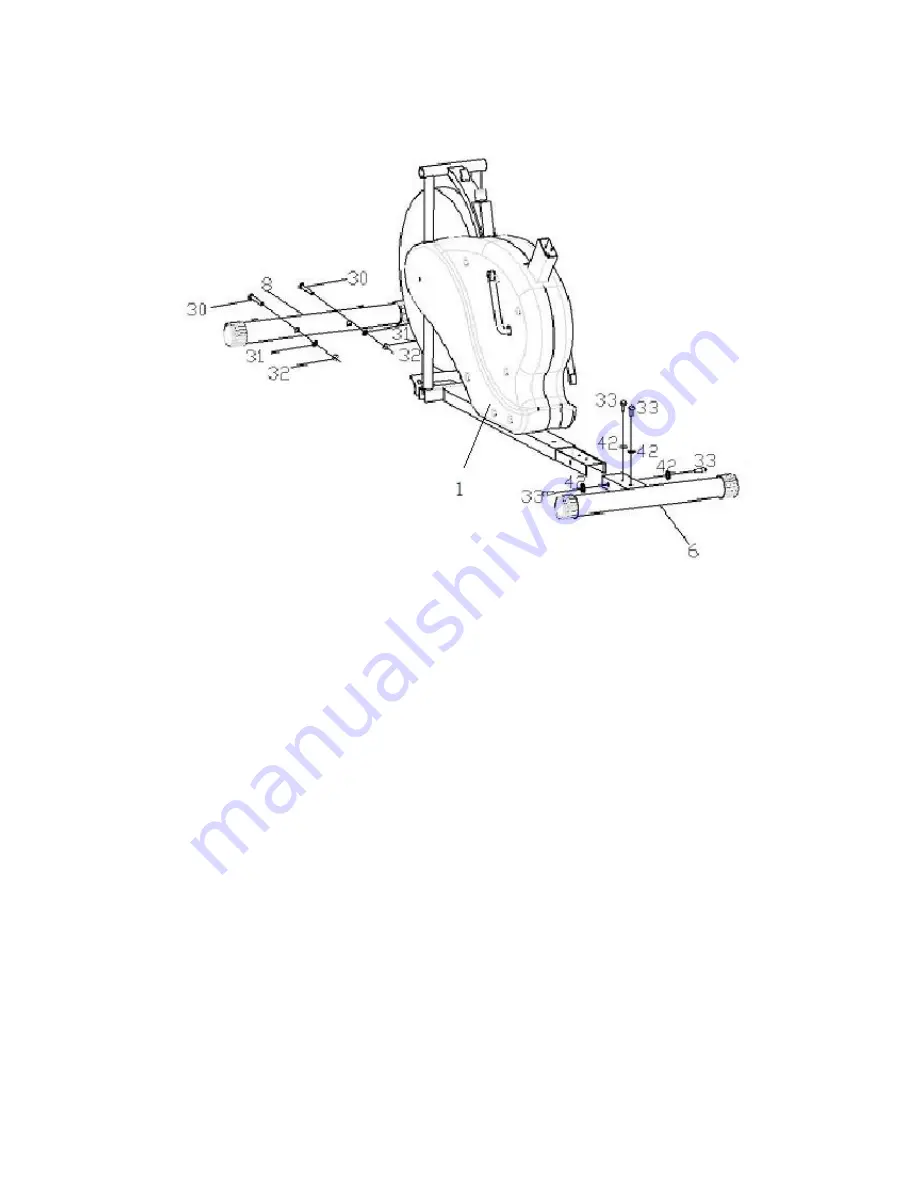
STEP 1: ASSEMBLE FRONT AND REAR STABILIZERS

Locate 2x M10 Cap Nuts (32), 2x Arc Washers (31), 2x M10 Bolts (30), the Front Stabilizer Bar with 

Wheels (8), 4x Allen Screws (33), 4x Washers (42) and the Rear Stabilizer Bar (6) 

A.

 Position the Front Stabilizer Bar with Wheels (8) under the Fan Wheel of the bike and align the 

bolt holes to the frame. 

IMPORTANT

: When aligning these holes, make sure the dimpled, square openings in the Bar are 

facing down towards the ground. 

B. 

Attach the Stabilizer Bar to the Main Frame by inserting the bolts up through the Bar. Secure the 

bolts first with the Arc Washers and then tighten the Cap Nuts down to this assembly.

C.

 Position the Rear Stabilizer Bar (6) behind the Main Frame and attach this to the Main Frame by 

lining up the holes in the Rear Stabilizer to the holes in the Main Frame. Secure by first placing down 

a washer (42) to each hole, and then securing 4x Screws (33) to this assembly. 

NOTE: The following instructions use the included tools: 

Multi-Hex Tool, Small Allen Wrench, and Large Allen Wrench. 

Please locate these and keep on hand to assemble. 

Meijer.com

Содержание 8534FB

Страница 1: ...renuous activity Do not allow more than one person on the trainer at any time ADULT ASSEMBLY REQUIRED To ensure warranty coverage please visit www pureglobalbrands com to register your product Pure Fi...

Страница 2: ...ny other questions or concerns about this Pure Global product please e mail the Pure Global Brands Inc customer service department at customerservice puregbi com or contact us at 1 866 498 5269 You ca...

Страница 3: ...usage or repairs not provided by a Pure Fitness authorized service center or for products used for commercial or rental purposes This warranty does not cover ordinary wear and tear weathering failure...

Страница 4: ...very attempt is made to ensure the highest degree of protection in all equipment we cannot guarantee freedom from injury The user assumes all risks of injury due to use All merchandise is sold on this...

Страница 5: ...lobal is not liable ALWAYS consult a physician before beginning any exercise program Ask your doctor to evaluate your present fitness level and determine the exercise program that is most appropriate...

Страница 6: ...8534FB EXPLODED VIEW Meijer com...

Страница 7: ...End Cap 4 40 Large Bearing 2 8 Front Stabilizer 1 41 Small Bushing 2 9 L R Left Right Pedals 2 42 Washer 7 10 Fan Wheel 1 43 M8 Nut 5 11 Crank 1 44 Flywheel Axle 1 12 Connection Plate 2 45 M10 Spring...

Страница 8: ...1 8534FB Assembly Parts Hardware Pack 8 6 3 L R 12 17 39 14 37 61 54 49 45 47 9 L R 40 51 48 45 56 30 32 33 42 31 16 43 34 41 63 62 Meijer com...

Страница 9: ...e ground B Attach the Stabilizer Bar to the Main Frame by inserting the bolts up through the Bar Secure the bolts first with the Arc Washers and then tighten the Cap Nuts down to this assembly C Posit...

Страница 10: ...x Wave Washer 61 down on the rod against the hole housing on the Main Frame Next slide the Left Handlebar 3L onto the Rotation Rod Then place 1st 1x D Washer 54 2nd 1x Flat Wash er 49 and 3rd 1x Sprin...

Страница 11: ...st slide 1x Large Flat Washer 51 and then 1x Large Bushing Thread this completed assembly into the hole in the Pedal Crank Use the Multi Hex Wrench to turn the flat edges of the Pedal Screw assembly s...

Страница 12: ...ly lower this assembly and secure with the Seat Adjustment Knob 16 Be sure to watch for pinch points in case the seat suddenly drops Before continuing make sure that this assembly is se cure and the k...

Страница 13: ...on the meter to ZERO 2 Auto On Off The system turns on when the MODE key is pressed or when you begin to pedal the bike The system turns off automatically approximately 4 minutes after you have stopp...

Страница 14: ...muscles to move the pedals NEVER attempt to suddenly stop pedaling or switch the direction of pedaling while moving as serious injury and or severe damage to the unit can occur for which Pure Global...

Страница 15: ...tch Sit with the soles of your feet together with your knees pointing outward Pull your feet as close into your groin as possible Gently push your knees towards the floor Hold for 15 counts Hamstring...

Страница 16: ...on the other side for 15 counts Toe Touch Slowly bend forward from your waist letting your back and shoulders relax as you stretch toward your toes Reach down as far as you can and hold for 15 counts...

Страница 17: ...AGED PARTS CEASE USE OF THE UNIT IMMEDIATELY AND CONTACT CUSTOMER SER VICE AT customerservice puregbi com OR BY CALLING 866 498 5269 Question Something was missing from the packaging I need to purchas...

Отзывы: