background image

Chapter 5: Programs

OneNote Mobile

Ikôn Rugged PDA (Windows Mobile 6.1) User Manual

91

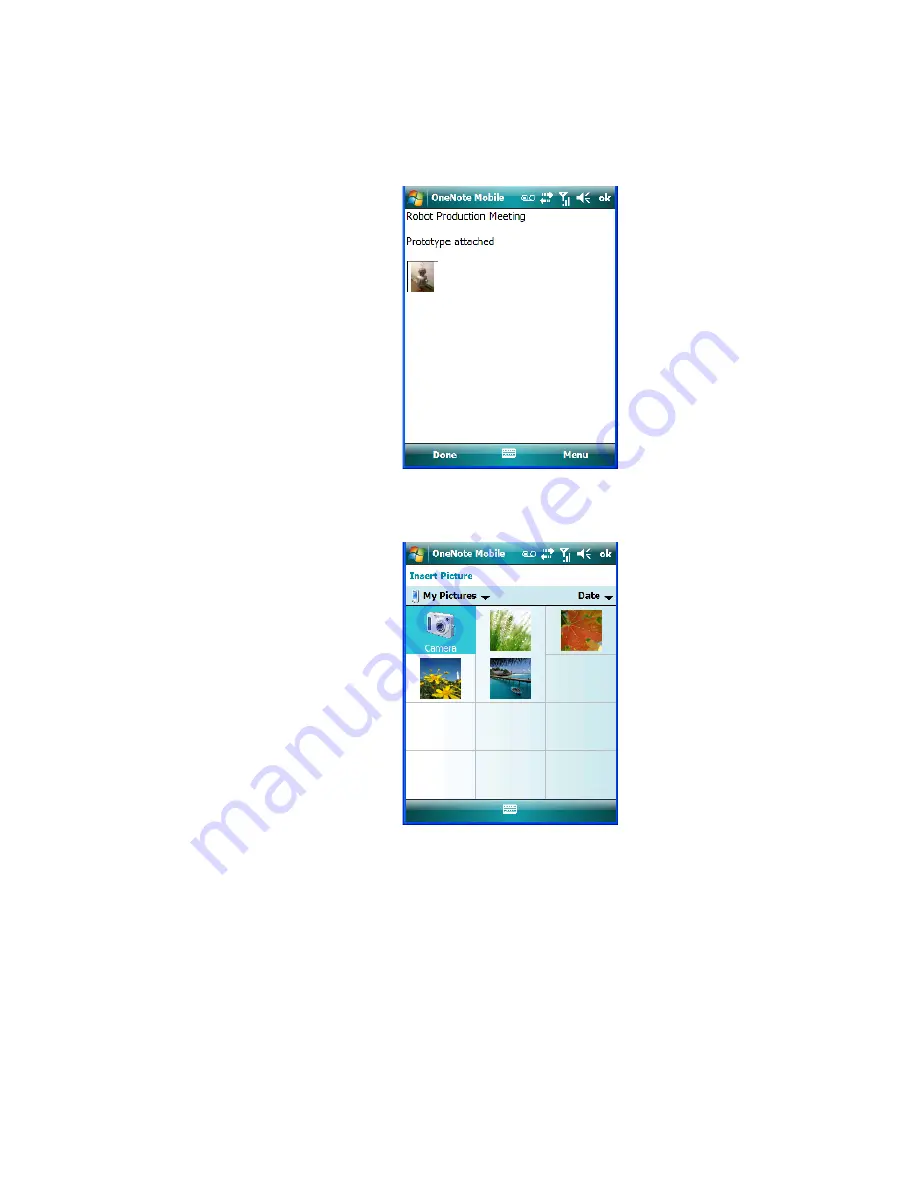
Press [ENTER] to snap a photo that is automatically inserted into your note.

Insert Picture:

 Tapping on this command automatically displays your 

My Pictures


folder where you can tap on an existing picture to insert it into your note.

Содержание Ikon 7505-BT

Страница 1: ...ISO 9001 Certified Quality Management System Ik n Rugged PDA Windows Mobile 6 1 Classic Professional April 16 2009 Part No 8100181 B...

Страница 2: ...made to make this material complete accurate and up to date In ad dition changes are periodically added to the information herein these changes will be in corporated into new editions of the publicat...

Страница 3: ...en The PC The Ik n 14 2 3 1 Using Microsoft ActiveSync 15 2 3 2 Using Windows Vista 15 2 4 Aligning Calibrating The Touchscreen 15 2 5 The Getting Started Centre 16 2 6 Setting Up An 802 11b g Radio S...

Страница 4: ...ientation 47 3 5 Ik n Indicators 47 3 5 1 LEDs 47 3 6 Audio Indicators 48 3 6 1 Adjusting Speaker Volume 48 3 7 Monitoring The Battery And Maximizing Run Time 48 3 7 1 Storing Batteries 49 3 8 Uploadi...

Страница 5: ...g A File 72 4 5 Using Menus 72 4 5 1 Pop Up Menus 72 4 6 The Softkey Bar 73 4 7 Programs Using Applications 75 4 8 Settings 76 4 9 Help 77 4 10 Entering Text 78 4 10 1 Soft Keyboard 78 4 10 2 The Tran...

Страница 6: ...A Photo 104 5 12 5 Editing A Photo 104 5 12 6 Creating A Slide Show 104 5 12 7 Using The Video Recorder 105 5 13 Remote Desktop Mobile 106 5 13 1 Connecting To A Terminal Server 107 5 13 2 Disconnect...

Страница 7: ...ne Windows Mobile 6 1 Professional Only 142 6 10 Sound Notifications 142 6 10 1 Sounds 143 6 10 2 Notifications 143 6 11 Today Screen 144 6 11 1 Appearance 144 6 11 2 Items 144 6 12 System Tab Setting...

Страница 8: ...Programs 170 6 29 Screen Icon 170 6 30 Task Manager 171 6 31 Teklogix Error Handling Service 173 6 31 1 ErrorLogInfo 173 6 31 2 NetLog 174 6 32 Teklogix Imagers Settings 175 6 33 Scanner Settings 176...

Страница 9: ...anager Icon 215 6 42 1 Flight Mode Disabling Wireless Components 215 6 42 2 Setting Up A Network Card 216 6 42 3 Network Adaptor Cards 216 6 42 4 Changing Network Card Settings 218 6 42 5 VPN Connecti...

Страница 10: ...9 7 6 3 Quad Dock Operation 260 7 6 4 Cleaning The CH4004 261 7 6 5 Troubleshooting 262 7 7 AC Wall Adaptor Model No PS1050 G1 262 7 8 Automotive Power Adaptor Model No CH3050 263 7 9 The Non Powered...

Страница 11: ...1 802 11 b g WLAN Radio 286 8 2 2 Siemens MC75 GSM GPRS EDGE Radio 286 8 2 3 Siemens HC25 UMTS Modem 288 8 2 4 Bluetooth Radio 290 8 3 Lithium Ion 5000 mAh Battery Specifications 291 8 4 Scanner Imag...

Страница 12: ...C 6 C 3 6 Modifying A Custom Preset C 7 C 3 7 Removing A Custom Preset C 9 C 4 Configuring The Bar Code Decoding Camera Presets C 9 C 4 1 Selecting A Camera C 10 C 4 2 Setting The Active Preset C 10...

Страница 13: ...E D 11 D 2 11 UPC EAN Shared Settings D 12 D 2 12 Code 93 D 13 D 2 13 Codabar D 14 D 2 14 MSI Plessey D 14 D 2 15 Interleaved 2 of 5 D 16 D 2 16 Discrete 2 of 5 D 16 D 2 17 RSS Code D 17 D 2 18 Compos...

Страница 14: ...D 4 4 EAN 13 D 38 D 4 5 EAN 8 D 39 D 4 6 UPC A D 39 D 4 7 UPC E D 40 D 4 8 Code 93 D 40 D 4 9 Codabar D 40 D 4 10 Interleaved 2 of 5 D 40 D 4 11 RSS Code Reduced Space Symbology D 41 D 4 12 Composite...

Страница 15: ...Ik n Rugged PDA Windows Mobile 6 1 User Manual 1 INTRODUCTION 1 1 1 About This Manual 3 1 2 Text Conventions 4 1 3 Ik n Rugged PDA Features 4 1 3 1 The Ik n Rugged PDA 6...

Страница 16: ......

Страница 17: ...With Windows Mobile 6 1 describes the Microsoft Windows Mobile 6 1 Today screen and how to use it This chapter also outlines basics like moving around a window displaying menus and so on Chapter 5 Pr...

Страница 18: ...nsactions All possible bar code input methodologies are supported by one of a variety of scanners available Optimization for specific operational environments is supported with a wide range of periphe...

Страница 19: ...ambidextrous one hand operation Backlit high durability hard capped keys Wireless Communication Optional expansion modules for 802 11b g proprietary module operating in the 2 4 GHz band Supports IEEE...

Страница 20: ...class 2 ver 2 0 support Enhanced Data Rate EDR for up to 3 Mbps data rate support Advanced Frequency Hopping AFH for reduced interference with 802 11b g radio 1 3 1 The Ik n Rugged PDA Figure 1 1 Ik n...

Страница 21: ...gure 1 2 Phone Keys Talk Key End Key Note The Talk and End phone keys printed on the Ik n shown in the picture above are useful for units equipped with Windows Mobile 6 1 Professional that support the...

Страница 22: ......

Страница 23: ...2 6 Setting Up An 802 11b g Radio Summit Client Utility 17 2 6 2 Using The SCU To Connect To The WLAN 17 2 7 The Phone Windows Mobile 6 1 Professional Only 20 2 7 1 The Phone Keypad 20 2 7 1 1 Sending...

Страница 24: ......

Страница 25: ...described in Chapter 7 Peripheral Devices Accessories 2 1 2 Installing The Battery To unlock the battery cover turn the left hand battery fastener to the left and turn the right hand battery fastener...

Страница 26: ...s remain on but the display keyboard backlight and processor are switched off When the Ik n is turned on from this state operation resumes within a few seconds in the screen in which you were working...

Страница 27: ...dios remain on Keep in mind that because the processor continues to run Standby mode consumes more power than Suspend mode Keep in mind that if you press and immediately release the Power button a dia...

Страница 28: ...s not reinstalled Windows Mobile Device Handbook guides you through the steps required to access these options Additional Windows Mobile Resources lists Windows Mobile web sites that provide additiona...

Страница 29: ...PC in the same way that you would between PC drives Back up Ik n files to the PC then restore them from the PC to the Ik n again if needed and so on 2 3 1 Using Microsoft ActiveSync You can install ac...

Страница 30: ...itially setting up your Ik n You can access the Getting Started centre from the Today screen or you can tap on Start Programs and then tap on the Getting Started icon Tapping on Getting Started displa...

Страница 31: ...obtained Tap on Start Settings Connections tab Wireless Manager icon In the Wireless Manager dialog box tap on the Settings button Tap on the Network Adapters tab and then tap on Summit WLAN Adapter i...

Страница 32: ...p on the Profile tab Tap on New to define a new Profile Type a unique name for your configuration using any alpha numeric combination to uniquely identify this profile Tap on OK to return to the Profi...

Страница 33: ...EP WPA PSK or WPA2 PSK Tap on the WEP PSK Keys button For Manual WEP choose up to four static WEP keys For PSK type an ASCII passphrase or hex PSK Configure any other settings that are supplied by the...

Страница 34: ...th your Ik n to for example send and receive phone calls make conference calls view your call history set up speed dial numbers etc 2 7 1 1 Sending Ending Phone Calls Using The Phone Keypad To display...

Страница 35: ...are connected to the first number tap on Menu Hold Type the second number Tap on Talk Tap on Menu Conference To add another party tap on Menu Hold type the number and then tap Menu Conference Tap on E...

Страница 36: ...speed dial key to which the phone number has been assigned Tap on the Speed Dial Number to the left of the phone number you want to dial or Tap on the Call softkey the number is dialled for you Using...

Страница 37: ...23 In the list choose a contact for a speed dial Tap on Enter a name and type a contact name or tap on a name in the list A sequential speed dial key is automatically assigned in the Location field Yo...

Страница 38: ...s Mobile 6 1 User Manual Using The Contact List To Program A Speed Dial Tap on the Contact softkey in the taskbar at the bottom of the Today screen Tap on the Contact to which you want to assign a spe...

Страница 39: ...and an End call key on the keyboard Using these phone keys you can display the phone keypad and answer send and terminate phone calls 2 7 3 Managing Phone Settings You can adjust phone settings such a...

Страница 40: ...ing Type allows you to tailor the type of ring used for incoming calls The Ring Tone drop down menu allows you to determine the ring tone of incoming phone calls Keypad This option allows you to deter...

Страница 41: ...Identification Number so that your PDA is protected from unauthorized use Your SIM card manufacturer provides the default PIN which you can change in this field Changing A PIN Tap on the Change PIN b...

Страница 42: ...te PIN security Tap in the checkbox to the left of Require PIN when phone is used When security is enabled you will be prompted to enter a PIN before you are allowed to use the phone Important If you...

Страница 43: ...hen a particular service dialog box you ve chosen is displayed you can always tap on Start Help to get additional information Voice Mail Setup If your service includes Voice Mail a temporary passcode...

Страница 44: ...one is unavailable You can also specify manual or automatic network changes and you can add a network 2 7 3 5 Data Tab This screen is used to configure the connection to the ISP You can select a netw...

Страница 45: ...ms stored on the flash file system and data are preserved whether you perform a cold or a warm reset RAM memory is cleared and the RAM disk is reinitialized The difference between the two forms of res...

Страница 46: ...Ik n Rugged PDA Windows Mobile 6 1 User Manual 2 8 2 Performing A Cold Reset To perform a cold reset and launch the Windows Mobile 6 1 operating system Press and hold down the ENTER key and the Power...

Страница 47: ...40 3 3 3 2 Locking Modifier Keys 41 3 3 4 The Keys 41 3 3 5 The Numeric Keyboard Accessing Alpha Keys 43 3 3 5 1 Choosing A Single Alpha Character 43 3 3 5 2 Creating Uppercase Letters 44 3 3 5 3 Cho...

Страница 48: ...al 3 9 Bluetooth Radio 50 3 9 1 Pairing A Bluetooth Headset 50 3 10 Inserting The microSD And SIM Card 51 3 10 1 Inserting The Cards 51 3 11 The Camera 52 3 12 General Maintenance 52 3 12 1 Caring For...

Страница 49: ...Ik n Rugged PDA Windows Mobile 6 1 User Manual 35 3 1 Features Of The Ik n Rugged PDA 3 LEDs Light Emitting Diodes Receiver Power Button RIGHT SIDE Enter Button Vertical Scroll LEFT SIDE Scan Button...

Страница 50: ...Ik n operates with a 5000 mAh Lithium Ion battery pack model number CH3000 Preparing the Ik n for operation requires that a battery pack be charged and installed in the Ik n Speaker Hand Strap Battery...

Страница 51: ...the RAM is only backed up for a short period of time If you choose Maximum Backup Time the Ik n shuts off with more energy left in the battery so RAM can be backed up for a longer period of time Refer...

Страница 52: ...arge the battery of up to four Ik ns inserted in the docking station see page 259 Note Do not leave a spare battery to charge for more than 72 hours Charging for more than 72 hours may damage the batt...

Страница 53: ...r Ik ns equipped with the Windows Mobile 6 1 Professional operating system Figure 3 3 QWERTY And Numeric Keyboards With Phone Keys Most of the keys on these keyboards operate much like a desktop compu...

Страница 54: ...LT keys operate much like a desktop keyboard except that they are not chorded two keys held down simultaneously The modifier key must be pressed first followed by the key whose function you want modif...

Страница 55: ...Modifier Key Once a modifier key is unlocked or turned off it is no longer displayed in the shift state in dicator icon 3 3 4 The Keys The SHIFT Key The SHIFT key is used to display uppercase alpha ch...

Страница 56: ...rasing the incorrectly entered key stroke The DEL key BLUE BKSP erases the character at the cursor position The ALT And CTRL Keys The ALT and CTRL keys modify the function of the next key pressed and...

Страница 57: ...ples below illustrate how to access A B and C all of which are printed in orange characters above the numeric key 2 To choose the letter a Press the ORANGE key and type the numeric key 2 To choose the...

Страница 58: ...efer to the softkey bar for a visual indication of which alpha key will be displayed on the screen Note Keep in mind that there is a time out if you pause for one second between key presses when selec...

Страница 59: ...efer to Backlight on page 146 for details 3 4 2 Adjusting the Backlight Using The Keyboard The display backlight can be adjusted using a keyboard key sequence The key sequence varies depending on the...

Страница 60: ...icon to display the Alignment tab Tap on the Align Screen button and follow the directions on the screen to align cali brate the screen Note This window provides two additional tabs ClearType and Text...

Страница 61: ...and so on 3 5 1 LEDs Three LEDs are located on the upper left side of the Ik n just above the display When you press the Power button the LED flashes yellow to indicate that the Ik n has been powered...

Страница 62: ...un Time As Lithium Ion batteries age their capacity decreases gradually and they are generally con sidered depleted after approximately 2 years of use less than 60 of original capacity remaining Keep...

Страница 63: ...us of the battery installed in your Ik n When the Ik n is switched off it goes into a low power suspend state but continues to draw a small amount of power from the battery This should not be an issue...

Страница 64: ...is equipped with an on board Bluetooth radio This type of radio enables short range data communication between devices The Bluetooth also provides the capability to use a Bluetooth enabled cellular p...

Страница 65: ...d the Ik n then prompts you to provide a passcode Type the passcode or PIN Personal Identification Number and then tap on Next The Ik n then displays a list of services Choose the Hands Free service I...

Страница 66: ...ctive coating on the inside The polyester can be permanently damaged by harsh chemicals and is susceptible to abrasions and scratches Using sharp objects on the touchscreen can scratch or cut the plas...

Страница 67: ...asive cleaners solvents or strong chemicals for cleaning The plastic case is susceptible to harsh chemicals The plastic is partially soluble in oils mineral spirits and gasoline The plastic slowly dec...

Страница 68: ......

Страница 69: ...sk Notification 63 4 2 6 Calendar Of Upcoming Appointments 66 4 2 6 1 Creating And Editing Appointments 66 4 2 6 2 Adding Reminders 67 4 2 6 3 Using Categories 68 4 2 6 4 Deleting Appointments 69 4 3...

Страница 70: ...56 Ik n Rugged PDA Windows Mobile 6 1 User Manual 4 10 3 Block Recognizer And Letter Recognizer 80...

Страница 71: ...ake selections and so on 4 2 Windows Mobile 6 1 Desktop Today Screen Keep in mind that if your Ik n is running Windows Mobile 6 1 Professional the Today screen will offer Phone connectivity in the Nav...

Страница 72: ...icons that when tapped open their associated programs If you re unit is equipped with Windows Mobile 6 1 Professional you ll be see a Phone hotkey for quick access to phone settings Start Button Tappi...

Страница 73: ...ab in the Settings window This tab provides access to Bluetooth network network card and internet connection setups Phone Settings If your Ik n is running Windows Mobile 6 1 Professional it is equippe...

Страница 74: ...peaker volume or turn the speaker on and off On units running Windows Mobile 6 1 Professional two volume adjustments are provided one for the speaker volume and the other for the phone dialer volume B...

Страница 75: ...nt date If you need to adjust the date or set an alarm In the Today screen tap on today s date The Clock Alarms screen is displayed Tap on the dropdown menu arrows to set the GMT time and date An opti...

Страница 76: ...ighlight the min utes and type the appropriate minutes or You can also assign the alarm activation time using the clock graphic Position the stylus on the hour hand of the clock and drag it to the cor...

Страница 77: ...l it will be indicated in the Today desktop screen To view your e mail tap on the E mail notification option represented by an icon in the shape of an envelope Refer to Messaging on page 110 for detai...

Страница 78: ...placed with a blink ing cursor If you prefer to type the task using the soft keyboard tap on the soft keyboard icon in the softkey bar Type your task description Tap anywhere in the blank part of the...

Страница 79: ...us on a task until a pop up menu is displayed Tap on Delete Task Marking A Task As Completed In the Tasks list tap the checkbox next to the items that are completed Sorting Tasks In the Tasks list tap...

Страница 80: ...Today screen or tap on Start Calendar to display the calendar If your unit is running Windows Mobile 6 1 Classic you can tap on Calendar in the Softkey Bar The default calendar displays an Agenda of...

Страница 81: ...nce of an appointment In the Reminder field choose Remind me from the dropdown menu In the second Reminder field tap on the number in the field to display a dropdown menu where you can define a numeri...

Страница 82: ...Using Categories Categories help you organize and track the different types of data you keep on your Ik n To assign an appointment to a category Tap on an appointment in the Today screen In the Calen...

Страница 83: ...with which you want to work 4 3 1 Customising The Start Menu You can choose the items you want to appear in the Start menu items you use most often Note You can create a new category by tapping on New...

Страница 84: ...e Menus icon Tap the checkboxes next to the items you would like to appear in your Start menu When you ve completed your selections tap on OK 4 4 Managing Files And Folders Windows Mobile 6 1 files ar...

Страница 85: ...ename A ring of dots is displayed fol lowed by a pop up menu Tap Rename The file name is highlighted Type a new name 4 4 3 Copying A File Press and hold the stylus on the file you want to copy A ring...

Страница 86: ...ing Menus In Windows Mobile 6 1 Classic and Professional the menu is located in the softkey bar at the bottom of the screen To execute a command Tap on Menu to display the commands associated with it...

Страница 87: ...Ik n is equipped with a softkey bar at the bottom of the screen It displays softkeys that allow you to access menus and commands It also displays the soft keyboard icon Softkeys Tapping on a softkey...

Страница 88: ...keyboard icon with the shift state indicator icon When a modifier key is pressed it is displayed in the shift state indicator icon In the example above the ORANGE key was activated To distinguish a l...

Страница 89: ...y the programs installed on your Ik n Figure 4 3 Program Screen Icons Opening An Application Tap on a Program icon to launch the associated program Minimizing An Application Tap on the X button in the...

Страница 90: ...ns to manage your opened applications End Task To shut down an application highlight the program in the list and tap on the End Task softkey in the taskbar at the bottom of the screen End All Tasks To...

Страница 91: ...Settings for details about the options available to you 4 9 Help Tapping on the Help option displays a screen of help topics that are content specific if for example the Today screen is displayed and...

Страница 92: ...s etc will appear in the document 4 10 1 Soft Keyboard The soft keyboard is laid out just like the keypad on a PC keyboard By tapping the stylus on letters and modifier keys like the SHIFT key you can...

Страница 93: ...5 Transcriber Screen Use your stylus to write a few words anywhere on the screen After a few seconds your words are recognized or not and are transcribed into typed text Editing Text Within The Trans...

Страница 94: ...our writing to the Block Recognizer input panel do not write in the body of the document Second write only uppercase letters with your stylus Tap on the icon in the Recognizer Icon Bar to display the...

Страница 95: ...e Letter Recognizer Input Panel do not write in the body of the document Second write only lowercase letters with your stylus Tap on the icon in the Recognizer Icon Bar to display the Character Recogn...

Страница 96: ......

Страница 97: ...Modes 94 5 6 3 2 Sharing Documents With Your PC 94 5 6 4 PowerPoint Mobile 94 5 7 File Explorer 95 5 8 Getting Started 95 5 9 PTSI Imager Demo 95 5 10 Internet Sharing 96 5 10 1 Creating An Internet C...

Страница 98: ...ile 106 5 13 1 Connecting To A Terminal Server 107 5 13 2 Disconnecting Without Ending A Session 107 5 13 3 Ending A Session 107 5 14 Summit Client Utility SCU 107 5 15 Search 108 5 16 Task Manager 10...

Страница 99: ...Microsoft Windows XP operating system ActiveSync Microsoft PC connectivity software can be used to connect the Ik n to PCs running this software By con necting the Ik n to a PC through your desktop do...

Страница 100: ...yed in the Programs window 5 6 1 Excel Mobile Excel Mobile is an abridged version of Microsoft Excel an electronic spreadsheet program If you re familiar the Excel application on your PC you ll be abl...

Страница 101: ...ions provided 5 6 2 OneNote Mobile You can use OneNote Mobile to take notes wherever you are and then synchronize your notes with a notebook section in the OneNote version on your PC For example you c...

Страница 102: ...your PC tap Synchronize with this desktop computer and then tap on Next Tap on Finish to begin the partnership between the Ik n and the PC Now you ll be able to pass notes back and forth between your...

Страница 103: ...ap on Start Programs Office Mobile icon Tap on the OneNote Mobile icon Tap on New to create a note page Begin typing When you complete your note tap on Done Note Remember that you can tap on the Menu...

Страница 104: ...le applet Undo Redo Cut Copy and Paste These commands operate in the same way as they do in any Windows Office application Format Tapping on this command lists the formatting options you can apply to...

Страница 105: ...s Mobile 6 1 User Manual 91 Press ENTER to snap a photo that is automatically inserted into your note Insert Picture Tapping on this command automatically displays your My Pictures folder where you ca...

Страница 106: ...ompleted your message Tap on Play to listen to your voice message To discard your message tap on X the Cancel button To save your message tap on OK An audio icon is displayed in your note You can tap...

Страница 107: ...owever that Word Mobile is designed for a small screen and limited memory Tap on Start Programs Office Mobile Word Mobile If Office Mobile is listed in your Start menu tap on Start Office Mobile and t...

Страница 108: ...pen a doc file and change it on the Ik n 5 6 4 PowerPoint Mobile PowerPoint Mobile works just like the desktop version that may be installed on your PC To launch this program on your Ik n Tap on Start...

Страница 109: ...p PC 5 8 Getting Started For information about the Getting Started applet refer to The Getting Started Centre on page 16 5 9 PTSI Imager Demo To run a demonstration of the Teklogix Imager applet featu...

Страница 110: ...nections tab Tap on the Connections icon Under My Work Network tap Add a new modem connection Type a name for the connection and choose Cellular Line GPRS or for 1xRTT con nections choose Cellular Lin...

Страница 111: ...Point choose Connect If it is not listed choose Create a new connection and use the New Connection Wizard to add the Ik n to the list 5 11 Notes The Notes application is an electronic notepad you can...

Страница 112: ...chosen Tap on OK when you re done Your note is automatically saved The file name is the first line of the note if you used the keyboard otherwise it s named Note1 Note2 and so on 5 11 2 Converting Ha...

Страница 113: ...ncorrectly converted word In the pop up menu choose Alternative to display a list of possible alternatives to the incorrectly converted word Your handwritten version is displayed along the top of the...

Страница 114: ...ename Move In the Name field type the new name and tap OK 5 11 4 Recording Notes It s sometimes easier to record a note than to write it down just to make certain that you ve captured an idea before i...

Страница 115: ...es program are copied to your PC and can be edited in Outlook s Notes module To review the steps required to synchronize a note with a Note page opened tap on Start Help Follow the steps in the Ik n h...

Страница 116: ...nted at The camera is built into the back of the Ik n Frame the image in the Ik n screen Press ENTER to snap the photograph Photo Menu When the camera is activated tapping on Menu displays a set of co...

Страница 117: ...er right click My Computer and click on Explorer drag photos from their folder to the Mobile Device My Pictures folder 5 12 3 Opening A Photo To open a photo tap on Start Programs Pictures Videos You...

Страница 118: ...d 5 12 5 Editing A Photo Tap a thumbnail photo to open it Tap on Menu Edit The Rotate command is now displayed in the softkey bar Additional editing tools are now listed in the Menu 5 12 6 Creating A...

Страница 119: ...he Video Recorder Ik n Rugged PDA Windows Mobile 6 1 User Manual 105 To display the slide show tool bar tap anywhere on the photo 5 12 7 Using The Video Recorder Tap on the Camera icon Flip View Play...

Страница 120: ...the video press ENTER again or tap on the Stop softkey 5 13 Remote Desktop Mobile This program allows you to log onto a Windows Terminal Server and run the desktop pro grams from the server on your I...

Страница 121: ...A Session In the Remote Desktop Connection window tap on Start Shutdown Tap on Disconnect OK 5 13 3 Ending A Session In the Terminal Services Client screen tap on Start Shutdown Tap on Log Off OK 5 14...

Страница 122: ...gh all files leave this option at All Data 5 16 Task Manager Refer to Task Manager on page 171 for details about this applet 5 17 Tasks This program helps you stay ahead of your schedule by managing y...

Страница 123: ...rn images on and off e mail links to friends and so on To go to a web site Connect your Ik n to the Internet If you re not certain how to do this tap on Start Internet Explorer to display a blank wind...

Страница 124: ...s on the Ik n and the copies on the mail server are broken When you next con nect the mail server will recognize that the messages are missing from the Ik n Inbox folder and delete them from the serve...

Страница 125: ...top of the screen Make certain that a check mark is displayed in the checkbox next to E mail Tap on OK Once you check E mail for synchronization Outlook e mail messages are synchronized as part of th...

Страница 126: ...in the Sync Options tab Tap on the Select Folder button Add a checkmark next to the folders in this screen that you want to synchronize with your Ik n and tap on OK The E mail Synchronization screen i...

Страница 127: ...y music and videos on your Ik n You can use Windows Media to play digital audio and video files that are stored on your Ik n or on the Web To work with this applet tap on Start Programs Windows Media...

Страница 128: ......

Страница 129: ...28 6 4 6 Scancode Remapping 129 6 4 7 Lock Sequence 132 6 5 Input 133 6 5 1 Input Method Tab 134 6 5 1 1 Word Completion 138 6 5 2 Options Additional Choices 138 6 6 Lock 139 6 7 Menus 140 6 7 1 Start...

Страница 130: ...3 6 22 GPS Global Positioning System Settings 154 6 23 Manage Triggers 159 6 23 1 Trigger Mappings 160 6 23 1 1 Add And Edit Trigger Mapping 161 6 24 Managed Programs 163 6 25 Memory 163 6 25 1 Main T...

Страница 131: ...183 6 33 4 1 Port Replicator Port A COM5 184 6 34 Total Recall 186 6 34 1 Creating A Backup Profile 187 6 34 2 Restoring A Profile 190 6 35 TweakIT 190 6 35 1 Advanced Interface And Network 191 6 35...

Страница 132: ...6 42 6 1 Editing A Connection 219 6 42 6 2 Changing A Connection Setting Name 219 6 42 7 Selecting A Network 220 6 42 8 Proxy Server Setup 221 6 42 8 1 Changing Advanced Proxy Server Settings 222 6 4...

Страница 133: ...Ik n Rugged PDA Windows Mobile 6 1 User Manual 119 6 44 6 2 Inbox 236 6 44 6 3 Outbox 237 6 44 6 4 SMS Configuration 238 6 45 Windows Update 239...

Страница 134: ......

Страница 135: ...his screen Figure 6 1 Settings Tabs 6 2 Personal Settings The Personal tab allows you to tailor the general behaviour of your Ik n such as defining input methods Start menu options owner information p...

Страница 136: ...le 6 1 User Manual Tap on Start Settings and then tap on the App Launch Keys icon To assign an application key Tap the Add button Press the key you want to use to launch an application If an unsupport...

Страница 137: ...special pa rameters to your application launch key If you don t want to assign any parameters you can leave the Data field blank If for example you want to assign an application launch key to launch t...

Страница 138: ...ol Sliding the Delay before first repeat bar to the left decreases the delay between key repeats while sliding the bar to the right increases the repeat delay time Sliding the Repeat rate bar to the l...

Страница 139: ...mes With the ORANGE key locked on if you press 2 twice and then pause between key presses for 1 second the letter b will be selected automatically Moving the Sequence slider to the right increases the...

Страница 140: ...ly until the next key is pressed If you choose OneShot Lock and then press the modifier key twice it is locked on remain ing active until the modifier key is pressed a third time to turn it off Show M...

Страница 141: ...or positions The macro keys can be pro grammed to replace frequently used keystrokes along with the function of executable keys including ENTER and BKSP function keys and arrow keys Recording And Savi...

Страница 142: ...Tap on the Delete button 6 4 5 Unicode Mapping Tap on the Unicode Mapping tab to display this screen The Unicode Mapping tab is used to map combinations of virtual key values and CTRL and SHIFT state...

Страница 143: ...a number that is associated with a physical key on a keyboard Every key has a unique scancode that is mapped to a virtual key a function or a macro Scancode Remap ping allows you to change the functi...

Страница 144: ...can be overwritten for each of these three tables using the Scancode Remapping tab The first column in the Scancode Remapping tab displays the Scancodes in hexidecimal If the scancode is remapped to...

Страница 145: ...key is sent If No Force is selected the shift state is dependent on whether the shift state is on or off at the time the virtual key is sent When Function is selected a list of valid functions appears...

Страница 146: ...board tap in the checkbox next to Enable key lock sequence If you want the keyboard to be locked at startup tap in the checkbox next to Keyboard locked at startup Otherwise leave this option disabled...

Страница 147: ...d in the softkey bar when the keyboard is locked To unlock the keyboard type the key sequence again 6 5 Input The Input icon provides access to text input options you can use to tailor the soft keyboa...

Страница 148: ...display your options A dropdown menu next to Input method allows you to tailor your methods of input Block Recognizer Keyboard Letter Recognizer and Transcriber Block Recognizer Block Recognizer teach...

Страница 149: ...le Use gestures for the following keys these keys are removed from the soft key board Gestures are handwriting shortcuts for the keyboard keys Before you can enable this option you ll need to tap on t...

Страница 150: ...e tabs of options are available to you Quick Settings Inking and Advanced Quick Settings The Quick Settings tab allows you choose the writing direction the icons indicate direction In addition you can...

Страница 151: ...space after automatically adds a space after each word you write The Pen option allows you to choose the line Width and Colour Finally tapping on Match Letter Shapes to your writing displays a screen...

Страница 152: ...displays what it assumes is the complete word saving you having to type the word in its entirety You can also tailor how and when you want word sug gestions made 6 5 2 Options Additional Choices This...

Страница 153: ...vice unused to turn on password protection Choose the amount of time that the unit can remain idle before you are prompted to enter your password In the Password type dropdown menu choose the type of...

Страница 154: ...ptions to customise the Start Menu Tap on Start Settings and then tap on the Menus icon 6 7 1 Start Menu Tab This tab allows you to define the items that will be listed in your Start menu In the Start...

Страница 155: ...r Information Tapping on Start Settings and then tapping on the Owner Information icon allows you to add your personal information to the Ik n Some of this information will be displayed in the desktop...

Страница 156: ...and then tapping on the Phone icon allows you to adjust phone settings such as the ring type and tone choose phone services such as barring calls and you can also determine network selections 6 10 So...

Страница 157: ...o buttons to enable the event s that will cause your unit to emit a sound 6 10 2 Notifications This tab allows you to determine how you are notified about different events Choose an event from the Eve...

Страница 158: ...of the Today screen the desktop screen Tap on Start Settings and then tap on the Today icon 6 11 1 Appearance This screen allows you to customize the background displayed on the Today screen Choose th...

Страница 159: ...en the About icon displays a grouping of tabs that provide device information Version Tab This tab outlines the Windows Mobile 6 1 version processor information memory size and a description of the ex...

Страница 160: ...a dropdown menu Each category contains a group of default settings If you change a default setting the category is automat ically changed to Custom settings 6 15 Backlight Tap on Start Settings then t...

Страница 161: ...al Power This tab determines the behaviour of the backlight when the Ik n is using external rather than battery power 6 15 3 Intensity This tab is used to adjust the light intensity of the display bac...

Страница 162: ...nstalled in the unit Personal certificates establish your identity Intermediate certificates as the name suggests identifies intermediate certifi cation authorities and Root certificates establish the...

Страница 163: ...fy intermediate certification authorities Root Certificates To view details about a certificate who issued the certificate to whom it was issued the issue date and the expiry date tap on a certificate...

Страница 164: ...te tap the desired certificate Your Ik n will connect automatically 6 17 Clock Alarms Located under Start Settings System tab the Clock Alarm icon allows you to set the current date and time and it al...

Страница 165: ...n allows you to encrypt the data on your storage card Note If you want to make this option inaccessible go to Start Settings and tap on the About Device icon In the Experience tab remove the checkmark...

Страница 166: ...ows Mobile 6 1 User Manual Tap on Start Settings System tab Encryption icon 6 20 Error Reporting Error Reporting allows you to enable or disable Microsoft error reporting prompts Tap on Start Settings...

Страница 167: ...ent mapping programs can run on your Ik n Tap on Start Settings System tab GPS icon Tap on the GPS program port dropdown menu and choose the communication COM port that the GPS software will use to co...

Страница 168: ...f this is the case Tap on the Access tab and disable Manage GPS automatically recommended You can go to www microsoft com pocketstreets if a map viewing program is not included with your Ik n and copy...

Страница 169: ...dropdown menu is used to control when the GPS is powered on and off Off the GPS module is left off always Always on the GPS module is powered on at all times regardless of the power state of the Ik n...

Страница 170: ...ick location updates as the vehicle moves When the GPS module is set to this profile and the vehicle enters an area such as a tunnel where satellite coverage is interrupted it will attempt to predict...

Страница 171: ...have greater difficulty calculating a fix AGPS reduces Time To First Fix TTFF and increases the likelihood of finding and keeping a fix in poor coverage areas such as indoor sites AGPS downloads sate...

Страница 172: ...ult settings option is generally acceptable for most applications Note that aside from the Update field in which you can choose how long the fix is stored in your Ik n the field values cannot be edite...

Страница 173: ...last updated and so on If GPS module support service is re quired you may be asked to tap on the Save button in this tab and forward the information to Psion Teklogix support staff 6 23 Manage Trigger...

Страница 174: ...ed key is pressed the trigger consumer for example a decoded scanner is sent a message Double Click When a key is pressed and released then pressed again within the configured time between 0 to 1000 m...

Страница 175: ...t you can add new trigger mappings Edit Tapping this button brings up the Edit mapping dialog so that you can edit existing trigger mappings Remove Tapping this button removes an existing mapping OK T...

Страница 176: ...osen in this menu when the trigger is pressed released and then pressed again a double click event will occur If a mapping with the Up down type has also been configured for the same source it will on...

Страница 177: ...ntrol of their device deployment with respect to security management and access to the corporate network To access Managed Program Tap on Start Settings System tab Managed Programs icon 6 25 Memory Th...

Страница 178: ...llocated for file and data storage and for program storage 6 25 2 Storage Card The Storage Card screen indicates the total storage card or RAM disk memory along with the amount in use 6 26 Power Icon...

Страница 179: ...y Tab This tab allows you to view the remaining battery capacity 6 26 2 Advanced Tab The Advanced tab allows you to manage battery consumption On Battery Power When the Ik n is operating on battery po...

Страница 180: ...en the Ik n is drawing external rather than battery power this option allows you to deter mine the number of minutes the unit will remain on when not in use Tap in the checkbox to the left of On exter...

Страница 181: ...t to Enable Bluetooth switches on the built in Bluetooth radio 6 26 5 Card Slots When you select one or more of the card slots listed power is supplied to the enabled slot s Clicking on the Apply butt...

Страница 182: ...s installed or the unit is inserted in a docking station or cradle Slide the Suspend Threshold button to the right to increase the battery capacity reserved for backup purposes Data will be preserved...

Страница 183: ...the Start menu Go to standby on suspend forces the Ik n to enter Standby mode In Standby mode applications processors and services e g Blue tooth continue to run even while the Ik n is powered down ma...

Страница 184: ...ch of the items and choose how each item should be displayed on your Ik n 6 28 Remove Programs Tap on Start Settings Tap on the System tab followed by the Remove Program icon Tapping on the Remove Pro...

Страница 185: ...Settings Tap on the System tab and then tap on the Screen icon 6 30 Task Manager The Task Manager screen lists all running tasks applications or processes This applet pro vides a number of options to...

Страница 186: ...Manager screen is opened End Task To shut down an application highlight the program in the list and tap on the End Task softkey in the taskbar at the bottom of the screen Task Manager Menu The Task M...

Страница 187: ...sses based on Memory size CPU or application or process Name Refresh Updates the list of applications or processes Exit Closes the Task Manager 6 31 Teklogix Error Handling Service Tap on Start Settin...

Страница 188: ...etrieve and forward the information file to our offices 6 31 2 NetLog The NetLog option is used to log network traffic When you tap in the checkbox to the left of Enable NetLog Debug Capturing debug d...

Страница 189: ...nciple uses of the applet are to decode bar codes and to capture images To launch this applet Tap on Start Settings System tab and then tap on the Teklogix Imagers icon A PTSI Imager demo applet is al...

Страница 190: ...Manual To launch the demo Tap on Start Programs and then tap on the PTSI Imager icon 6 33 Scanner Settings The Teklogix Scanners icon in the Settings menu provides access to dialog boxes in which you...

Страница 191: ...Settings The Scanner Menu The dropdown menu to the right of the Scanner option allows you to choose from one of the following scanner types used with your Ik n Decoded internal Decoded Intermec ISCP...

Страница 192: ...ouble click produces different results depending on whether or not a value is assigned in the Click Data parameter When a value is not assigned for the Click Data double click ing the scanner trigger...

Страница 193: ...appears where you can enter a value Good Scan Beep And Bad Scan Beep These parameters determine whether or not the Ik n emits an audible scanner beep when a good successful scan or a bad unsuccessful...

Страница 194: ...uses double byte Chinese characters choosing this option will filter data through the local ASCII of that OS and display it accurately in this example using double byte characters If you choose ISO 88...

Страница 195: ...Chapter 6 Settings Translations Tab Ik n Rugged PDA Windows Mobile 6 1 User Manual 181 In the Translations tab tap on a Case to create rules...

Страница 196: ...yed in which you can define the rule 6 33 3 1 Case Rules The case rules are defined as follows No rule ignored Match at index matches the match string at a specified index Match and replace at index m...

Страница 197: ...isplayed in the scan log file see Scan Log File on page 179 when enabled This is useful if a case fails and you are trying to de termine why a rule is failing 6 33 4 Ports Tab While you cannot configu...

Страница 198: ...on enable and off Baud Double tapping on this parameter displays a pop up window in which you can choose an ap propriate baud rate Data Bits This parameter determines the number of data bits included...

Страница 199: ...n which you can choose the appropriate Parity Stop Bits This parameter specifies the number of stop bits 1 1 5 2 used for asynchronous communication Trigger On Sequence And Trigger Off Sequence If a S...

Страница 200: ...When you press the trigger key the Trigger On Sequence is sent and when you release the trigger key the Trigger Off Sequence is sent turning the trigger key on and off 6 34 Total Recall Total Recall...

Страница 201: ...Selected Profile View Selected Profile Data and Delete Selected Profile Keep in mind that until a profile is created only one option is available Create Backup Profile 6 34 1 Creating A Backup Profile...

Страница 202: ...device only creates a profile that automatically restores itself following a cold start Finally choose a Profile Location Tap on the Next button to display the next dialog box Add Files Add Files By...

Страница 203: ...rofile you can view a list of all files selected files databases and or the registry If you re satisfied with the items in the profile tap on Next Performing The Backup Tap on Backup to begin the proc...

Страница 204: ...oose Restore Selected Profile from the dropdown menu and choose the Profile Name you want to restore In the next screen tap on Restore to restore your profile 6 35 TweakIT This utility allows you to t...

Страница 205: ...Pv6 This option allows you to enable Internet Protocol version 6 that has been published to use 128 bit IP address replacing version 4 Modem Logging When this option is enabled the Ik n logs AT comman...

Страница 206: ...tion is restricted to the Temp folder that is data are always loaded from the FTP Server to the Temp folder and from the Temp folder to the FTP Server If this option is disabled a warm reset must be p...

Страница 207: ...ignal strength Setting AP Density to Low will cause the radio to wait until the signal strength is significantly low before attempting to connect to another Access Point Depending on your site configu...

Страница 208: ...ected to reduce power consumption Another benefit is that when Radio Power Management is enabled even when no activity is detected the access point does not disassociate the Ik n 6 35 4 User System Se...

Страница 209: ...or software updates and if found downloads updates to your Ik n You can choose to have updates checked automatically or if you prefer you can determine when your unit will check for updates 6 37 Conne...

Страница 210: ...setups Tapping on a hotkey displays a bubble that pro vides information about your connections and provides a shortcut to the Wireless Manager applet where you can set up your connections Automatic N...

Страница 211: ...e bottom of the screen will automatically connect to a network that s already been set up Tapping on Settings in the network bubble will launch the Wireless Manager applet If you prefer not see this n...

Страница 212: ...uetooth Setup Bluetooth is a global standard for wireless connectivity for digital devices and is intended for Personal Area Networks PAN The technology is based on a short range radio link that opera...

Страница 213: ...Bluetooth enabled devices and it allows you to pair devices To add a new device Tap on Add new device The Ik n scans for a Bluetooth device within a 10 meter range Any Bluetooth devices within range...

Страница 214: ...Rugged PDA Windows Mobile 6 1 User Manual Highlight the device you want to add Tap on Next If required type your Passcode If not skip this step and just tap on Next A pop up message lets you know that...

Страница 215: ...r on and bring the device within 10 meters of the Ik n before proceeding with the discovery process described below Note To connect to a Bluetooth equipped device that s already been added tap on the...

Страница 216: ...n on Bluetooth is checked Bluetooth features are available If this option is dis abled you cannot send or receive information using Bluetooth When Make this device visible to other devices is enabled...

Страница 217: ...s option allows you to assign an outgoing COM port number To work with an existing COM port number tap and hold the stylus on an existing port To assign a new port number make certain that your Ik n i...

Страница 218: ...and choose the device with which you want to communicate from the list You can also tailor the behaviour of your Ik n so that you are prompted to choose the device with which you want to communicate...

Страница 219: ...e limited and are widely used In Windows Mobile 6 1 the COM Ports tab is used to assign a virtual outgoing COM port to a Paired Bluetooth service and the Outgoing Port tab is used to assign multiple o...

Страница 220: ...GPRS Phone Once you ve completed the Bluetooth settings you can go ahead and set up communication through your Bluetooth equipped phone Before you begin make certain that the Bluetooth phone is turned...

Страница 221: ...the list tap phone and then tap on Next 8 In the PIN screen type a personal identification number PIN you can enter up to 16 characters 9 Enter the same PIN on the phone 10 If you wish you can edit th...

Страница 222: ...ed PDA Windows Mobile 6 1 User Manual 6 40 Connection Properties This applet is used to set up serial modem connections Tap on Start Settings Connections tab Connection Properties icon Choose a connec...

Страница 223: ...of bits for the data going through this port Possible values are 4 5 6 7 8 Parity This parameter determines the type of parity checking used on the data going through the port The options are none odd...

Страница 224: ...tion when using a modem disable this option tap in the checkbox to the left of this option Wait For Credit Card If you are paying for calls with a credit card enter the number of seconds you want the...

Страница 225: ...example launch Internet Explorer on your Ik n to browse the Internet Your Ik n automatically connects 6 41 1 Modem Connection Setup Before you begin you ll need the following information from your ISP...

Страница 226: ...Tap on the Connections tab followed by the Connections icon 2 To create a new connection in either My ISP or My Work Network tap on Add a new modem connection 3 In the Make New Connection screen type...

Страница 227: ...administrator 9 Tap on the Finish button If you need to edit the Advanced settings refer to Advanced Modem Settings in the next section Note Generally you will not need to change any of the Advanced s...

Страница 228: ...our server assigns IP addresses dynamically you will not need to change these settings Servers requiring assigned IP addresses may also need a way to map computer names to IP addresses The Ik n suppor...

Страница 229: ...io highlight the radio and tap on the Disable button 6 42 1 Flight Mode Disabling Wireless Components To disable all wireless components when for example you are taking your Ik n onto a plane where wi...

Страница 230: ...connection on your Ik n 6 42 3 Network Adaptor Cards When the network card is inserted in your unit for the first time the Network Settings screen is displayed automatically so that you can configure...

Страница 231: ...dress and or Name Servers tab If necessary use a network cable to connect the network card to your network Refer to the documentation shipped with your network card for details To activate the connect...

Страница 232: ...rk tap on Add a new VPN server connection In the Name field type a name for this connection In Host name IP type the VPN server name or IP address Tap on the VPN type radio button next to the type of...

Страница 233: ...ess and hold the stylus on the connection you want to activate Choose Connect from the pop up menu To delete a connection press and hold the stylus on the connection you want to delete Choose Delete f...

Страница 234: ...are used for private network connec tions corporate networks while My ISP settings are used for Internet network connections When you use programs such as Internet Explorer your Ik n automatically con...

Страница 235: ...ollowing information proxy server name server type port type of Socks protocol used and the user name and password Tap Start Settings Tap on the Connections tab followed by the Connections icon Note I...

Страница 236: ...he Proxy server field type the proxy server name Tap on OK to save your changes 6 42 8 1 Changing Advanced Proxy Server Settings To change advanced settings such as the port number or proxy server typ...

Страница 237: ...e area networking data transfer capabilities 6 44 1 Softkey Bar Icons Wireless WAN icons in the softkey bar indicate the status of your wide area network con nection Note that these icons are only vis...

Страница 238: ...strength is between 61 and 80 Signal strength is between 81 and 100 A CDMA 1xRTT packet data connection is active 6 44 2 Establishing A Connection Tap on Start Settings Tap on the System tab followed...

Страница 239: ...nal strength while a connection is active The Rx bytes and Tx bytes fields esti mate the amount of data transmitted and received respectively 6 44 3 1 Shutting Down The Wireless WAN User Interface Whi...

Страница 240: ...or states states that may disappear without interaction may be displayed Emergency calls only The modem has found a network but is not allowed to register e g no roaming agreement between networks The...

Страница 241: ...internal software error has occurred If a reset does not clear this condition Psion Tek logix technical support may need to investigate further 6 44 5 Tools Menu The Tools menu in the main Wireless W...

Страница 242: ...e used with the same device The connection parameters are adjusted automatically when a new SIM card is detected this may require a reset The connection parameters are retrieved from a database Manual...

Страница 243: ...o matic configuration may be used to automatically pick the correct manually configured profile for each SIM card For this to work each profile has to be configured while the corre sponding SIM card i...

Страница 244: ...anually configured profile has a secret password and unauthorized access to the device is a concern even after the SIM PIN has been entered the password should not be entered in the New Data Profile d...

Страница 245: ...he New PIN entry field is greyed out The Require PIN on resume checkbox is independent of the aforementioned settings By de fault this checkbox is unchecked While the checkbox remains unchecked any PI...

Страница 246: ...which you know to support packet data roaming Automatic network selection is enabled or disabled by checking or unchecking Enable auto matic network select in the Network dialog box When automatic net...

Страница 247: ...s WAN driver is started as soon the Driver Mode dialog box is closed using the OK button Since all currently supported modems are automatically detected the Enable automatic port detection checkbox sh...

Страница 248: ...power is not applied to the modem and a driver is not loaded neither the serial port driver nor the Wireless WAN driver If the checkbox is checked power is applied to the modem and the drivers are loa...

Страница 249: ...re the modem remains powered during suspend mode have several advantages When the Ik n wakes from suspend mode the modem is ready immediately modem or network initializa tion is not required A packet...

Страница 250: ...cter indicating an international number i e the country code follows immediately after the character By checking the Store message in Outbox field a new message can be stored in the Outbox before bein...

Страница 251: ...e can be read including the original formatting line breaks are replaced by spaces in the Inbox message list Pressing the Reply button opens the new message dialog as described above except the destin...

Страница 252: ...gardless of the setting The user interface tries to keep the SMS storage location available for a new incoming message if the Delete oldest message when full checkbox is checked In this case when a ne...

Страница 253: ...Mobile 6 1 User Manual 239 6 45 Windows Update This program checks for software updates and if found downloads updates to your Ik n You can choose to have updates checked automatically or if you prefe...

Страница 254: ......

Страница 255: ...ntrols 255 7 5 2 Indicators 255 7 5 3 Operation 255 7 5 3 1 Charging The Ik n Battery 255 7 5 3 2 Charging A Spare Battery 256 7 5 3 3 Operating The USB Dock 256 7 5 4 Cleaning The CH4000 258 7 5 5 Tr...

Страница 256: ...e Ik n In The Vehicle Cradle 265 7 9 2 4 Removing The Ik n From The Vehicle Cradle 266 7 9 3 Vehicle Cradle Mounting Recommendations 266 7 9 3 1 Mounting Template 266 7 9 4 Cleaning The CH1000 Vehicle...

Страница 257: ...taching The Hand Strap The hand strap is attached by fixing the ends of the strap to the anchors located on the back and bottom of the unit see Figure 7 1 on page 244 Carrying Accessory Model Number H...

Страница 258: ...4 Ik n Rugged PDA Windows Mobile 6 1 User Manual Figure 7 1 Attaching The Hand Strap Bottom of Ik n Back of Ik n Hand Strap Anchor Velcro Pad Underneath Velcro Tab Eyelet for Tether Elastic Stylus Hol...

Страница 259: ...d Strap With Tether Model No CH6021 Ik n Rugged PDA Windows Mobile 6 1 User Manual 245 1 Attach the hand strap to the Ik n by looping the Velcro tab around the pin and adhering the tab to the Velcro p...

Страница 260: ...he plastic loop on the hand strap and install the screws 4 Adjust the hand strap by pulling up the Velcro tab and readjusting to your hand as needed Attaching The Stylus Tether To The Hand Strap The s...

Страница 261: ...s Accessories The Hand Strap With Tether Model No CH6021 Ik n Rugged PDA Windows Mobile 6 1 User Manual 247 2 Thread the tether through the eyelet on the strap 3 Pass the stylus through the tether loo...

Страница 262: ...ows Mobile 6 1 User Manual 4 Slip the stylus into the elastic holder and you re finished 7 1 2 Attaching The Tether Model No CH6020 The tether can be installed to the back of the Ik n to provide a sec...

Страница 263: ...PDA Windows Mobile 6 1 User Manual 249 Attaching The Velcro Retainer Attach the retainer to the Ik n by looping the Velcro tab around the pin and adhering the tab to the Velcro pad Velcro Tab Elastic...

Страница 264: ...d PDA Windows Mobile 6 1 User Manual Attaching The Stylus Tether To The Retainer 1 If not assembled thread the tether cord through the stylus as shown pulling the cord tight 2 Thread the tether throug...

Страница 265: ...n screen and keyboard for functionality 7 2 The Battery The Ik n operates with a 5000 mAh Lithium Ion battery pack 7 3 Adaptor Cable Options The following are adaptors can be ordered for your Ik n No...

Страница 266: ...igned with different applications in mind Do not operate the AC adaptor with a damaged cord or plug Replace immediately Do not disassemble the AC adaptor it should be repaired by qualified service per...

Страница 267: ...qualified service personnel Do not use a docking station if the battery while charging becomes more than lukewarm 7 4 2 Installation Chargers And Docking Stations When installing a charger or docking...

Страница 268: ...sufficient power to concurrently support all the above functions The CH4000 uses careful charge algorithms designed to maximize battery life while ensuring the shortest possible charge time The charg...

Страница 269: ...us of the spare battery 7 5 3 Operation 7 5 3 1 Charging The Ik n Battery The CH4000 supplies DC power to enable the Ik n internal fast charger Normally it takes 2 5 to 3 0 hours to charge the 5000 mA...

Страница 270: ...in this state once the battery is completely charged 7 5 3 3 Operating The USB Dock The CH4000 Desktop Docking Station offers a rear mounted host or device USB connec tion to the Ik n The Ik n suppor...

Страница 271: ...uld between PC drives A USB cable is included with your docking station To link the Ik n to a PC Insert the Ik n in the desktop docking station Insert the USB cable into the docking station Type B USB...

Страница 272: ...unit or with the docking station Use an Ik n with a properly functioning charge indicator to isolate the problem 7 5 5 3 Ik n Charge LED Fast Flashes Green If the Ik n charge LED the left most LED fas...

Страница 273: ...working battery it is defective and requires service 7 6 Quad Docking Station Model No CH4004 The CH4004 Quad Docking Station is a desktop model designed to accept up to four Ik n Rugged PDAs The dock...

Страница 274: ...ntly but firmly to seat them securely During the charge the Ik n LED slow flashes green When the battery capacity reaches 95 the LED turns solid green 7 6 3 2 Connecting To The Ethernet Network The re...

Страница 275: ...n on the host and on the Ik n must have a recovery mechanism in the event that the Ik n is removed from the dock interrupting the link 7 6 4 Cleaning The CH4004 Use only mild detergent or soapy water...

Страница 276: ...uires service 7 6 5 3 Green LED OFF When Connected To A Network Check the Category 5 5e cable Replace if the cable is suspect Contact your network administrator 7 6 5 4 Yellow LED OFF When Connected T...

Страница 277: ...adaptor Insert the DC power plug into the DC IN port at the base of the Ik n located between the tether and LIF ports Plug the pronged end into an AC outlet 7 8 Automotive Power Adaptor Model No CH30...

Страница 278: ...CH1000 vehicle cradle is a passive device designed to securely grip the Ik n The cradle design permits access for the DC input cable to connect to the Ik n see Figure 7 9 on page 265 A stylus holder A...

Страница 279: ...he CH1000 has no front indicators The Ik n LED serves as the power indicator 7 9 2 3 Placing The Ik n In The Vehicle Cradle Connect the vehicle power to the Ik n prior to inserting it in the vehicle c...

Страница 280: ...he vehicle cradle is shipped with detailed mounting instructions including a drill template Refer to the CH1000 Ik n Rugged PDA Vehicle Cradle Quick Start Guide PN 8000163 In every case please take th...

Страница 281: ...cable leave a 10 2 cm 4 in clearance at the bottom of the vehicle cradle Leave a 17 8 cm 7 in clearance at the top of the vehicle cradle to allow easy removal of the Ik n When selecting a mounting loc...

Страница 282: ...peaker identical to the one on Ik n that offers hands free functionality The powered cradle detects when the Ik n is docked and can automatically transfer the speaker function from the Ik n to the cra...

Страница 283: ...d all instructions and markings on the housing Do not operate a vehicle cradle if damaged by a sharp blow dropped or otherwise damaged in any way qualified service personnel should inspect for interna...

Страница 284: ...sues that require careful attention An improperly mounted vehicle cradle may result in one or more of the following operator injury operator visibility obstruction operator distraction and or poor eas...

Страница 285: ...y instructions that are pack aged with the pedestal when selecting a mounting location 7 10 1 1 Mounting Template For detailed mounting instructions including a drill template refer to the CH1005A Ik...

Страница 286: ...se cables should only supply operating power from the vehicle to the Powered Vehicle Cradle from 12VDC or 24VDC systems Warning Applying a voltage above 36VDC or reversing polarity may result in perma...

Страница 287: ...le will run on its internal battery However if the operator switches the key off repeatedly for long periods during a shift it may make more sense to wire the vehicle cradle before the switch In this...

Страница 288: ...til it bottoms in the cradle the locks on the latches will engage This can be one smooth motion if you wish Electrical contact will not be made until the Ik n is fully inserted On a vehicle it s a goo...

Страница 289: ...afety information in the Ik n Rugged PDA Regulatory Warranty Guide PN 8000148 before proceeding 7 11 1 Scanning Techniques Hold the scanner at an angle Do not hold it perpendicular to the bar code Do...

Страница 290: ...he problem is not with the bar code Check that the bar code is within the proper range Does the Ik n display the warning without scanning This suggests a hardware problem in the Ik n Is the laser beam...

Страница 291: ...tre of the bar code you want to scan or in the centre of the area in which multiple bar codes are to be scanned The illumination LEDs will flash typically several times and a picture of the bar code s...

Страница 292: ...throughput To minimize the impact on the backbone 802 11g net work Psion Teklogix recommends using Bluetooth peripherals that have low transaction rates such as printers and scanners Refer to Bluetoot...

Страница 293: ...ifications 286 8 2 1 802 11 b g WLAN Radio 286 8 2 2 Siemens MC75 GSM GPRS EDGE Radio 286 8 2 3 Siemens HC25 UMTS Modem 288 8 2 4 Bluetooth Radio 290 8 3 Lithium Ion 5000 mAh Battery Specifications 29...

Страница 294: ......

Страница 295: ...portrait mode TFT Adjustable Backlight Sunlight readable for outdoor use High reliability LED backlight Easily replaceable and customizable bezel Passive stylus or finger operation Signature capture...

Страница 296: ...On the Go OTG functionality One Low Insertion Force LIF docking connector DC Power Jack Power Management Battery Pack Lithium Ion 5000 mAh capacity Advanced Smart Battery with gas gauge 3 power source...

Страница 297: ...ndows Mobile Device Center Voice dialer and Personal Information Manager PIM included with Windows Mobile 6 1 Professional PTX Connect VoIP Optional Open TekTerm terminal emulation software supports I...

Страница 298: ...ce Bluetooth class 2 version 2 0 Support Enhanced Data Rate EDR for up to 3Mbps data rate Support Advanced Frequency Hopping AFH for reduced interference with 802 11b g radio 8 1 4 Bar Code Applicatio...

Страница 299: ...10 100 BaseT Ethernet and charge functions Desktop dock with Type A and Type B USB connectivity and charge functions for an internal battery along with a spare battery Power supplies AC wall adaptor...

Страница 300: ...nas 2 1 dBi Transmit Power 802 11b 70mW 18 5 dBm 802 11g 30mW 15 dBm Frequency Range 2 400 2 4897 GHz Channels FCC 11 ETSI 13 TELEC 13 RX Sensitivity 96dBm 1 Mbps 90 dBm 11 Mbps 94 dBm 6 Mbps 75 dBm 5...

Страница 301: ...Mobile station class B Modulation and coding scheme MCS 1 9 GPRS data transmission GPRS class 12 Mobile station class B PBCCH support Coding schemes CS 1 4 CSD data transmission Up to 14 4 kbps V 110...

Страница 302: ...GSM1800 Class 1 30dBm 2dB for GSM1900 Class E2 27dBm 3dB for GSM 850 8 PS Class E2 27dBm 3dB for GSM 900 8 PS Class E2 26dBm 3 4dB for GSM 1800 8 PSK Class E2 26dBm 3 4dB for GSM 1900 8 PSK Class 3 2...

Страница 303: ...S 1 4 MCS 1 9 Uplink coding schemes CS 1 4 MCS 1 9 Uplink coding schemes CS 1 4 MCS 1 9 BEP reporting SRB loopback and test mode B 8 bit 11 bit RACH PBCCH support 1 phase 2 phase access procedures Lin...

Страница 304: ...50Ohms External antenna can be con nected via antenna connector or antenna pad spring contact Module interface 50 pin board to board connector 8 2 4 Bluetooth Radio Embedded 920 kbps serial interface...

Страница 305: ...2V max Cell Configuration 2P1S 2 parallel connected cells Maximum charge voltage 4 2V 1 Recommended charge termination timeout 5 0 hr charging must stop Charge temperature 0 C to 40 C 32 F to 104 F Di...

Страница 306: ...1 cm H x 2 16 cm W x 1 55 cm max 0 47 in H x 0 85 in W x 0 61 in D max Symbologies UPC EAN Code 128 Code 39 Code 93 I 2 of 5 Discrete 2 of 5 Codabar MSI Plessey Decode Zone Typical 4 mil 1 0 in 5 5 in...

Страница 307: ...ISBT Interleaved Matrix Industrial and Standard 2 of 5 Codabar Code 93 93i Code 11 MSI Plessey Telepen PDF417 Micro PDF417 Ambient Light Works in any lighting conditions from 0 to 100 000 lux Shock 20...

Страница 308: ...Supply voltage 5 V 10 Power supply 3 6 Volt DC nominal 2 7 5 Volts DC Connectivity USB 1 1 or serial async Connector to the interface board Molex 52892 1295 or HiRose FH12 12S 5SH Symbologies supporte...

Страница 309: ...t Total darkness to 100 000 lux full sunlight Illumination LEDs 626 nm 30 nm Aiming LEDs 526 nm 30 nm Laser 650 nm 10 nm Symbologies supported 2D PDF417 MicroPDF417 MaxiCode Data Matrix QR Code Aztec...

Страница 310: ...ing Range 8 3 mil Linear 02 cm 10 mil PDF417 025 cm 13 mil UPC 033 cm 15 mil Data Matrix 038 cm 15 mil QR 038 cm 35 mil Maxi code 089 cm Near 3 5 in 8 9 cm 3 1 in 7 9 cm 2 1 in 5 3cm 2 3 in 5 8 cm 2 1...

Страница 311: ...tting Up An 802 11b g Radio Summit Client Utility on page 17 A 1 SCU Tabs This section provides a detailed description of each of the tabs available in the SCU Main Profile Status Diags and Global A 2...

Страница 312: ...at the radio can be used in any domain Status Indicates if the radio is associated to an access point If this is not the case Association Status indicates the radio status Auto Profile When this optio...

Страница 313: ...it a name Rename Allows you to assign a profile name Delete Deletes the profile unless it is currently active Scan Opens a new window which displays a list of available access points with their respec...

Страница 314: ...er Max Maximum defined for current regulatory domain Measured in mW 50 30 10 1 Max Bit Rate Used by radio when interacting with WLAN access point Auto Rate automatically negoti ated with access point...

Страница 315: ...otected Access 2 WPA2 as well as predecessors such as WPA and WEP Summit software includes an integrated suppli cant that supports a broad range of security capabilities including 802 1X authenticatio...

Страница 316: ...y and domains SCU EAP Types The following EAP types are supported by the integrated supplicant and can be configured in SCU PEAP MSCHAP PEAP GTC LEAP and EAP FAST With each of these four types if auth...

Страница 317: ...actions while the profile is the Active Profile Cause the Ik n to go through a power cycle or suspend resume Disable and enable the radio or tap the Reconnect button on the Diags windows Modify the pr...

Страница 318: ...radio IP address and MAC address for the AP signal strength channel transmit power and data rate A 5 Diags Tab Use the Diags tab as a troubleshooting tool The functions are as follows Re connect Enabl...

Страница 319: ...the radio state profile settings global settings and BSSID list of APs The SCU is saved to a file called _sdc_diag txt in the Windows directory A 6 Global Settings Tab The Global settings tab allows...

Страница 320: ...radio scans for available APs more aggressively Aggressive scan ning complements and works in con junction with the standard scanning that is configured through the Roam Trigger Roam Delta and Roam Pe...

Страница 321: ...words On SCU as well as EAP authentica tion dialog boxes hide passwords WEP keys and other sensitive information On Off Off Admin Password Password that must be specified when Admin Login button is pr...

Страница 322: ...itted on a ping Bytes 32 64 128 256 512 1024 32 Ping Timeout ms Amount of time in milliseconds that passes without a response before ping request is considered a failure Integer from 0 to 30000 5000 P...

Страница 323: ...Input These 3 pins are connected together 4 VDD_EXT_PWR 5 BATT_OUT VDD_BATT_OUT Output 6 AUDIO_P Output Audio positive 7 AUDIO_N Output Audio negative 8 VDD_USBOTG Bi directional USB Power 5 5V As ou...

Страница 324: ...it rate 115 kbits sec 15 RXDATA Input RS 232 data receive Max bit rate 115 kbits sec 16 GND DGND Pin Pin Name Signal Direction Rela tive To DPA Comment Pin Pin Name Direction Relative To DPA Comment 1...

Страница 325: ...Contact Pinout PIN Signal Name Description 1 BATT RAW Positive lead of battery Provides mechanical polarity 2 BATT RAW Positive lead of battery 3 BATT CLK SMBus data clock 4 BATT THERM Thermistor 10K...

Страница 326: ......

Страница 327: ...ined preset Create a custom preset based on a predefined preset A preset is a group of exposure and image correction settings Each preset config ures the imager for a specific purpose such as bar code...

Страница 328: ...rity of the most popular bar codes and their subtypes The bar code decoding symbology predefined presets define which bar codes can be decoded The bar code decoding camera predefined presets determine...

Страница 329: ...ager can decode See Imager on page D 37 for a description of these symbologies C 2 3 Bar Code Decoding Camera Predefined Presets The following presets enable successful bar code image capture in almos...

Страница 330: ...ut 300 Lux Motion This preset uses a shorter exposure time so as to freeze motion Low light near This preset is designed for dark conditions it uses a longer exposure time and includes the flash C 3 U...

Страница 331: ...has more than one built in camera one camera must be selected for configura tion To select a camera Tap on the Camera Presets dropdown menu to view the camera options Choose a camera either Front Imag...

Страница 332: ...ight a preset and tap on the View button The associated preset window is displayed Tap on the sign to expand the lists so that you can view the parameter settings C 3 5 Creating A Custom Preset A new...

Страница 333: ...he dialog box Tap on OK to save your changes The preset list is displayed the new custom preset appears at the end of the list It is marked as read and write C 3 6 Modifying A Custom Preset The parame...

Страница 334: ...ameter list until you reach the parameter that you want to change For a parameter that can take a range of values Highlight the parameter and then press the SPACE key or double click the parameter An...

Страница 335: ...om preset you want to delete and tap on the Remove button A window is displayed warning you that you are about to remove a preset Tap on Yes to remove the preset or No to cancel the operation C 4 Conf...

Страница 336: ...mager located at the top of the unit or Bottom Colour Camera the camera located at back of the Ik n C 4 2 Setting The Active Preset An active preset has an A to the right in Figure C 2 on page page C...

Страница 337: ...lists so that you can view the parameter settings C 4 4 Creating A Custom Preset A new custom preset is created by modifying a preset either a predefined preset or an ex isting custom preset To create...

Страница 338: ...om preset can be modified It is recommended that very few changes be made to a custom preset To ensure that it will work reliably it should be as close as possible to the original predefined preset To...

Страница 339: ...then press the SPACE key or double click on the parameter Either method toggles between the two available values When you ve completed your edits tap on OK The parameter list is displayed the new val...

Страница 340: ...C 4 8 Setting The Active Preset An active preset has an A to the right in Figure C 2 on page page C 9 the active preset is Defaults To set an active preset Highlight the preset and tap on the Activate...

Страница 341: ...set A new custom preset is created by modifying a preset either a predefined preset or an ex isting custom preset To create a custom preset Highlight a preset and tap on the Add button A screen like t...

Страница 342: ...nsure that it will work reliably it should be as close as possible to the original predefined preset To change a parameter value Highlight the custom preset and tap on the Edit button Tap on the symbo...

Страница 343: ...lable values When you ve completed your edits tap on OK The parameter list is displayed the new value for the changed parameter is shown Tap on OK to exit to the preset list and save the changes C 4 1...

Страница 344: ...y Default is the active preset In this case the changes to the symbology configuration are also made in the Teklogix Scan ners applet When My Default is not the active preset In this case the changes...

Страница 345: ...t the parameter and then press the SPACE key or double click the parameter An associated dialog box containing the valid range of values for the parameter and the current setting like the sample scree...

Страница 346: ...For instructions on adding editing and removing translation rules refer to the Translations Tab on page 180 C 4 16 Advanced Tab C 4 16 1 File Locations For Captured Images To configure the location fo...

Страница 347: ...oose the Location in which your files will be saved When you have completed all the changes tap on the Save button C 4 16 2 Configuring Triggers Viewing The Trigger Configuration The trigger on the Ik...

Страница 348: ...iggers on page 159 C 5 Teklogix Scanners Applet The bar code symbologies that are to be read by the imager can be enabled using the Tek logix Scanners applet Tapping on Start Settings System tab follo...

Страница 349: ...Decoded internal Decoded Intermec ISCP or Imager The symbologies listed change to reflect the scanner you choose and the bar codes it supports Keep in mind that some bar code types are only available...

Страница 350: ...alue of 0 msec 200 msec or 400 msec A value of 0 zero disables the target dot Aim Duration This parameter determines the total time the aiming pattern appears before the scanner laser begins sweeping...

Страница 351: ...r is in a standby state drawing minimal power until a trigger pull or serial communication wakes it Keep in mind that while this option is more suitable for battery powered applications there will be...

Страница 352: ...codes must be successfully read twice before being decoded Linear security level 3 specifies that code types other than the following must be success fully read twice before being decoded The followi...

Страница 353: ...ble tapping on this parameter displays a dialog box in which you can enter a value from 1 to 15 D 2 4 Data Options Decoded Internal Scanner Transmit Code ID Char A code ID character identifies the sca...

Страница 354: ...ting this parameter to on enables the scanner to interpret any Extended Channel Interpre tations ECIs supported by the scanner This parameter has no effect on symbols that were not encoded using ECIs...

Страница 355: ...ngths where you can define the code length that will be decoded by your scanner Choosing One discrete length allows you to decode only those codes containing a selected length Choosing Two discrete le...

Страница 356: ...Keep in mind that increased levels reduce decode security When you double tap on this parameter a dialog box is displayed in which you can enter a decode performance level of between 1 and 3 Length R...

Страница 357: ...decoded bar code Press the key you want to insert in the dialog box attached to this parameter The ASCII Unicode key value of the keypress is displayed Strip Leading This parameter determines the num...

Страница 358: ...curity When you double tap on this parameter a dialog box is displayed in which you can enter a decode performance level of between 1 and 3 Length Restriction Refer to Length Restriction on page D 8 f...

Страница 359: ...idered part of the symbol Add Remove Data Refer to Add Remove Data on page D 9 for details D 2 10 UPC E Enabled UPC E Set this parameter to on to allow UPC E bar code scans Enabled UPC E1 Set this par...

Страница 360: ...er to recognize Bookland EAN bar codes Supplementals Supplementals are additionally appended characters 2 or 5 Double tapping this parameter displays a list of options If Ignore is chosen UPC EAN is d...

Страница 361: ...his parameter to on to enable Code 93 or off to disable it Set Length L1 And Set Length L2 Lengths for Code 93 can be set for Any length Length within a range One discrete length or Two discrete lengt...

Страница 362: ...h allows you to decode only those codes containing a selected length Choosing Two discrete lengths allows you to decode only those codes containing two selected lengths Length within a range allows yo...

Страница 363: ...type within a specified range from 6 to 55 Check Digits Double tapping on this parameter displays a dialog box in which you can choose One or Two check digit s If this parameter is set to One it is as...

Страница 364: ...hose codes containing a selected length Choosing Two discrete lengths allows you to decode only those codes containing two selected lengths Length within a range allows you to decode a code type withi...

Страница 365: ...tion Refer to Length Restriction on page D 8 for details Add Remove Data Refer to Add Remove Data on page D 9 for details D 2 17 RSS Code Enable Setting this parameter to on enables 2D RSS Code scanni...

Страница 366: ...omponents of a composite symbol Enable CC C And Enable CC AB To activate these components set these parameters to on Enable TLC 39 This composite component integrates MicroPDF417 with the linear code...

Страница 367: ...t was encoded in Code 128 symbols If Code 128 Emulation is enabled the following Micro PDF 417 symbols are transmitted with one of the following prefixes C1 if the first codeword is 903 907 912 914 91...

Страница 368: ...plays a dialog box in which you can enter a value between 1 and 10 seconds D 3 2 Advanced Options Decoded Scanner Continuous Scan Mode Setting this parameter to on keeps the laser on and continuously...

Страница 369: ...meter determines the number of reads required from 0 to 10 times Same Read Timeout Prevents the same bar code from being read more than once The value assigned determines after what time period the sc...

Страница 370: ...on of using one of the two start stop characters or both char char and char Check Digit Verification Uses the specified algorithm of the option you ve chosen to ensure the integrity of the symbol data...

Страница 371: ...Conversion FNC1 Conversion allows the embedded FNC1 character to be converted to another char acter for applications that cannot use the default GS Group Separator or hex 1d Double tapping on this op...

Страница 372: ...ding distance Check Digit Verification The available options for this parameter are Disabled or French CIP This parameter uses the specified algorithm of the option you ve chosen to ensure the integri...

Страница 373: ...d Convert To EAN 13 If this parameter is enabled an EAN 8 bar code is converted to EAN 13 Add Remove Data Refer to Add Remove Data on page D 9 for details D 3 7 UPCA Enabled Set this parameter to on t...

Страница 374: ...and is affected by UPC A pro gramming selections e g Check Digit Add Remove Data Refer to Add Remove Data on page D 9 for details D 3 9 UPC EAN Shared The setting assigned to the Addendum parameter a...

Страница 375: ...r EAN UCC GTIN To use GTIN processing you must activate the EAN 128 symbology Reading Range This parameter determines the reading distance from which a bar code can be successfully scanned The default...

Страница 376: ...acters 1 5 10 in the 14 character label used in the USA by libraries using the CLSI system Check Digit Verification When enabled this parameter checks the integrity of a symbol to ensure it complies w...

Страница 377: ...ta does not contain that algorithm the data is not transmitted Transmit Check Digit If the check digit is to be transmitted with the data this parameter must be enabled Plessy Transmit Check Digit If...

Страница 378: ...to 255 The length of a code refers to the number of characters i e human readable characters including check digit s Length Restriction Refer to Length Restriction on page D 8 for details Add Remove D...

Страница 379: ...gnized by your scanner Length Mode You can chose to set L1 as Minimum Length or L1 L2 L3 as Fixed Length Length Restriction Refer to Length Restriction on page D 8 for details Add Remove Data Refer to...

Страница 380: ...not contain that algorithm the data is not transmitted Transmit Check Digit If the check digit is to be transmitted with the data this parameter must be enabled Set Length L1 Set Length L2 And Set Le...

Страница 381: ...able RSS 14 RSS 14 code can be either purely linear or split in half with one half stacked on top of the other half Stacking the code reduces the bar code length and providing the nominal height of th...

Страница 382: ...ar Transmission Only is enabled only the linear code portion of the composite bar code is transmitted when scanned UPC EAN Composite Message This option allows you to choose how UPC EAN shared bar cod...

Страница 383: ...417 Length Restriction Refer to Length Restriction on page D 8 for details Add Remove Data Refer to Add Remove Data on page D 9 for details D 3 22 Micro PDF 417 Enabled Set this parameter to on to ena...

Страница 384: ...Restriction Refer to Length Restriction on page D 8 for details Add Remove Data Refer to Add Remove Data on page D 9 for details D 3 23 Codablock Enable Codablock A Set this parameter to on to enable...

Страница 385: ...get dot is pointed at the centre image and only that image is returned Max Number Barcodes This parameter specifies the maximum number of bar codes the imager will attempt to decode in an image A maxi...

Страница 386: ...eck Digit Verification When this parameter is enabled set to on the integrity of a Code 39 symbol is checked to ensure that it complies with specified algorithms Length Restriction Refer to Length Res...

Страница 387: ...nal the scanner searches for an addendum and if one exists appends it to the main bar code When the parameter is set to Required the scanner does not accept the main bar code without an addendum Add R...

Страница 388: ...led Set this parameter to on to enable Code 93 Length Restriction Refer to Length Restriction on page D 8 for details Add Remove Data Refer to Add Remove Data on page D 9 for details D 4 9 Codabar Ena...

Страница 389: ...fer to Length Restriction on page D 8 for details Add Remove Data Refer to Add Remove Data on page D 9 for details D 4 11 RSS Code Reduced Space Symbology Enable Setting this parameter to on enables R...

Страница 390: ...D 9 for details D 4 15 2D Data Matrix Enable Set this parameter to on to enable Data Matrix Inverse Video Mode Enabling this parameter allows the imager to read inverse bar codes white symbols pre se...

Страница 391: ...le 2D QR Code Field Size Refer to Field Size on page D 8 for details D 4 17 2D Maxicode Enabled Set this parameter to on to read 2D Maxicode images Length Restriction Refer to Length Restriction on pa...

Страница 392: ...20 Postal PostNET Enabled Set this parameter to on to enable Postal PostNET Length Restriction Refer to Length Restriction on page 8 for details Add Remove Data Refer to Add Remove Data on page 9 for...

Страница 393: ...Refer to Length Restriction on page 8 for details Add Remove Data Refer to Add Remove Data on page 9 for details D 4 24 Postal Royal Enabled Set this parameter to on to enable Postal Royal Length Rest...

Страница 394: ...ndix D Bar Codes Settings Postal Canadian D 4 26 Postal Canadian Enabled Set this parameter to on to enable Postal Canadian Length Restriction Refer to Length Restriction on page 8 for details Add Rem...

Страница 395: ...D 2 aiming dot duration of D 2 alarm setting 61 alarms setting 150 aligning touchscreen 45 All Predefined preset C 2 alpha keys accessing 43 appending to bar codes characters 178 App Launch icon 121...

Страница 396: ...up 206 Mode tab 202 Bluetooth specs 290 boot reset 31 Built In Devices tab 167 Built in Devices tab 167 Buttons icon 124 One Shot tab 125 Sequence tab 125 Up Down Control tab 124 C calculator 86 calen...

Страница 397: ...modem setup 211 network selecting 220 network cards setting up 216 Proxy Server setup 221 VPN setting up 218 connections managing 218 Connections Internet 210 connectivity hotkey 59 connectivity hotke...

Страница 398: ...RSS Expanded D 17 D 33 Enable RSS Limited D 17 D 33 Enable RSS 14 D 17 D 33 Enable TLC 39 D 18 Error Handler Psion Teklogix 173 Error Reporting 152 Ethernet connecting with docking station 260 Ethern...

Страница 399: ...ion D 24 ISBT Concat Any Pair D 24 ISBT Concat Transmit D 23 ISBT 128 D 9 D 23 ISM band Bluetooth radio 198 ISO 8859 1 Latin 1 code page 180 K keyboard one shot mode 125 options 135 Scancode remapping...

Страница 400: ...Minimum Length D 22 D 24 D 27 D 29 D 30 D 31 D 33 Minimum Size D 9 Mode Bluetooth 202 modem setup 211 Baud Rate 209 Call Options 210 Cancel If Not Connected 210 Data Bits 209 Dial String Commands 210...

Страница 401: ...port pinouts B 1 C 1 portrait orientation 47 Port Replicator Port A COM5 184 Baud 184 Data Bits 184 Parity 185 Stop Bits 185 Trigger On Sequence 185 ports docking port B 1 Port Settings modem setup 2...

Страница 402: ...ensional 1D internal scanner 276 safety warnings 275 techniques scanning 275 troubleshooting tips 276 two dimensional 2D imager scanner 277 scanner module SE 955 specs 291 scanner options 275 scanning...

Страница 403: ...D 6 UPC A Check Digit D 11 UPC A Preamble D 11 UPC EAN D 12 UPC EAN Shared Settings D 26 UPC E Check Digit D 11 UPC E Preamble D 11 UPC E1 Check Digit D 11 UPC E1 Preamble D 11 1D internal 276 2D Max...

Страница 404: ...s tether CH6020 attaching 248 Suffix D 6 Suffix Char D 9 Summit Client Utility SCU 17 Supp Redundancy Code 128 D 12 Supplementals UPC EAN D 12 Surface Glossy C 3 Suspend 12 swap time for battery 37 SX...

Страница 405: ...AN Shared Settings D 26 UPC E Check Digit D 11 UPC E Preamble D 11 UPC E1 Check Digit D 11 UPC E1 Preamble D 11 UPC Half Block Stitching 2D D 13 V vehicle cradle CH1005A powered 268 powered installing...

Страница 406: ......

Отзывы: