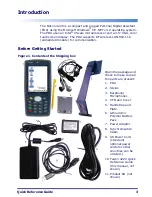
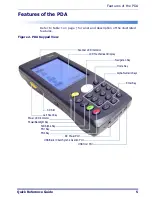
PSC Falcon 4220 Скачать руководство пользователя страница 9

Features of the PDA

Quick Reference Guide

7

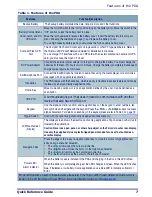
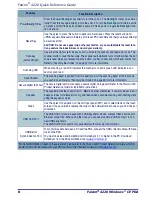
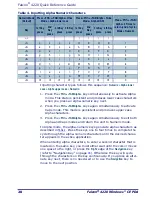
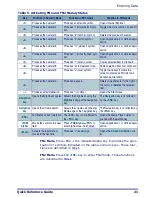
Table 1. Features of the PDA

Features

Function/Description

Backup Battery 

 The backup battery maintains the date, time, memory, and other functions. 

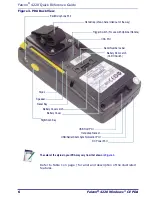
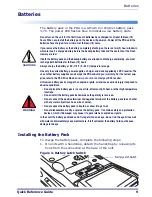
Battery Compartment, 

Cover, Latch, and On/

Off Switch

Move the On/Off Switch to the “On” position to open the battery door. Move the switch to the 
“Off” position to lock the battery door in place.
Move the latch upwards to release the battery cover. Insert the battery into this compart-
ment, following the directions on page 

11

 and replace the battery cover.

To use high capacity battery pack, you must use the high capacity battery cover. 
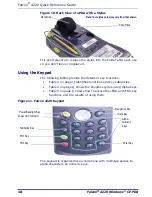
Compact Flash (CF) 

Slot

The Compact Flash card slot accepts storage cards or other CF type peripherals. Refer to 
the 

Falcon 4220 Product Reference Guide

 for installation instructions.

To use a larger CF interface such as an RF card with an external antenna, camera or GPS 
card, you must use the Open CF Cover.
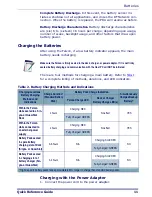
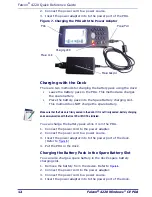
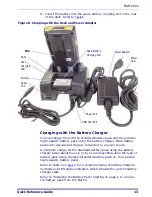
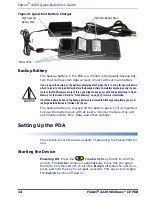
DC Power Adaptor 

Connect the external power adaptor to this port to charge the battery. You must charge the 
batteries for thirteen (13) hours prior to first use. Charge the battery completely. Subsequent 
charge cycles require four (4) hours. 

Ear/Microphone Port

Connect the Ear/Microphone to listen to audio files using the media player, or record voice 
messages with an applicable application.

Handstrap

The PDA comes with the handstrap, which is easily removable to access features and can be 
replaced by an ergonmically designed handle.

Home Key

Moves to desktop window or runs an application defined by the user. Can be defined as a 
scan button.

IrDA Port

A communications port that uses Infrared to communicate with another 
device that also has an IrDA port.
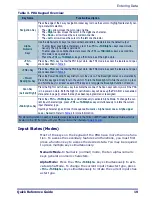
Keypad

Use the alpha-numeric, function, and navigation keys on the keypad to enter numbers, let-
ters, symbols and navigate with the keypad. Press the 

<FN2> + <Tab/Alpha>

 keys to access 

alpha characters. For details on each key in the keypad, please refer to Table 3 on 

page 19

.

Trigger Switch

Used with the optional ergonomically designed handle accessory.

LCD/Touchscreen 

(Display)

The display screen shows the desktop and running applications. Tap on screen with stylus to 
interact with applications.

Caution: Never use a pen, pencil, or other sharp object on the Falcon’s touchscreen display. 
Use only the supplied stylus or plastic-tipped pens intended for use with a touchscreen-
sensitive display. 

Navigation Key

Press the edge of the 4-way navigation rocker key to move the cursor or highlighted text 
entry during a menu/list selection.

The 

<Up> 

arrow moves the cursor 

up

 one line.

The 

<Right> 

arrow moves the cursor to the 

right

 one character.

The 

<Down> 

arrow moves the cursor 

down

 one line.

The 

<Left>

 arrow moves the cursor to the 

left 

one character.

Power LED /

Alarm Indicator

When the battery pack is installed in the PDA and charging in the Dock, this LED is Red. 

When the battery is completely charged, the LED changes to Green. When the LED flashes 
blue, it indicates a low battery. Some applications use a blue LED to indicate an Alarm or 
Error. 

For more information on each of these features, please refer to the 

Falcon 4220 Product Reference Guide, which is 

located on the CD that came with your PDA and/or on the internet at www.psc.com

www.psc.com

.

Содержание Falcon 4220

Страница 1: ...Quick Reference Guide Falcon 4220 Windows CE NET Ruggedized PDA...

Страница 2: ...contacting PSC Customer Administration Electronic versions may either be downloadable from the PSC web site www pscnet com or provided on appropriate media If you visit our web site and would like to...

Страница 3: ...y 14 Setting Up the PDA 14 Starting the Device 14 Adjusting the Brightness 15 Calibrating the Touch Screen 15 Setting up the RF Card 16 Adjusting the Volume 16 Setting the Date and Time 16 Entering Da...

Страница 4: ...4 Appendix C PSC Falcon Warranty 35 Appendix D Safety Information 36 Safety Labels 36 Advisory Statements 38 Regulatory Statements 38 Radio Frequency Interference 38 Canadian Compliance Statement 38 A...

Страница 5: ...02 11b embedded module for communication Before Getting Started Figure 1 Contents of the Shipping box Open the package and check to make sure all the parts are present 1 PDA 2 Stylus 3 Earphone Microp...

Страница 6: ...Power off the PDA until the batteries have charged for a minimum of thirteen 13 hours When you install the battery pack the device will power on Power off the PDA until the batteries have charged for...

Страница 7: ...ion of the illustrated features Figure 2 PDA Keypad View Scanner LED Indicator LCD Touchscreen Display Navigation Key Home Key Power Backlight Key Power LED Indicator Left Scan Key SD Slot DC Power Po...

Страница 8: ...here rolled out of the way IrDA Port Trigger Switch For use with Optional Handle Reset Key Battery Cover Latch Right Scan Key Stylus DC Power Port Ear Microphone Port Speaker Battery Cover USB Serial...

Страница 9: ...ication defined by the user Can be defined as a scan button IrDA Port A communications port that uses Infrared to communicate with another device that also has an IrDA port Keypad Use the alpha numeri...

Страница 10: ...g beam at the bar code you wish to scan Refer to Scanning Bar Codes on page 23 for more information Secure Digital SD Slot The secure digital card slot accepts a secure digital storage card Refer to t...

Страница 11: ...charge the battery at 32 113 F 0 45 C temperature range Use only the correct battery power supplies charger and dock supplied by a PSC reseller The use of other battery supplies can damage the PDA an...

Страница 12: ...ck 5 Slide the battery latch up and press the cover into place sliding the battery lock down again see Figure 6 6 Move the Battery Latch Switch to the On position see Figure 4 7 Connect the Power Adap...

Страница 13: ...er adapter Make sure the Falcon is firmly seated in the dock charger or power adaptor If it is not firmly seated battery charging and communication with the Host PC will NOT be initiated Charging Loca...

Страница 14: ...DA 1 Connect the power cord to the power adapter 2 Connect the power cord to a power source 3 Insert the power adapter into to the power port of the dock Refer to Figure 8 4 Put the PDA in the dock Ch...

Страница 15: ...ce A complete charge for the standard battery pack using the battery charger takes about four six 4 6 hours depending upon the type of battery pack being charged standard battery pack vs the optional...

Страница 16: ...on The Backlight comes on automatically Press this key again briefly to turn the unit off To turn the Backlight off while the unit is on press and hold the key for at least a second This key acts to...

Страница 17: ...operation of the device Adjusting the Brightness The factory default for the Brightness is set at maximum You can adjust the brightness to your environment and comfort 1 Press the FN2 key while simult...

Страница 18: ...comfort 1 Press the FN2 key while simultaneously pressing on the Up or Down edge of the Navigation key 2 Press the Up edge to increase volume and the Down edge to decrease volume No screen will open 3...

Страница 19: ...Use the bar code scanner to enter data Press the trigger or scan button to initiate a scan The scanned data will be entered into the current application s open file Refer to Scanning Bar Codes starti...

Страница 20: ...es functions and key categories Table 4 on page 20 shows the keypress cycles using Alpha keys Table 5 on page 21 shows how to access the FN2 and FN1 key functions and the results of using them Figure...

Страница 21: ...time This state is also persistent Press the FN1 TAB Alpha keys a third time to exit the Alpha state FN1 Key Press the FN1 key to enter the FN1 input state Use FN1 mode to access the features and ope...

Страница 22: ...e alpha numeric characters until the desired charac ter appears in the active application When entering alpha characters to enter a second character that is located on the same key you must either wai...

Страница 23: ...duces caret symbol Copies selected item to clipboard 8 Produces the numeral 8 Produces ampersand sign Pastes selected item from clipboard 9 Produces the numeral 9 Produces plus symbol Toggle these key...

Страница 24: ...e a new item in the current program select File New View Refer to Figure 12 to view the Command bar Figure 12 Application Navigation The Task Bar The Task bar at the bottom of the screen displays the...

Страница 25: ...l In applications that accept keyed input the soft input panel SIP can be used to enter data using the stylus The SIP is a digital QWERTY style keyboard Figure 13 Soft Input Panel To open the SIP tap...

Страница 26: ...15 Scanning Beam Positions 4 Press the Right or Left Scan key The scanner scans as long as you hold the key or for five 5 seconds Before being able to scan bar codes you must open the Quick ScanSet ap...

Страница 27: ...charge the batteries and to communicate with a Host PC Refer to Charging the Batteries starting on page 11 Figure 16 PDA in the Dock Top and Rear Views of the Dock ActiveSync Protocol is used to comm...

Страница 28: ...ouble tap the My Computer icon on the desktop 2 Double tap the DiskOnChip icon to view DiskOnChip Use only Falcon 4220 docks with Falcon 4220 Windows CE NET devices It is very important to make sure t...

Страница 29: ...red check mark in the command bar at the top of the display See Figure 18A 3 The DiskOnChip Properties dialog opens See Figure 18B The number following Free is the amount of memory currently availabl...

Страница 30: ...f the reset key After Warm Reset The splash screen will appear shortly The desktop appears with the application shortcuts on the screen The custom settings in the registry are persistent CAUTION Alway...

Страница 31: ...eset If the Windows CE NET operating system OS locks up and or the warm reset command does not work Cold Reset Procedure To perform a cold reset simultaneously press the Reset key with the stylus whil...

Страница 32: ...ng products for repair PSC Website TekForum Search for information on the TekForum by clicking on the Support link at the top of PSC s home page Browse the TekForum at PSC s website to find answers to...

Страница 33: ...y in the receiving party s possession or rightfully known prior to receipt 3 rightfully learned from a third party not in violation of any other s proprietary rights or 4 independently developed witho...

Страница 34: ...nconformi ties verified by PSC End User agrees to supply PSC with all reasonably requested information and assistance nec essary to help PSC in remedying such nonconformities For all defects reported...

Страница 35: ...on of this Agreement 10 2 Upon termination of this Agreement End User immediately shall cease using any non preloaded software and shall return to PSC or destroy all non preloaded software covered by...

Страница 36: ...port The SOFTWARE may contain support for programs written in Java Java technol ogy is not fault tolerant and is not designed manufactured or intended for use or resale as online control equipment in...

Страница 37: ...other instrument equipment or apparatus modification or alteration of product or units with Warranty Void labels that have been tampered with External cables and replacement of upper window cartridge...

Страница 38: ...TTED FROM THIS APERTURE IEC 825 1 EN 60825 1 LASER LIGHT DO NOT STARE INTO BEAM CLASS 2 LASER PRODUCT 13 These illustra tions are for illustrative purposes only View the actual labels on the productit...

Страница 39: ...Polymer Battery Pack 3 7V 1800mAh CAUTION CAUTION USE SPECIFIED CHARGER ONLY KEEP THE BATTERY CONTACTS DRY TO PREVENT INJURY OR BURNS DO NOT DISPOSE OF IN FIRE DO NOT SHORT CIRCUIT DO NOT CRUSH OR OP...

Страница 40: ...s with Canadian ICES 003 Cet appareil num rique de la Classe A est confirme la norme NMB 003 du Canada WARNING Never apply strong pressure to the touchscreen or subject it to strong impact If the LCD...

Страница 41: ...u PSC sont certifi conforme la norme DHHS CDRH 21CFR sous chapitre J et la norme IEC EN 60825 1 1998 2001 Les produits de class 1 2 3R class II et de IIA ne sont pas consid r s dangereux Le scanneur c...

Страница 42: ...te Lo scanner progettato in modo che non ci sia alcun accesso alla luce dannosa del laser nel corso di uso normale di manutenzione da parte dell utente o durante la manutenzione periodica stabilita AT...

Страница 43: ...erats s att personer vid nor mal anv ndning bruksunderh ll och f reskriven service inte uts tts f r skadlig laserstr lning VAR F RSIKTIG Om scanningsm nstret r en enda punkt n r du trycker p avtryckar...

Страница 44: ...ten o pelo usu rio ou durante as opera es recomendadas de servi o CUIDADO Se ao pressionar o gatilho a luz do laser for um nico ponto interrompa a opera o e devolva o scanner PSC CUIDADO N o tente abr...

Страница 45: ...Appendix E Laser Safety Quick Reference Guide 43 Chinese Japanese...

Страница 46: ...Appendix E Laser Safety 44 Falcon 4220 Windows CE PDA NOTES...

Страница 47: ...iano Dansk Portugu s Espa ol Svenska Norsk lslenska This equipment is in compliance with the essential requirements other relevant provisions of Directive 1999 5 EC Deze apparatuur voldoet aan de esse...

Страница 48: ...49 0 61 51 93 58 0 Fax 49 0 61 51 93 58 58 Italy PSC S p A Vimercate MI Italy Telephone 39 0 39 62903 1 Fax 39 0 39 6859496 Japan PSC Japan K K Shinagawa ku Tokyo Japan Telephone 81 0 3 3491 6761 Fax...

Отзывы: