PSA Lifesaver HA240 Скачать руководство пользователя страница 5

4

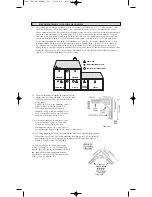
7. INSTALLING THE BASE PLATE

After installation TEST your alarm by pressing and holding the test button for several seconds. You can also use a
hand held hair dryer to test your heat alarm. 
Complete details on this procedure are outlined in Section 8.

CAUTION !

Early warning fire detection is best achieved by the installation of smoke alarms in all rooms and areas

of the household as follows: A smoke alarm should be installed in each separate sleeping area (in the
vicinity of - but outside the bedroom) and heat or smoke alarm where appropriate in the living rooms,
dining rooms, kitchens, hallways, attics,  furnace rooms, closets, utility storage rooms, basements, and
attached garages.

8. OPERATION

The Heat Alarm is operating once A.C. power is applied, new battery is installed and testing is  complete.  When

the Heat Alarm senses temperatures above 73°C (163.4°F) (plus or minus a few degrees), the horn will sound a loud
(85db) pulsating alarm until the temperature drops below 73°C (163.4°F). The heat alarm is designed to activate at
73°C when the temperature range is between 58°C(136.4°F) and 88°C(190.4°F).

FLASHING RED LED LIGHT: This Heat Alarm is equipped with a flashing Red LED. The LED is located under
the test button and has two functions.

1. Stand-by Condition---The Red LED will flash every 30-40 seconds to indicate that the Heat Alarm is operating

properly.

2. Alarm Condition  ----When the unit detects heat and goes into alarm the red LED will flash rapidly ( 2-3 

times per second ). The rapid flashing LED and pulsating alarm will continue until the 
temperature drops below 73°C (163.4°F).

WHEN HEAT ALARMS ARE INTERCONNECTED with compatible Smoke Alarms, only the Red LED of the
originating unit will flash rapidly. All other units in the interconnect system will sound an alarm but their Red LED’s
will not flash.

TESTING:

Test by pushing the test button on the cover and hold it down for a minimum of  5 seconds. This will
sound the alarm if all the electronic circuitry and horn are working correctly.

The test switch may not cause a test signal if the ambient temperature is below 8° C (20°F). In this
case, test the unit by blowing hot air at the alarm sensing element with a hair dryer held about
20cm from the unit.  

If no alarm sounds, check the fuse or circuit breaker supplying power to the alarm circuit, if the alarm still does not
sound the unit may have defective battery or other failure.

IT IS RECOMMENDED TO TEST THE ALARM WEEKLY TO ENSURE PROPER OPERATION.

Erratic or low sound coming from your alarm may indicate a defective alarm, and it should be returned for service.
(SEE SECTION 16)

CONNECTOR

SQUEEZE

LOCKING

ARMS AND PULL

FIGURE. 3 

FIGURE. 4 

INSTALL

MARKS

REMOVE

FIGUE 5

TAMPER RESIST

LOCKING PIN

9. FALSE ALARMS  

To avoid false alarms, DO NOT USE WHERE THE MAXIMUM ROOM TEMPERATURE WILL EXCEED 88°C .

Heat Alarms respond only to heat. They do not detect smoke. If the alarm does sound, check for fires first. If a fire is
discovered, get out of the house and call the Fire Brigade. If no fire is present, check to see if one of the reasons
listed in Section 2 may have caused the alarm.

1004-7201-01(HA240)_V2:_  2010.9.2  9:20 AM  Page 5

Содержание Lifesaver HA240

Страница 1: ... and or multiple station 24 units maximum The heat alarm is designed to activate at 73 C when the temperature range is between 58 C and 88 C Temperature rating 73 C 163 4 F Fixed temperature only Maximum ambient 88 C 190 4 F temperature at heat alarm Recommended coverage 230 square metres Note A Recommended spacing 15 3 metres Maximum distance from wall 7 6 metres Note B Note A Maximum coverage is...

Страница 2: ...alled within rooms may be necessary BEDROOM ATTIC BEDROOM HEAT ALARM IONISATION SMOKE ALARM PHOTOELETRIC SMOKE ALARM KITCHEN LIVING ROOM GARAGE UTILITY LAUNDRY 2 2 The most favourable mounting location for a Heat Alarm is on the ceiling and in the centre of the room At this location the alarm is closest to all areas of the room EXCEPTION When the mounting surface might become considerably warmer o...

Страница 3: ...ir conditioning near ceiling fans or other high air flow areas 3 2 In an area where the temperature may fall below 5 C 41 F or rise above 88 C 190 4 F 3 3 Near fluorescent lights electronic noise may cause nuisance alarms Diagram C 4 INSTALLATION INSTRUCTIONS PLEASE READ CAREFULLY 4 1 This Heat Alarm should be installed with an AS approved junction box All connections must be installed by a qualif...

Страница 4: ... in the AC connector into the back of the Heat Alarm Ensure the locks on the AC connector snaps firmly into place 6 5 Now mount the heat alarm onto the trim ring Rotate the heat alarm until the heat alarm snap firmly into place NOTE PLEASE ENSURE THAT BATTERY IS INSTALLED PRIOR TO MOUNTING OF HEAT ALARM Switch on the A C power and the green A C power ON indicator should be lit The Heat Alarm is no...

Страница 5: ...per second The rapid flashing LED and pulsating alarm will continue until the temperature drops below 73 C 163 4 F WHEN HEAT ALARMS ARE INTERCONNECTED with compatible Smoke Alarms only the Red LED of the originating unit will flash rapidly All other units in the interconnect system will sound an alarm but their Red LED s will not flash TESTING Test by pushing the test button on the cover and hold ...

Страница 6: ...your alarm by using a vacuum cleaner hose and vacuuming around the heat sensing element and the perimeter of the alarm The outside of the alarm can be wiped with a damp cloth We recommend a periodic monthly inspection and cleaning of the Heat Alarm to ensure proper operation AFTER CLEANING REINSTALL YOUR ALARM AND TEST YOUR ALARM BY USING THE TEST BUTTON AND CHECK THAT THE GREEN LED IS ON 12 LIMIT...

Страница 7: ...s defective in any way do not tamper with the unit Return it to PSA Products Pty Ltd 17 Millicent Street Burwood Victoria 3125 16 1 PSA Products Pty Ltd warrants that for two years from the date of purchase of the Heat Alarm it will re pair or replace the Heat Alarm at the option of PSA Products Pty Ltd due to any manufacturing defect at the cost of PSA Products Pty Ltd excluding any labour costs ...

Страница 8: ...et Burwood 3125 Victoria Australia Telephone 03 9888 9889 Facsimile 03 9888 9993 E mail enquiry psaproducts com au Website http www psaproducts com au AUSTRALIAN ELECTRICALAUTHORITY CS SGSE 100434 1004 7201 01 N10116 7 1004 7201 01 HA240 _V2 _ 2010 9 2 9 20 AM Page 8 ...

Отзывы: