background image

Fingerprint Time Attendance Terminal Manual 


- 19 -

3.2.1 - Direct Connection through RS232 

1>

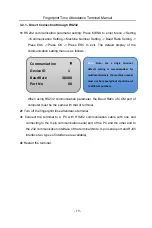
 RS232 communication parameter setting: Press MENU


to enter Menu ->Setting 

->Communication Setting ->Machine Number Setting -> Baud Ratio Setting -> 

Press ESC ->Press OK -> Press ESC to exit. The default display of the 

communication setting menu is as follows


When using RS232 communication parameter, the Baud Ratio of COM port of 

computer must be the same with that of terminal. 

2>

 Turn off the fingerprint time attendance terminal 

3>

 Connect the terminal to a PC with RS232 communication cable with one end 

connecting to the 9-pin communication serial port of the PC and the other end to 

the 232 communication interface of the terminal (Note: 9-pin serial port and RJ45 

interface two types of interface are available). 

4>

 Restart the terminal.   

Communication


Device


ID


1


Baud


Rate


38400


Port


No


80


Note:


Note:


For


a


single


terminal,


default


setting


is


recommended;


for


multiple


terminals,


the


machine


number


must


not


be


repeated


but


should


be


set


to


different


numbers.


Содержание AC-8000P

Страница 1: ...ProVisual AC 8000P User Manual For the optimal use and maintenance of the product Please read the manual carefully before using it...

Страница 2: ...ter Three Basic Usage Instructions 11 3 1 Basic Usage 11 3 2 Quick Connection Guidance 18 Chapter Four Administrator Manual 22 4 1 Enrol Management 23 4 1 1 User Registration 23 4 1 2 Administrator Re...

Страница 3: ...responsible for the registration of the employees fingerprint and daily check on work attendance And the software is mainly to read the work attendance record of the terminal to process the statistics...

Страница 4: ...Fingerprint Time Attendance Terminal Manual 4 Correct Too perpendicular Too deflective Tilting Too Low...

Страница 5: ...nu The terminal is convenient to operate with function keys and numerical keys to perform flexible menu selection keyboard input and various settings The level 1 menu includes three categories record...

Страница 6: ...nductive card of the users or the administrators and to perform the functions such as examining records setting arithmetic security and downloading records etc 2 Setting To set the system information...

Страница 7: ...ll Password Card User Manager All Log Delete Finger Sup Manager Gen Manager Download SLog ALL GLog GLog All SLog If the machine does not have U Disk function then this menu will not be available Level...

Страница 8: ...ual 8 2 2 1 2 Set up continue to the next page System Setup Manager Language Voice Out Time Time Fmt Level Setting Bri Adjust LCD Contrast Lock Ctrl Shutdown Key Auto Shutdown Log Setup Glog Wrn Slog...

Страница 9: ...Fingerprint Time Attendance Terminal Manual 9 Communication Terminal Number Password IP Address Subnet Mask Default Gateway Baud Ratio Machine Number RS485 Ethernet Level 3 Menu Level 2 Menu...

Страница 10: ...ilable Press OK in each menu to display another item as follows Note If the cursor is placed on the item of User Registration and OK is pressed then the information of Administrator Registration will...

Страница 11: ...anging the terminal hang the terminal on the iron board and fastening them with the bolts E Turn on the terminal Connect the electrical wire one side with the terminal and the other side with 220V ele...

Страница 12: ...gerprint Registration New Registration Input ID Number Press with the finger for three times Save Exit Detailed procedure is as follows When MENU is pressed the following will be displayed Press OK to...

Страница 13: ...e finger away Press it with the same finger for the second time or third time according to the instruction on the interface If the registration is successful the following will be displayed Finger New...

Страница 14: ...ress ESC to register backup fingerprint Press OK to register the new fingerprint data to operate the registered backup of the user s fingerprint press ESC Displayed as follows Press OK to choose regis...

Страница 15: ...ng will be displayed Press OK to finish registration Press ESC to exit 3 1 5 Password Registration Press OK to display the following Input the corresponding ID number of the person and press OK to dis...

Страница 16: ...cross the administrator verification to change the setting system Meanwhile the terminal can set two administration authorities super administrator and administrator The former has the supreme power a...

Страница 17: ...e verification is success your fingerprint is clear the registration is good If the verification is difficult to pass the registered fingerprint is unqualified or the fingerprint is not clear Please o...

Страница 18: ...fication is failed terminal will display please input again after Di Di ring 3 2 Quick Connection Guide Basic procedure for quick connection 1 Connect the terminal to power supply 2 Select the communi...

Страница 19: ...be the same with that of terminal 2 Turn off the fingerprint time attendance terminal 3 Connect the terminal to a PC with RS232 communication cable with one end connecting to the 9 pin communication...

Страница 20: ...e serial port of the PC and the other end to the RJ45 interface of the terminal 5 Restart the terminal 3 2 3 Network Connection through TCP IP 1 In communication setting press Scroll down to set RS485...

Отзывы: