

User Guide
P.5
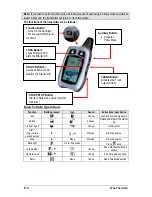
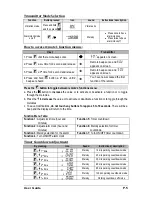
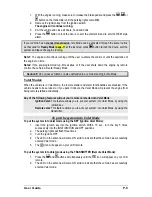
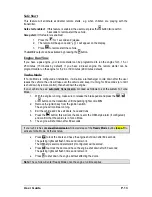
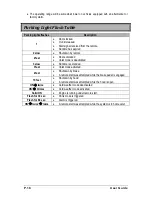
Transmitter
Mode
Selection
Function
Button pressed
Icon
sound
Instructions /description
Vibration mode Press and hold
and then press
Vibrates 4x
Alarm clock mode
on/off
+
Melody
z
Press once to have
alarm clock on
z
Press twice to have
alarm clock off
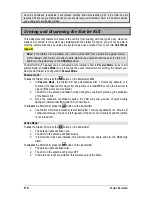
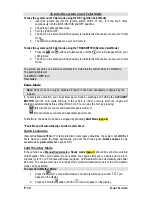
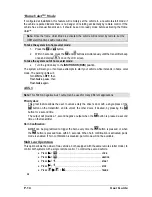
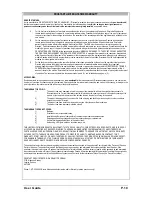
How
to
access
remote’s
function
menus:
User
Transmitter
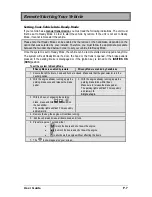
1.
Press
until the remote beeps once
Î
appears on screen.
2.
Press
a 2
nd
time for 2 second and release
Î
Remote beeps once and
appears on screen.
3.
Press
a 3
rd
time for 2 second and release
Î
Remote beeps once and
appears on screen.
4.
Press and hold
button a 4
th
time until 2
beeps are heard.
Î
You have now accessed the first
function of the remote.
Press the
button to toggle between remote’s functions menu:
a.
Press the button to increase the value or to activate or deactivate a function or to toggle
through the melodies.
b.
Press the to decrease the value or to activate or deactivate a function or to toggle through the
melodies.
c.
To save modifications, do not touch any buttons for approx 5 to 10 seconds. There will be a
beep and the display will return to the time.
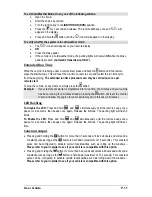
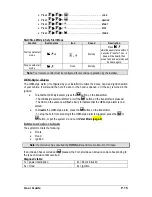
Function Menu Table:
Function 1: Adjust clock time (hour and
minutes)
Function 5: Timer countdown
Function 2: Adjust alarm clock (hour and
minutes)
Function 6: Melody selection for timer
countdown
Function 3: Melody selection for the alarm
Function 7: Turn ON/OFF timer countdown
Function 4: Turn ON/OFF alarm clock
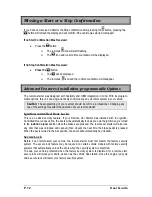
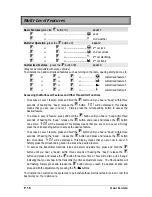
Timer
Countdown
Adjustment
By pressing
Icon
Sound
Instructions / description
+ 1
st
time
Melody
10 min parking countdown mode
+ 2
nd
time
Melody
20 min parking countdown mode
+ 3
rd
time
Melody
30 min parking countdown mode
+ 4
th
time
Melody
60 min parking countdown mode
+ 5
th
time
Melody
90 min parking countdown mode
+ 6
th
time
Melody
120 min parking countdown mode
+ 7
th
time
Melody
Parking countdown off mode


