background image

9

BASIC OPERATIONS

Turning the screen on or off 

1.

 Plug the power cord into an AC power outlet.

2.

 Press Power Switch on the screen.

3.

 Now the screen  is in standby mode. Wait a moment until the power indicator lights up, then press

button to turn on 

the screen. 

Note:

 Be sure to wait for a few seconds before pressing

 button. If you promptly press

button then the screen may 

not respond or act wrongly.    

4.

 Press 

button again to turn off the screen  and put the  display in standby mode.

5.

 To cut off the power completely, press Power Switch on the back of the screen. 

FIRST TIME INSTALLATION

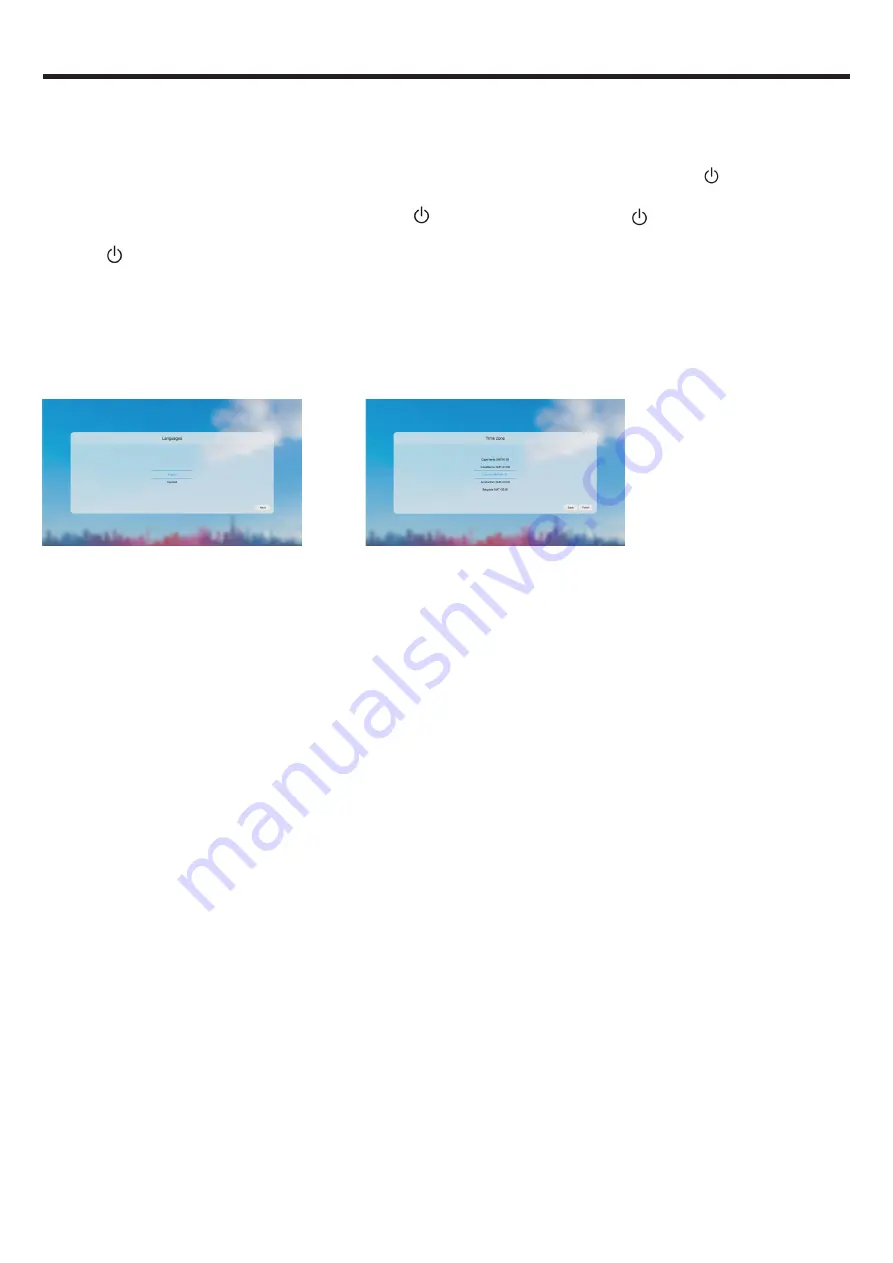
When turning on the screen for the first time, the below shown installation menu pages will appear on the screen.

Select the desired menu language. 

Press 

Next

  to go to the next page.

Select your Time Zone and press  

Finish 

to finish the installation.

Содержание PM-TS55A/32/HD

Страница 1: ...55 HD 32 TOUCH LED SCREEN INSTRUCTION MANUAL Before connecting operating or adjusting this product please read the manual completely Please keep this manual for future reference ...

Страница 2: ...Safety Precautions 2 Identification of Controls 4 Remote Control 6 Connections 7 Basic Operations 9 Operating the Side Menu 10 User Menu List 11 UBoard 15 Annotation 16 WhiteBoard 17 USB multi media player 18 Troubleshooting 19 Specifications 20 ...

Страница 3: ...anchoring both the furniture and the screen to a suitable support Do not position the screen on cloth or place any material between the screen and supporting furniture Increase children s awareness of danger caused by falling down of the screen or being hurt by bumping into the screen Do not use immediately after moving from a low temperature to high temperature environment as this causes condensa...

Страница 4: ... Refer all servicing to qualified service personnel Servicing is required when the device has been damaged in any way such as the power supply cord or plug is damaged liquid has been spilled objects have fallen into the device the device has been exposed to rain or moisture does not operate normally or has been dropped 11 Damage requiring service If any of the following conditions occurs unplug th...

Страница 5: ...er when the temperature returns to normal Do not leave the unit in a hot or cold location Also do not leave the unit in a location exposed to direct sunlight to near a heater or in high humidity as this may cause the cabinet to deform and the screen to malfunction and affect the screen s performance Environment condition Operating temperature 5 C 35 C Operating humidity 20 80 no moisture condensat...

Страница 6: ...V 50 60Hz 4 Power Switch Push I to connect the power push O to cut off the power Note Don t cover the power switch 5 Extension module Slot Insert an extension module Optional 6 OPS module slot Insert an OPS module Optional 7 USB C Full featured Type C 8 USB 3 0 Connect USB devices to this port 9 TOUCH OUT 3 Connect an external device to support touch control of the external device on the screen No...

Страница 7: ...ernal device to DP out jack 4 USB 2 0 Connect USB devices to this port for Android 5 TOUCH OUT 1 2 Connect an external device to support touch control of the external device on the screen Note Touch out 1 corresponds to the HDMI 1 Touch out 2 corresponds to the HDMI 2 DP or VGA 6 WiFi module slot Insert a WiFi module 7 Switches the screen power on or standby 8 PC IN Connect the video audio of a co...

Страница 8: ...n storage Return to OPS PC desktop Volume up down Display desktop Home page on the screen To confirm or enter a sub menu or toggle between options during menu operation Use Arrow buttons to navigate in on screen menu Display or exit the setting menu screen 0 9 number buttons Mute the sound Page up down in OPS PC mode Switch to VGA mode Switch to HDMI mode Display or exit the current program inform...

Страница 9: ...OUCH OUT with USB cable to PC USB port Connect PC with VGA cable HDMI cable or DP cable Please choose the proper method of connection based on your device Only for PC HDMI DP signal Touch out 1 corresponds to the HDMI 1 Touch out 2 corresponds to the HDMI 2 DP or VGA Note After installation of the driver it can control the external computer by native touch control PC etc Serial port cable Network ...

Страница 10: ...h two screws WiFi module slot Screw Screw USB cable USB devices HDMI devices HDMI cable USB Type C devices USB cable USB cable Type C cable PC etc Connect TOUCH OUT with USB cable to PC USB port Connect PC with VGA cable HDMI cable or DP cable Please choose the proper method of connection based on your device Only for PC HDMI DP signal Touch out 3 corresponds to the HDMI 3 Note After installation ...

Страница 11: ... button If you promptly press button then the screen may not respond or act wrongly 4 Press button again to turn off the screen and put the display in standby mode 5 To cut off the power completely press Power Switch on the back of the screen FIRST TIME INSTALLATION When turning on the screen for the first time the below shown installation menu pages will appear on the screen Select the desired me...

Страница 12: ...tch Calendar ScreenShot Wireless network setting Opening SpotLight mode Opening Curtain mode OPERATING THE SIDE MENU Display User menu Side menu Swipe up from the left bottom or the right bottom of the screen and pause Go back Swipe up from the left bottom or the right bottom of the screen Go to Home screen Swipe up from the bottom centre of the screen ...

Страница 13: ...st the color saturation Sharpness Adjust the sharpness PC mode Select PC mode PC Video Display mode Select the aspect ratio display propor tions MEMC Frame rate up conversion Only for 4K model Overscan Turn on or off HDR Turn on or off the High Dynamic Range It can provide more dynamic range and image details VGA auto adjust Automatically adjust the image settings such as position and phase 1 NETW...

Страница 14: ...nnels Sound Effect Turn the surround sound effect on or off Volume Adjust volume Balance Adjust volume level of right and left speak ers 2 2 Sound Adjusting sound 3 SYSTEM 3 1 Security Change password Password settings App lock In order to lock the App App install lock In order to lock the App install Touch lock To disable the function of the touch panel Keypad lock In order to lock the monitor bu...

Страница 15: ...omatically recognition source Prompt Direct Temperature protection Turn on or off the temperature protection function Current temperature Showing the present temperature value of the monitor Alarm temperature Setting alarm temperature Note When the temperature proteciont is turned on if the current temperature exceeds the alarm temperature the countdown is on for the monitor turn off If you want t...

Страница 16: ...llpaper no input wallpaper source label Note When the fullscreen gesture is turned off swipe up from the bottom of the screen to call only the side menu 4 2 Device It displays the following information Device name Device model System information Display system information System updates Local update Online update Reset Reset all settings to factory defaults ...

Страница 17: ...ly for MacBook and Windows Mirror the screen to multiple mobile devices and touch on the mobile device screen to control the screen just like you are touching on your screen Multiple senders side by side mirroring and touch feedback With wireless annotation tools you can add annotations from mobile devices to the screen wirelessly Stream camera and mic phone of android phone or tablet to the scree...

Страница 18: ...e pen Eraser Click to choose a size of the eraser Screenshot Click to capture the current screen Eraser all Click to eraser all the annotation on the screen Exit Click to exit the annotation Press and drag to any place of the screen Annotation 16 ...

Страница 19: ...17 WHITEBOARD Click to exit the UBoardMate Options UBoardMate Help ...

Страница 20: ...ic movie etc Notes Never remove the USB storage device or turn off the screen while using the USB storage device It is recommended that you back up your USB device data Certain types of USB devices may not be compatible with this screen please change another Media ...

Страница 21: ...ar the screen Move the infrared communication equipment away from the screen until the noise is eliminated General Problem Possible Solutions Some items can not be accessed If a setting option appears in gray this indicates that the settings option is unavailable in current input mode Some display menu items may be different when the unit works in different sources Remote control command is not wo...

Страница 22: ...ze 55inches diagonal Power Source 100 240V 50 60Hz Current with PD 2 5A Power Consumption with PD 250 W Standby condition 0 5 W Number of pixels Display panel 3840 2160 Dimensions W H D Unit mm 1285 5 766 2 90 Weight 34 3 kg Net Operating conditions Operating temperature 5 C 35 C Storage temperature 15 C 45 C Storage humidity 10 80 Operating humidity 20 80 no moisture condensation Atmospheric pres...

Отзывы: