background image

s

ubsysteM

 P

robleMs

Subsystem problem troubleshooting includes:

• 

“Diagnosing a Subsystem Problem”

• 

“Overheating”

• 

“Power Supply”

d

iAgnosing


A

 s

ubsysteM

 p

robleM

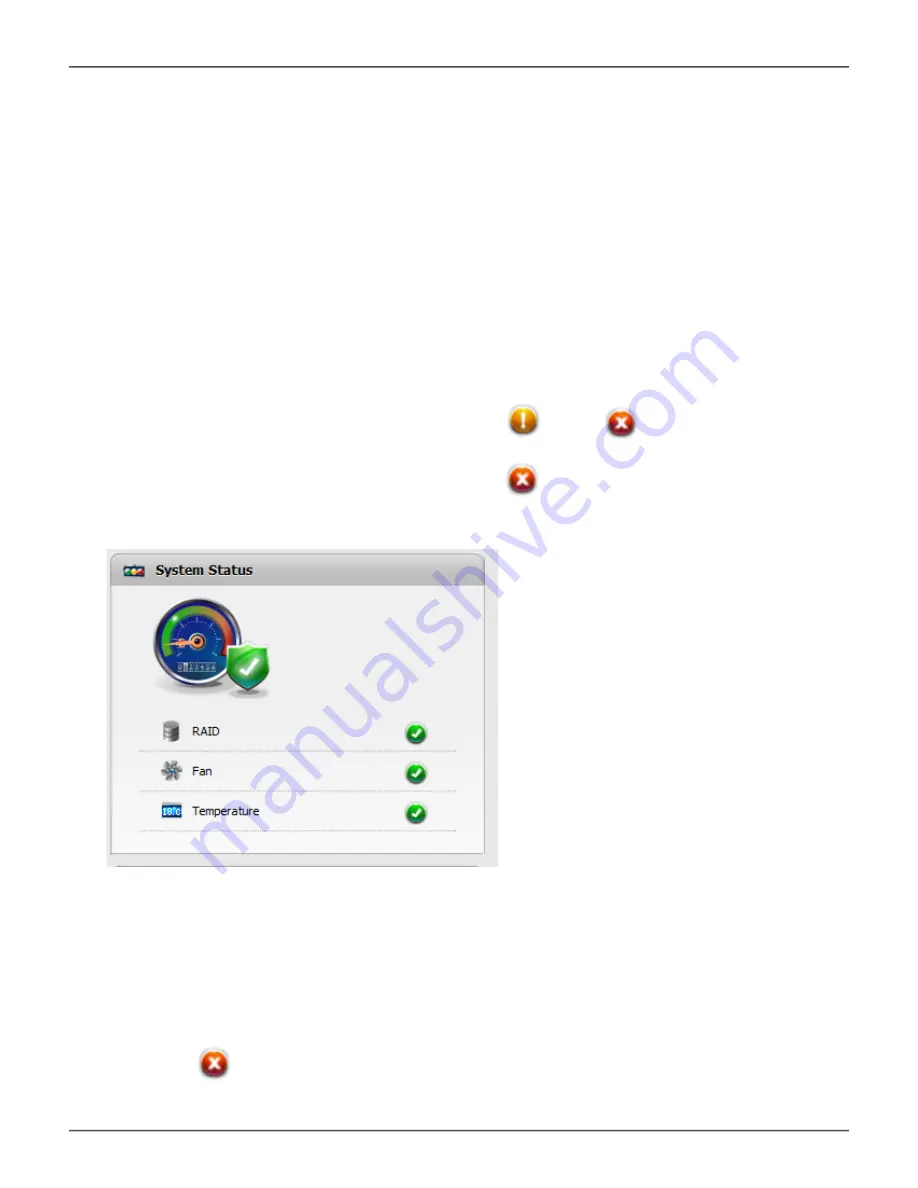
Check System Status on the Dashboard tab. If a yellow !      


or red X       appears in the System 

Status box:

1.  Click the name link of the component with the red X 


icon.

System Status box on the Dashboard, all hardware function normal

The list containing the problem component displays. In the case of a high- temperature issue, shown in 

the example above, the Component List displays.

2.  For physical drives, disk arrays, logical drives, and spare drives, mouse-over the component with 

the red X 


icon and click the 

View 

button.

57

Promise Technology

Содержание Pegasus2 R2+

Страница 1: ...PEGASUS2 R2 Product Manual Version 1 0 2015 PROMISE Technology Inc All Rights Reserved R2 ...

Страница 2: ... product Notice Although PROMISE T echnology has attempted to ensure the accuracy of the content of this document it is possible that this document may contain technical inaccuracies typographical or other errors PROMISE T echnology assumes no liability for any error in this publication and for damages whether direct indirect incidental consequential or otherwise that may result from such error in...

Страница 3: ...se the PROMISE Utility software that you install and run on your Windows or Mac computer This manual includes a full table of contents chapter task lists and numerous cross references to help you find the specific information you are looking for Also included are four levels of notices WARNING WARNING iii Promise Technology ...

Страница 4: ...Federal Communications Commission FCC Class B Information This device complies with Canada ICES 003 Issue 5 CAN ICES 3 B NMB 3 B ICES NMB 003 Compliance iv Pegasus2 R2 Product Manual ...

Страница 5: ...Including residential areas Pegasus2 R2 Korean KCC certification ID MSIP REM PMS Pegasus2R2 Pegasus2 R2 Media Pods HDD Pod Korean KCC certification ID MSIP REM PMS HDDPod SSD Reader Pod Korean KCC certification ID MSIP REM PMS SSDReaderPod CF SD Reader Pod Korean KCC certification ID MSIP REM PMS CFSDReaderPod v Promise Technology ...

Страница 6: ...WARNING WARNING vi Pegasus2 R2 Product Manual ...

Страница 7: ...WARNING WARNING vii Promise Technology ...

Страница 8: ...ents for Windows 13 Summary of the setup procedure 13 Download the latest driver and software 14 Install driver and software on Windows 15 Install Windows Driver 15 Install Software for Windows 17 Install on Mac 19 System requirements for Mac 19 Summary of setup for Mac 19 Installing the PROMISE Utility on Mac 20 Connect the power cord 23 Connectto your computer 24 Power modes on the Pegasus2 R2 2...

Страница 9: ...w 45 Updating Firmware in Mac 46 Updating Firmware in Windows 47 Updating the PROMISE Utility 48 Troubleshooting 49 CheckingLEDs 50 Troubleshooting using LEDs 50 Download hard disk drive compatibility list 51 Replacing a Physical Drive 52 Physical Drive Warning Message 55 Unreadable Disk Warning 56 SubsystemProblems 57 Diagnosing a Subsystem Problem 57 Overheating 58 Fan Failure 58 Inadequate Air ...

Страница 10: ...e SOHO users and digital AudioandVideo production professionals Pegasus2 R2 supports Mac OS 10 8 5 and Windows 7 or later Windows versions Note that there are some differences in for using the Pegasus2 R2 with Mac or Windows in the setup procedure as well as small differences in the PROMISE Utility user interface and configuration procedures using the utility Please read the setup and configuratio...

Страница 11: ...peed peripheral devices including external disks video capture devices and a Mini DisplayPort monitor USB 3 0 is available when Thunderbolt cannot be used to access the HDD storage Key Benefits Rapidly ingest files from off site projects and edit at Thunderbolt 2 speeds Use for streaming editing and backup Ingest a variety of media formats using optional Pods Reduce clutter on your desktop Connect...

Страница 12: ...ed in device Power supply 110W AC input 100 240V 2 5A 50 60Hz AC output 12V 8 33A System Fan Dimension 92 W x 92 H x 25 D mm Airflow 70 CFM RAID function Hardware RAID 0 or RAID 1 Shipped with RAID 0 OS Support OS X 10 8 5 or higher Windows 7 and later versions of Windows Hardware monitoring Fan Temperature Power Enclosure Physical drives Logical drives RAID controller Temperature Operating 5 35 C...

Страница 13: ...he enclosure will differ slightly according to the type of Media Pod that is inserted in the Media Bay Pegasus2 R2 front view Drive Status LED DriveActivity LED Portable Media Pod in Media Bay Hard Disk Drive Carrier Power button System Status LED USB connection LED Thunderbolt connection LED Push to eject Media Pod 4 Pegasus2 R2 Product Manual ...

Страница 14: ...One or the other can be used to connect the RAID drive to the computer Drive Status The Drive Status LED lights blue when the disk tray is inserted even if no physical drive is present A red Drive Status LED indicates a problem with the physical drive or a problem with the RAID An amber LED indicates the RAID is degraded Drive Activity The Drive Activity LED lights blue when the physical drive is ...

Страница 15: ...r the other can be used to connect the RAID drive to the computer Cooling Vents The cooling vents on the back should be clear and unobstructed to allow proper airflow for disk and system cooling Note that the air intake vents located on the front of the enclosure should also be unobstructed Power Receptacle Use only the power cord shipped with the device to connect the power Insert one end of the ...

Страница 16: ...perform the drive ejection procedure according to the operating system you are using then press the eject to the right of the Media Bay to unseat the physical drive enclosed in the Media Pod You need to push the eject button hard to pry the pod loose Once ejected it should slide out easily front end of Media Pod insert this end into Media Bay USB 3 0 Micro B insert SATA connection used for Thunder...

Страница 17: ...cards are not included with the shipment To use the memory cards just insert CF or SD memory into the appropriate slot and use the PROMISE Utility to format the drives Then follow instructions in Partition on page 37 to format the drive CF SD Reader Pod empty Empty CF SD Reader Pod inserted into Pegasus2 R2 8 Pegasus2 R2 Product Manual ...

Страница 18: ...rmat the drive To insert the SSD orient the drive right side up and make sure power and SATA contacts are on the edge being inserted into the slot Then slide into the slot until the it clicks into position indicating it is properly seated in the Media Pod container SSD Reader Pod empty Empty SSD Reader Pod inserted into Pegasus2 R2 9 Promise Technology ...

Страница 19: ...5 HDD Pod includes a 1 TB drive installed It is shipped ready for use Follow follow instructions in Partition on page 37 to format the drive 2 5 HDD Pod 2 5 HDD Pod inserted into Pegasus2 R2 10 Pegasus2 R2 Product Manual ...

Страница 20: ...o the instructions for the operating system that is being used with the Pegasus2 R2 The Windows installation is covered in Install on Windows computer on page 13 The Mac installation is covered in Install on Mac on page 19 Other installation information and instructions include Connect the power cord on page 23 Connect to your computer on page 24 Power modes on the Pegasus2 R2 on page 25 Shutting ...

Страница 21: ...nd other body parts away Packing List The Pegasus2 R2 box contains the following items Pegasus2 R2 Unit includes two 3 5 hard disk drives installed in disk trays and inserted into enclosure CF SD Reader Pod inserted into Media Bay Power cord Thunderbolt cable USB 3 0 Type A to Type B cable USB 3 0 Type A to Micro B cable Quick Start Guide Optional additional equipment available for separate purcha...

Страница 22: ...bsite and download the driver and software used for the Pegasus2 R2 2 Connect the Pegasus2 R2 to your Windows computer with a Thunderbolt cable 3 Connect the power cord and power on the Pegasus2 R2 4 Launch the PROMISE Utility and format the RAID 0 drive or change it to RAID 1 then format it Install on Windows computer Pegaus2 R2 is shipped with a hardware RAID that can be used on a Windows comput...

Страница 23: ...te Go to www promise com and click on Support at the top of the page Find the Pegasus2 logo and click on that then find the link for Pegasus2 R2 near the bottom left corner That s where you will find the software and Windows driver as well as user documentation for the Pegaus2 R2 Download Windows driver and software from PROMISE website 1 2 3 14 Pegasus2 R2 Product Manual ...

Страница 24: ...e you connect the Thunderbolt cable Get the latest Windows driver and PROMISE Utility from the PROMISE website Install Windows Driver 1 To install the driver on a Windows computer double click on the installation file to launch the InstallShield Wizard 2 In the InstallShield menu click on Next to continue with the driver installation Promise Technology 15 ...

Страница 25: ...3 Click on Install 4 Click on Next to continue 5 Click on Finish to complete the installation Final driver install menu in Windows 7 Final driver install menu in Windows 8 16 Pegasus2 R2 Product Manual ...

Страница 26: ...ou computer 1 Double click the software installation file for Windows The InstallShield Wizard appears Click Next 2 In the license agreement menu read the user agreement and click to select the I agree option if you agree to the terms Click Next Promise Technology 17 ...

Страница 27: ... for the software or click Browse to place it somewhere else Click Next to continue 4 To begin installation click the Install button 5 When the installation is completed click Finish to exit the wizard 18 Pegasus2 R2 Product Manual ...

Страница 28: ...ity installation package located on the device Pegasus2 is shipped with RAID 0 configuration and install the management software utility Install on Mac The Pegasus2 R2 is shipped ready to use with a Mac computer Follow the instructions in this section to connect and power on the device Install the PROMISE Utility on the Mac system for monitoring and managing the Pegaus2 R2 and other connected Pega...

Страница 29: ...ped with the device The software utility installation package is located on the Pegasus2 Follow the instructions below to install the utility To install the Pegasus2 Software Utility 1 Double click on the Pegasus2 icon on your desktop to view the device contents See example to right 2 Find the file R_PROMISE_Utility dmg and double click on it to mount the virtual drive containing the installation ...

Страница 30: ...e read the statement and click Continue to proceed 5 Click Agree if you agree to the terms of the license To read the license click Read License Choose Disagree if you do not agree the terms in which case the installation procedure is terminated 6 If you clicked Agree in the previous menu the software is now ready to install Click Install to begin Promise Technology 21 ...

Страница 31: ...lick Close to end the installation procedure The PROMISE Utility is now available to be used for management of the Pegasus2 R2 Use this if you need to change a hard disk drive or change the default RAID configuration or to update the device firmware This is also useful for monitoring the status of the system and for troubleshooting 22 Pegasus2 R2 Product Manual ...

Страница 32: ...unit 1 Attach the power cord on the back of the Pegasus2 R2 unit 2 Plug the other end into a suitable power source Thunderbolt and power connections Thunderbolt ports Pegasus2 system Thunderbolt port Thunderbolt cable To power source Power cable Promise Technology 23 ...

Страница 33: ...The Pegaus2 R2 should appear with the name you gave it in the partitioning and formatting procedure To establish the Thunderbolt connection 1 Connect a Thunderbolt cable from one of the Thunderbolt ports on the back of the Pegasus2 R2 to the Thunderbolt port on your computer 2 The Pegasus2 R2 is plugged into a power source and the computer is running the Pegasus2 R2 will power on and begin to boot...

Страница 34: ...e Pegasus2 unit automatically powers up Shutting down the Pegasus2 R2 The shuts down automatically if you turn off your Mac If you want to turn off the Pegasus2 without shutting down your computer follow the steps below To shut down the Pegasus2 R2 on a Windows computer 1 Eject the Pegasus2 by right clicking on the drive icon and choosing the Eject option 2 Press and hold the Power Button until th...

Страница 35: ...rbolt ports on the back of your computer to one of the Thunderbolt ports on the first Pegasus Pegasus2 unit 2 Connect a second Thunderbolt cable from other Thunderbolt port on the first Pegasus Pegasus2 unit to one of the Thunderbolt ports on the second Pegasus Pegasus2 unit Thunderbolt daisy chain connections iMac used for this example any computer with a Thunderbolt port can be used Thunderbolt ...

Страница 36: ...ect it directly to your computer with the USB 3 0 cable included with the shipment There are two USB cables shipped with the Pegasus2 R2 one is for connecting the enclosure to a computer the other is used to connect a Media Pod to a computer Note When the the computer is connected to the Pegasus2 R2 via the USB 3 0 port any drive in the Media Bay Media Pod will not be accessible If you need to acc...

Страница 37: ... Media Bay use the utility to make settings changes to installed storage This section contains the following topics PROMISE Utility in Mac Unlocking the UI in Mac The PROMISE Utility interface for Pegasus2 R2 Customize the Mac user interface Dashboard Device menus Physical Drive menu Partition RAID Configuration Updating Firmware in Mac 28 Pegasus2 R2 Product Manual ...

Страница 38: ...ty double click the PROMISE Utility icon in the Macintosh Dock right The PROMISE Utility window opens and displays the Dashboard See Dashboard on page 34 Closing There are two ways close the PROMISE Utility PROMISE Utility icon Click the PROMISE Utility dropdown menu and choose Quit PROMISE Utility Press cmd Q Q 29 Promise Technology ...

Страница 39: ...the OK button The lock icon changes to open and you can now add and delete logical drives make settings run background activities and update your Pegasus2 system Displaying Multiple Pegasus Pegasus2 Units The PROMISE Utility displays a separate window for each Pegasus unit connected by Thunderbolt cable and powered up Note that the utility menu for the R2 has fewer management items in the user int...

Страница 40: ... to a specific function There are some differences in the user interface and in the way the menus are used in the Mac and Windows versions Functionally the utility is the same for both versions Drop down menus in the Menu Bar on desktop Toolbar icons Lock unlock The PROMISE Utility interface on Mac 31 Promise Technology ...

Страница 41: ... Firmware Update If you would like to add the Front or Back view icons to the toolbar in Mac follow the instructions in Customize the Mac user interface on page 33 Drop down menus at the top of the PROMISE Utility user interface Toolbar icons The PROMISE Utility interface on Windows 32 Pegasus2 R2 Product Manual ...

Страница 42: ...r The toolbar options dialog box appears 2 Do one or both actions are needed Click and drag an icon from the dialog box to the toolbar to add the icon Click and drag an icon from the toolbar to delete the icon 3 When you are finished click the Done button Drag menu icons into the toolbar from the customize user interface menu 33 Promise Technology ...

Страница 43: ...in the dashboard or other menus in the utility Note that the more frequently a system check is conducted Media Bay Lists the basic information of the Media Pod if one of the available pods are installed Information includes device type storage capacity and temperature HDD Storage Bay Overview Basic status information of the hard disk drives if present Information includes storage capacity and temp...

Страница 44: ...the Device menu option to display that menu Windows users will find this drop down menu at the top of the PROMISE Utility user interface For Mac go to the top of the Mac desktop while the PROMISE Utility is selected Device menu options on Mac desktop Device menu options in PROMISE Utility interface in Windows 35 Promise Technology ...

Страница 45: ...icon in the toolbar to display the Physical Drive menu This menu displays basic information on the physical storage installed in the device including the hard disk drives and storage in the Media Bay The information includes the location model of storage capacity and current temperature 36 Pegasus2 R2 Product Manual ...

Страница 46: ...for the OS you are using Note that if you forget to do this a warning message will appear telling you that a drive was not ejected properly Do not be concerned if this happens just click OK in the warning menu and continue with the partition creation steps A few notes to keep in mind about partitioning and formatting drives Partitioning a drive whether it is the RAID drive or the Media Pod is basi...

Страница 47: ...ner or the utility interface to allow changes requires password in Mac OS and do the following 1 Click on the Partition icon 2 Expand the display for the storage item you want to partition 3 Click on the Settings button for the storage you want to partition 4 Click the Add button 38 Pegasus2 R2 Product Manual ...

Страница 48: ...ch partition is now 50 Continue to add partitions as desired 6 When you have added all the partitions you want to create click on the Submit button The partition or partition you created will appear on the desktop after a few seconds They will also be listed in the Partition menu with capacity information 5 Type a Volume Name for the new partition The percentage of the drive that will be partition...

Страница 49: ...Pod drive partition The procedure for partitioning and formatting the drive s in the Media Pod is identical to creating a partition in the RAID drive Partition SSD in Media Pod Windows 40 Pegasus2 R2 Product Manual ...

Страница 50: ...hard disk drives shipped with the Pegasus2 R2 are configured with a hardware RAID 0 This type of RAID is excellent for applications where high read write performance is desirable However it does not include redundancy that is if one of the hard disk drives fails the data contained on the RAID is lost So it is important to back up all data stored on the RAID 0 drive If you prefer to use a mirrored ...

Страница 51: ... utility interface to allow changes requires Mac OS password follow these steps to install or change RAID settings 1 Click on the RAID Configuration icon 2 Click the RAID Config Change button 3 Choose the New RAID Mode RAID 0 or RAID 1 The size of the new RAID drive is calculated and appears below 42 Pegasus2 R2 Product Manual ...

Страница 52: ...nge the RAID type confirm in the space provided and click the Confirm button 5 A warning notice might appear notifying you that the disk is not readable Click the Ignore button then go to the Partition menu 6 Follow the instructions in Change partition settings on page 37 to create a new partition 43 Promise Technology ...

Страница 53: ...rface on page 33 for instructions on how to see place the icons into the menu toolbar at the top of the interface In Windows click on the Device drop down menu and select the Front View option to display the Front View menu Move the cursor over the drive carrier to display the information of the installed physical drive including the make and model of the hard disk drive physical capacity and oper...

Страница 54: ... Back view icons in the toolbar see Customize the Mac user interface on page 33 for instructions on how to see place the icons into the menu toolbar at the top of the interface In Windows click on the Device drop down menu and select the Back View option to display the Back View menu Hover the cursor over the fan vent to view health status of the system fan Device Back View display menu 45 Promise...

Страница 55: ... to restart your Mac To update the firmware 1 Click the Firmware Update icon 2 Click on the padlock icon to unlock the menu and type in the password for your Mac when the prompt appears 3 Click the Choose File button and locate the img file you downloaded from PROMISE 4 Click the Submit button 5 In the Confirmation box type the word confirm in the field provided and click the Confirm button 6 The ...

Страница 56: ...nd place the file on your computer To update the firmware 1 Click the Firmware Update icon 2 Click the Choose File button and locate the bin file you downloaded from PROMISE 3 Click the Submit button 4 In the Confirmation box type the word confirm in the field provided and click the Confirm button 5 The process will take several seconds When it is completed you will be prompted to restart the comp...

Страница 57: ... version available for download 3 If you want to update to the Online Version of PROMISE Utility click the Update button and follow the directions when prompted to complete the update Update software in Mac Follow these instructions to update the utility software in Mac 1 With the utility menu selected go to the top of the desktop click on Promise Utility and choose Check for Updates 2 The Mac wil...

Страница 58: ... Checking LEDs on page 50 Replacing a Physical Drive on page 52 Pegasus2 R2 LED indicators including 2 5 HDD pod Drive Status LED DriveActivity LED Power button System Status LED USB connection LED remains dark if Thunderbolt is connected Thunderbolt connection LED 2 5 HDD Status Activity LED 49 Promise Technology ...

Страница 59: ... below for quick reference State Power Button 3 5 Disk Status 3 5 Disk Activity Dark No power powered off Power off disk carrier not inserted Power off no disk disk carrier not inserted Blue Normal Normal Disk ready Flashing Blue Activity Orange short duration booting up or shutting down long duration RAID 1 rebuilding RAID problem RAID degraded RAID rebuiliding Red Fatal error in RAID high tem pe...

Страница 60: ...the top of the page 2 Click on the Pegasus2 logo near the middle right of the page 3 Locate the Pegasus2 R2 link and click on it 4 Scroll down to locate the compatibility section or use the menu to select only Compatibility and click the Multi Language link to download a PDF file with a list of compatible drives Download HDD compatibility list from PROMISE website 1 2 3 4 Click on download link to...

Страница 61: ... s or 6 Gb s Spin speed 7 200 RPM or 15 000 RPM Capacity Equal size or larger You do not have to install the identical make and model of physical drive However replacing with the same make and model of drive makes the process easier and simpler You can replace a physical drive without shutting down the Pegasus2 R2 unit Activity LED is blue Drive Status LED is red Failed physical drive 52 Pegasus2 ...

Страница 62: ... 1 Press the release button to unlock the drive carrier The drive carrier handle swings out 2 Grasp the handle and gently pull the drive carrier out of the Pegasus unit and place it onto a static free surface 53 Promise Technology ...

Страница 63: ... mounting screws Tighten the screws just until they are snug Position the drive carrier handle in outward position and slide the drive carrier back into the Pegasus unit 3 Press the drive carrier handle inward until it locks Physical drive Mounting screw Mounting screw Mounting screw Mounting screw Drive carrier handle 54 Pegasus2 R2 Product Manual ...

Страница 64: ...nit press and hold the Power Button LED until it turns red 2 Wait until the Power Button LED goes dark 3 For each drive carrier press the Release button pull the drive carrier part way out of the unit then press the drive carrier back in until it locks See Replacing a Physical Drive on page 126 4 Press the Power Button LED to power up the Pegasus unit 55 Promise Technology ...

Страница 65: ...ever see this warning message for Pegasus logical drive because the PROMISE Utility formats your logical drives automatically If the warning message appears try using the computer s disk utility to REPAIR the problem logical drive For more information see the utility s online help or the computer s User Manual If the disk utility cannot repair the logical drive contact T echnical Support for advic...

Страница 66: ...atus box 1 Click the name link of the component with the red X icon System Status box on the Dashboard all hardware function normal The list containing the problem component displays In the case of a high temperature issue shown in the example above the Component List displays 2 For physical drives disk arrays logical drives and spare drives mouse over the component with the red X icon and click t...

Страница 67: ...equate air circulation around the Pegasus unit Fan Failure The fan on the back of the Pegasus unit cools the entire enclosure including physical drives the RAID controller and the power supply The cooling fan is not field replaceable If there is any problem with a cooling fan contact T echnical Support to make arrangements for a repair System cooling fan Pegasus cooling fan on back 58 Pegasus2 R2 ...

Страница 68: ...t any problems identified above Shut down the Pegasus unit Press and hold the Power Button for a few seconds until the LED turns red The PROMISE Utility displays the message Unable to connect to the device Wait at least one hour then restart the Pegasus unit Press the Power Button The Pegasus boots within a few seconds Power Supply The power supply used in the Pegasus unit is not field replaceable...

Страница 69: ...le for the Thunderbolt connection Only use a USB 3 0 cable for a USB 3 0 connection Be sure to use approved cables because They are the proper ones for your system They are sold in brand new condition Daisy Chains If you have multiple Pegasus Pegasus2 units daisy chained together all Pegasus Pegasus2 units must be running to provide access to your volumes and the data they contain If you shut down...

Страница 70: ...e numbers of local Phone Support and other contact information PROMISE E Support https support PROMISE com PROMISE web site http www PROMISE com When you contact us please have the following information available Product model and serial number BIOS firmware and driver version numbers A description of the problem situation System configuration information including motherboard and CPU type hard dr...

Страница 71: ...hoven 5228 5692 EG Son The Netherlands Technical Support E Support https support PROMISE com Web site http www PROMISE com Austria Technical Support E Support https support PROMISE com Web site http www PROMISE com France Technical Support E Support https support PROMISE com Web site http www PROMISE com Germany Europaplatz 9 44269 Dortmund Germany Technical Support E Support https support PROMISE...

Страница 72: ...site http www PROMISE com Luxembourg Technical Support E Support https support PROMISE com Web site http www PROMISE com United Kingdom Technical Support E Support https support PROMISE com Web site http www PROMISE com Taiwan Technical Support E Support https support PROMISE com Web site http www PROMISE com China Room 1108 West Wing Shi Chuang Plaza 22 Information Road Shangdi IT Park Haidian Di...

Страница 73: ...ttps support PROMISE com Web site http www PROMISE com Singapore Technical Support E Support https support PROMISE com Web site http www PROMISE com Japan 3F Mura Matsu Bldg 3 8 5 Hongo Bunkyo ku Tokyo 113 0033 Japan Technical Support E Support https support PROMISE com Web site http www PROMISE com 64 Pegasus2 R2 Product Manual ...

Страница 74: ...w and in cartons on the date of purchase b is not transferable c is valid only when accompanied by a copy of the original purchase invoice d Is not valid on spare parts This warranty shall not apply to defects resulting from a improper or inadequate maintenance or unauthorized modification s performed by the end user b operation outside the environmental specifications for the product c accident m...

Страница 75: ... relied on to vary the terms of this limited warranty PROMISE s sole responsibility with respect to any product is to do one of the following a replace the product with a conforming unit of the same or superior product b repair the product PROMISE shall not be liable for the cost of procuring substitute goods services lost profits unrealized savings equipment damage costs of recovering reprogrammi...

Страница 76: ...hipping address Daytime phone number Description of the problem Copy of the original purchase invoice The technician helps you determine whether the product requires repair If the product needs repair the technician issues an RMA Return Merchandise Authorization number Return ONLY the specific product covered by the warranty Do not ship cables manuals CDs etc USA and Canada PROMISE Technology Inc ...

Страница 77: ...nder the Limited Warranty When repairing returned product s PROMISE may replace defective parts with new or reconditioned parts or replace the entire unit with a new or reconditioned unit In the event of a replacement the replacement unit is under warranty for the remainder of the original warranty term from purchase date or 30 days whichever is longer PROMISE pays for outbound standard shipping c...

Страница 78: ... 2015 PROMISE Technology Inc All Rights Reserved ...

Отзывы: