En
g
lis
h
CONTROL MODULE.
DT-802
04-2015
Page 19
4.7 CONFIGURATION
After turning on the unit, wait until the checking of all the units connected to the
control unit is done.
After the checking, press
ENTER
on the frontal equipped to get into the
CONFIGURATION
login screen.
After entering the
PASSWORD
you will access the settings.
From the starting screen, you can select the module you want to access in order
to edit its settings (Fig. 10.-). To do it, use the keys
LEFT
or
RIGHT
to move
among the available modules.
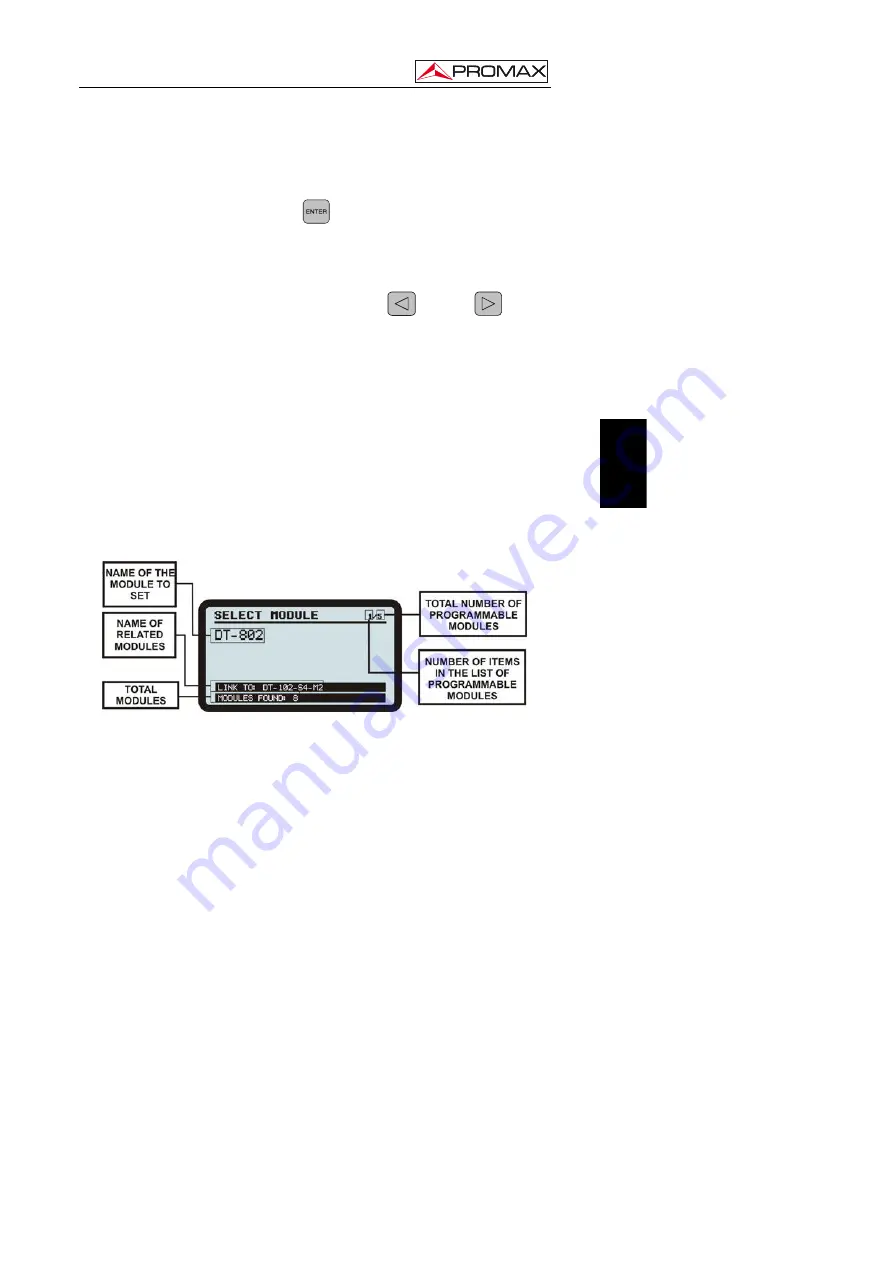
4.7.1 Description of the initial setup screen
At the top of the screen appears "
SELECT MODULE
” and at the top right corner
a fractional number indicating the position of the currently selected option over the total
amount of menu options.
At the central area of the screen it appears the name of the module (Fig. 12.-), on
the figure is the
DT-802
control unit. Note that the system counts the double modules
like two different units and the configurations of them are independent.
At the bottom area, the first line shows the message "
LINK TO
: ..." and then the
name of a module. This message indicates the modules the unit control is connected to
and have been detected during the scan after starting. The second line shows the
number of modules found, excluding the control unit.
Figure 12.-
Initial setup screen.
The first module that appears after entering the
CONFIGURATION
menu, is the
control unit
DT-802
. The order of appearance of the rest of modules may vary
depending on the location and connection of the modules at the rack and the automatic
assigment made by the control unit when booting.
Содержание DT-802
Страница 4: ...CONTROL MODULE DT 802 ...
Страница 8: ...CONTROL MODULE DT 802 Page 4 04 2015 ...
Страница 12: ...CONTROL MODULE DT 802 Figure 2 Assembling a DT 900 in a Rack Cabinet Figure 3 Tilting System Page 8 04 2015 ...
Страница 28: ...CONTROL MODULE DT 802 Figure 15 Menu tree DT 802 Page 24 04 2015 ...
Страница 42: ...PROMAX ELECTRONICA S L ...


