background image

GHOST GH080F

6

- 2 -  FUNCTIONS  AND SETTINGS

2.1 OPERATION

Note that faze machines develop condensation around the output nozzle. This may result in moisture ac-

cumulation on the surface below the output nozzle.

There is no On/Off power switch design for GHOST GH080F mist haze machine. When the power cord 

connects to the electricity outlet, the machine will immediately start heating up and in the standby mode, 

during this time the LCD pannel will display  “ WARMING UP”. It requires about 100 seconds for GHOST 

GH080F’s heating up. When the machine is ready during the warming up session, the LCD display will 

change to “READY TO FAZER”.

ADD PROLIGHTS FLUID IN TIME IF THE SMOKE MACHINE KEEPS RUNNING WHEN IT HAS RUN OUT OF 
FLUID. ITS PUMP WILL BE DAMAGED! 

Place the unit on a horizontal surface;

• 

Remove the cover of the flight-case

• 

Unscrew the tank cap

• 

Fill up the water-fluid container Prolights. If any fluid is split, wipe it off immediately with a dry cloth. It 

must not get inside the unit.

• 

Tightly close the tank.

• 

Plug main power cord from the fog machine into the appropriate power supply socket. Wait a few 

minutes for heating element to heat up.

• 

 When the heating process is completed the haze machine is ready for use.

• 

Refer to the section of the manual “Set-up”.

WARNING - while filling up the fluid container Prolights, the unit must not be connected. Disconnect the 

main plug from the socket first!

The unit is not splashproof. If fluid accidentally gets inside the unit, do not set the haze machine into op-

eration; it must be cleaned and checked by skilled personnel first.

2.2 BASIC

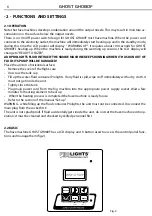
The haze machine GHOST GH080F has a LCD display and  6 button used to access the control panel func-

tions and manage them (fig.2).

Fig.2

8

A

M

P

FUNCTION

TIMER

VOLUME

MANUAL

Содержание GHOST GH080F

Страница 1: ...EN IT Manuale Utente User Manual GHOST GH080F PROFESSIONAL 800W FAZER MACHINE ...

Страница 2: ...ate nel presente manuale di istruzioni Tutte le revisioni e gli aggiornamenti sono disponibili nella sezione Manuali sul sito www musiclights it All rights reserved by Music Lights S r l No part of this instruction manual may be Reproduced in any form or by any means for any commercial use In order to improve the quality of products Music Lights S r l reserves the right to modify the characteristi...

Страница 3: ...per il funzionamento 2 2 Impostazione base 2 3 Modalità di funzionamento TIMER 2 4 Modalità di funzionamento VOLUME 2 5 Modalità di funzionamento QUICK START 2 6 Modalità di funzionamento DMX 2 7 Impostazione dell indirizzo di start 2 8 Collegamenti della linea DMX 2 9 Costruzione del terminatore DMX 2 10 Funzione manual 2 11 Funzione velocità ventole 2 12 Attivazione sensore AIR PUMP 2 13 Modalit...

Страница 4: ...itivo definitivamente consegnarlo per lo smaltimento ad un istituzione locale per il riciclaggio Attenzioni e precauzioni per l installazione Togliere tutto il materiale di imballo Vicino alla bocca di erogazione non si devono trovare resti dell im ballaggio Posizionare l unità in un posto ventilato per evitare un surriscaldamento della stessa Evitare di ostruire l ingresso e l uscita dell aria Te...

Страница 5: ... delle Condizioni Generali di Garanzia Si prega dopo l acquisto di procedere alla registrazione del prodotto sul sito www musiclights it In alternativa il prodotto può essere registrato compilando e inviando il modulo riportato alla fine del manuale A tutti gli effetti la validità della garanzia è avallata unicamente dalla presentazione del certificato di garanzia Music Lights constata tramite ve ...

Страница 6: ...caldaia GH080F risulta essere adatta per qualsiasi tipo di applicazione in stages teatri broadcasting grazie alla sua estrema silenziosità e la funzionalità in DMX che consente di regolare sia il volume di fumo che la frequenza delle ventole 1 2 SPECIFICHE TECNICHE Alimentazione AC 220 240V 50 60 Hz Caldaia 800W Emissione 3 000 cu ft min Preriscaldamento prima accensione 100 sec Consumo di liquido...

Страница 7: ... DISPLAY LCD 7 PANNELLO DI CONTROLLO con 6 pulsanti per accesso e gestione delle diverse funzioni 8 INGRESSO TUBO DI ASPIRAZIONE 9 BREAKER 8 AMP 10 POWER INPUT connettore di potenza Neutrik per il collegamento ad una presa di rete 220 240V 50 60Hz tramite il cavo rete in dotazione 11 DMX OUT XLR a 5 poli 1 massa 2 DMX 3 DMX 4N C 5N C 8 A M P FUNCTION TIMER VOLUME MANUAL 9 7 10 11 5 6 8 Fig 1 ...

Страница 8: ...I Posizionare l unità su un piano orizzontale Rimuovere il coperchio del flight case Svitare il tappo del serbatoio Versare il liquido Prolights Raccogliere subito con un panno asciutto il liquido eventualmente rovescia to per evitare che entri dentro alla macchina Richiudere bene il serbatoio Collegare il cavo di alimentazione alla rete elettrica Quando la fase di riscaldamento è terminata la rip...

Страница 9: ...zione desiderata INTERVAL SET DURATION SET TIMER OUT VOLUME OUT FAN SPEED 20 e DMX 512 INTERVAL SET Selezionare l intervallo di tempo tra le erogazioni di fumo da 5 a 200 secondi con i tasti UP DOWN da utilizzare nella modalitàTIMER DURATION SET Selezionare il tempo di durata di emissione continua da 5 a 200 secondi con i tasti UP DOWN da utilizzare nella modalitàTIMER TIMER OUT Selezionare la qua...

Страница 10: ...nel mode Value 1 SMOKE OUTPUT No function Smoke 2 100 000 005 006 255 2 SPEED CONTROL Speed Fans 20 100 000 255 2 5 MODALITÀ DI FUNZIONAMENTO QUICK START Questa modalità permette di richiamare l ultima impostazione attivata sulla macchina per esempio se è stata attivata la modalità TIMER per ultima la macchina al riavvio entrerà in modalità TIMER dopo che il riscaldamento è stato completato Per at...

Страница 11: ...nghe distanze è consigliato inserire sull ulti ma unità una terminazione DMX 2 9 COSTRUZIONE DEL TERMINATORE DMX La terminazione evita la probabilità che il segnale DMX 512 una volta raggiunta la fine della linea stessa venga riflesso indietro lungo il cavo provocando in certe condizioni e lunghezze la sua sovrapposizione al segnale originale e la sua cancellazione La terminazione deve essere effe...

Страница 12: ...disattivare il sensore Completata l operazione premere il tasto VOLUME per memorizzare l impostazione NOTA Il sensore AIR PUMP è un dispositivo di protezione in modalità di funzionamento normale si prega di attivare sempre il sensore 2 13 MODALITÀ DI SPEGNIMENTO UNITÀ Quando il display LCD mostra il messaggio READY TO FAZER tenere premuto il tasto MANUAL per circa 3 secondi per spegnere l unità Se...

Страница 13: ... di ricarica del fluido Rivolgersi a un centro autorizzato per l assistenza Errata emissione del fumo Errato settaggio del volume di emissione Utilizzo di fluido errato Pompa difettosa Regolare il valore corretto della funzione del volume di emissione Pulire il serbatoio dell unità e utilizzare il fluido appropiato Rivolgersi a un centro autorizzato per l assistenza L unità non si accende Mancanza...

Страница 14: ......

Страница 15: ... 1 3 Operating elements and connections 2 Functions and settings 2 1 Operation 2 2 Basic 2 3 Timer mode 2 4 Volume mode 2 5 QUICK START mode 2 6 DMX mode 2 7 Adjusting the start address 2 8 Connection of the DMX line 2 9 Construction of the DMX termination 2 10 Manual function 2 11 Fan speed function 2 12 AIR PUMP sensor 2 13 Power off mode 3 Maintenance 3 1 Trouble shooting Warranty 2 2 3 4 4 5 6...

Страница 16: ...qualified technical personnel Contact the nearest sales point for an inspection or contact the manufacturer directly If the unit is to be put out of operation definitively take it to a local recycling plant for a disposal which is not harmful to the environment Warnings and installation precautions Remove all the packaging material Make sure that there are no packaging remnants near the fog out pu...

Страница 17: ...ite www musiclights it Please remember to register the piece of equipment soon after you purchase it logging on www musiclights it The product can be also registered filling in and sending the form available on your guarantee certificate For all purposes the va lidity of the guarantee is endorsed solely on presentation of the guarantee certificate Music Lights will verify the validity of the claim...

Страница 18: ...le for this critical component The GH080F also features built in DMX functionality and silent operation making it suitable for the widest variety of theatrical and stage applications 1 2 TECHNICAL SPECIFICATIONS Power AC220 240V 50 60Hz Heater 800W Output 3000 cu ft min First Heat up Time 100 Sec Fluid Consumption 5 hr liter 100 Output Tank Capacity 2 7 liter Control Blue LCD screen Timer mode Vol...

Страница 19: ...XLR 1 ground 2 DMX 3 DMX 6 DISPLAY LCD 7 CONTROL PANEL with 6 button used to access the control panel functions and manage them 8 FOG FLUID IN 9 BREAKER 8 AMP 10 MAINS INPUT Neutrik connector for connection to a socket 220 240V 50 60Hz via the supplied mains cable 11 DMX OUT 5 pole XLR 1 ground 2 DMX 3 DMX 4 N C 5 N C 8 A M P FUNCTION TIMER VOLUME MANUAL 9 7 10 11 5 6 8 ...

Страница 20: ...ontal surface Remove the cover of the flight case Unscrew the tank cap Fill up the water fluid container Prolights If any fluid is split wipe it off immediately with a dry cloth It must not get inside the unit Tightly close the tank Plug main power cord from the fog machine into the appropriate power supply socket Wait a few minutes for heating element to heat up When the heating process is comple...

Страница 21: ...RUCTIONS FUNCTION Can be select the desired function INTERVAL SET DURATION SET TIMER OUT VOLUME OUT FAN SPEED 20 DMX 512 INTERVAL SET Setting of interval time from 5 200 seconds with the button UP DOWN effective when starting theTIMER mode DURATION SET Setting of duration time from 5 200 seconds with the button UP DOWN effective when starting theTIMER mode TIMER OUT Setting the amount of emission ...

Страница 22: ...s The GHOST GH080F fazer machine provide two channels one for the fan and the other is for fog output 2 7 ADJUSTING THE START ADDRESS To able to operate the GHOST GH080F with a controller adjust the DMX start address for first DMX chan nel If e g address 33 on the controller is provided for controlling the function of the first DMX channel adjust the start address 33 on the GHOST GH080F The other ...

Страница 23: ...s to run longer distance is recommended to insert a DMX termination on the last unit 2 9 CONSTRUCTION OF THE DMX TERMINATION The termination avoids the risk of DMX 512 signals being reflected back along the cable when they reach es the end of the line under certain conditions and with certain cable lengths this could cause them to cancel the original signals The termination is prepared by solderin...

Страница 24: ...important protection device Under normal operation mode please assure the sensor is activated on After above setting is completed press VOLUME button can memorize the final setting and leave setting mode 2 10 POWER OFF MODE When the LCD panel display READY TO FAZER press the MANUAL button for 3 seconds to turn off the machine If the machine is switched off this way the display will start to count ...

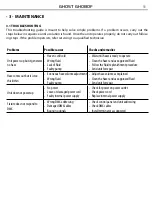
Страница 25: ...p Wait until hazer is ready to operate Clean the hazer and use approved fluid Follow the fluid replenishment procedure Send unit for repair Haze comes out but it is too thick thin Erroneous haze volume adjustment Wrong fluid Faulty pump Adjust haze volume as explained Clean the hazer and use approved fluid Send unit for repair Unit does not power up No power Loose or damaged power cord Faulty inte...

Страница 26: ......

Страница 27: ...chi conseguenti sono a carico del possessore dell apparecchio A tutti gli effetti la validità della garanzia è avallata unicamente dalla presentazione del certificato di garanzia The guarantee covers the unit in compliance with existing regulations You can find the full version of the General Guarantee Conditions on our web site www musiclights it Abstract General Guarantee Conditions Please remem...

Страница 28: ...date Data acquisto FORM TO BE FILLED IN AND MAILED CEDOLA DA COMPILARE E SPEDIRE FORM TO BE FILLED IN AND KEPT CEDOLA DA COMPILARE E CONSERVARE PROV ZIP CODE C A P MODEL MODELLO SERIAL N SERIE N Purchased by Acquistato da SURNAME COGNOME Dealer s stamp and signature Timbro e firma del Rivenditore NAME NOME ADDRESS VIA N CITY CITTà Purchasing date Data acquisto PROV ZIP CODE C A P ...

Страница 29: ......

Страница 30: ......

Страница 31: ......

Страница 32: ...39 0771 721955 www musiclights it info musiclights it Music Lights S r l entertainment technologies ISO 9001 2008 Certified Company 2012 Music Lights S r l PROLIGHTS è un brand di proprietà della Music Lights S r l PROLIGHTS is a brand of Music Lights S r l company ...

Отзывы: