ProHD DT-N17H Скачать руководство пользователя страница 15

15

To do
Return Main Menu
OSD Language setting
OSD Blending setting
OSD Duration setting
OSD Zoom setting

Key Led Brightness
Tally-R Brightness
Tally-G Brightness

Item
Exit
Key Inhibit

To do
Return Main Menu
Key Inhibit setting

Setting value

On

*1 During this period of time, if there's no operation to the menu, the menu will automatically quit.

Key Led Brightness setting
Set the brightness of tally when is red
Set the brightness of tally when is green

Low

Medium

High

Off

High

Low

Medium

High

Low

Medium

On

Setting value

English

Chinese

Low

Medium

High

Off

10Sec

15Sec

30Sec

60Sec

Item
Exit
OSD Language
OSD Blending
OSD Duration*1

OSD

Adjust the OSD display size, color, duration, and TALLY light/keyboard light settings

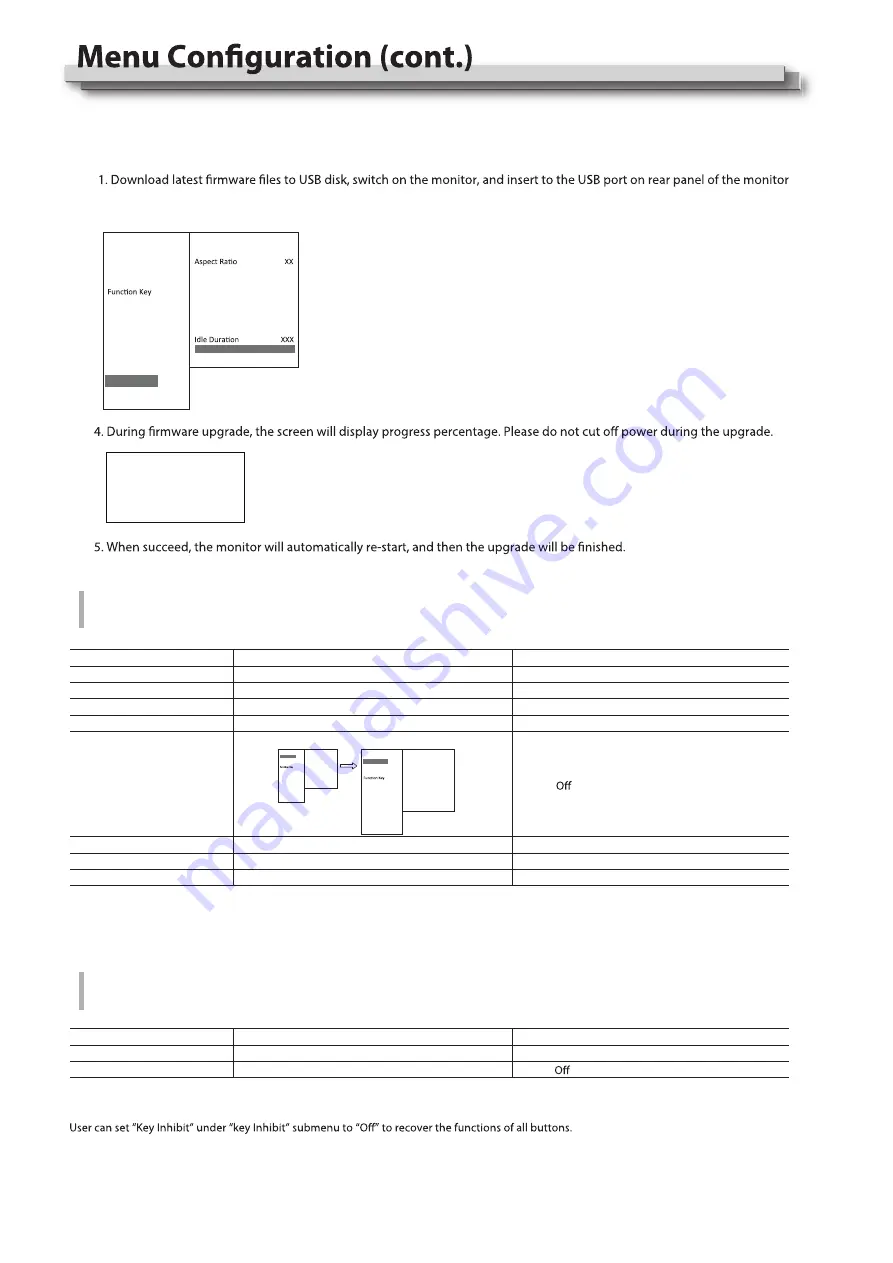
2. Press “MENU/ENTER”, enter “Main Menu” -  “System”, and select “Update Driver” or “Update Kernel”.

3. Set “Yes”, the monitor will upgrade automatically. 

OSD Zoom

Key Inhibit

To lock the keyboard for safety operation

If the “Key Inhibit” is “On”, there is no response when all the buttons expert ” VOLUME MENU/PUSH” are pressed, the sreen will be displayed as ” 
Key Inhibit”.

Main Menu

Exit&Status
Picture
Color Temp

GPI
UMD

Marker
Audio

Vector

Waveform

Display
System

OSD

Key Inhibit


Status

HDMI                                  XXX

User Profile                          XX

Color Temp                      XXXX

Scan Mode                         XXX

Freeze Frame                     XXX

F1                                         XXX

F2                                         XXX

F3                                         XXX

F4                                         XXX

F5                                         XXX

System Version                  XXX

Main Menu

Exit&Status

Picture
Color Temp

GPI

UMD

Marker
Audio

Vector

Waveform

Display
System

OSD

Key Inhibit


Status

HDMI                                  XXX

User Profile                          XX

Color Temp                      XXXX

Scan Mode                         XXX

Freeze Frame                     XXX

F1                                         XXX

F2                                         XXX

F3                                         XXX

F4                                         XXX

F5                                         XXX

System Version                  XXX

USB firmware upgrade

Firmware Upgrating...          37%

Caution !  DO NOT cut off power

during firmware upgrade.

*4, *5 Update Driver/ Kernel
Operation steps:

Main Menu

Exit&Status
Picture

Color Temp

GPI
UMD

Marker
Audio

Vector

Waveform

Display
System

OSD

Key Inhibit


System

Exit

Scan Mode                       XXXX

Zoom Mode                       XXX

Freeze Frame                     XXX

Recall Profile                      XXX

Save Profile                        XXX

Source Scan                        XXX

Logo                                     XXX

Green Mode                       XXX

Update Driver                     Yes

Update Kernel                    XXX

Содержание DT-N17H

Страница 1: ...Version A For Customer Use Please read the Instruction Manual carefully and retain this information for future reference MULTI FORMAT LCD MONITOR INSTRUCTIONS DT N17H...

Страница 2: ...n a damp or dusty room where the product is exposed to soot or steam such as near the cooking counter or a humidifier near heat sources where condensation easily occurs such as near the window in a lo...

Страница 3: ...le system Do not overload wall outlets extension cords or convenience or electric shock Slots and openings in the cabinet are provided for ventilation These ensure reliable operation of the product an...

Страница 4: ...ntinuous operations of the LCD panel may accelerate the deterioration Operating Precautions IMPORTANT SAFETY INSTRUCTIONS 1 Read these instructions 2 Keep these instructions 3 Heed all warnings 4 Foll...

Страница 5: ...tions 7 Rear panel 7 Front panel 8 Showing Input Signals 9 Volume Adjustment Audio Channel Selection 9 On the Information Display 9 On the Status Display 9 10 The operation procedure 10 Menu Transitio...

Страница 6: ...e LCD panel from being damaged Take out the desktop stand 2 feet from accessory box in the package Clockwise screw the feet onto the bottom of the monitor Do not rest your arm on the monitor or lean a...

Страница 7: ...ency of 48 kHz 5 HDMI terminal Input Output terminal for HDMI signals The monitor will not display or output HDMI with HDCP protection page 22 7 AUDIO IN terminals pin jack Input terminals for the ana...

Страница 8: ...to apply When the menu is inactivated revolve VOLUME MENU PUSH to adjust the sound volume Picture adjustment knob BRIGHT Adjusts the picture brightness and the default value is 50 CONTRAST Adjusts th...

Страница 9: ...ending etc can be changed under Audio Bar submenu User can set function Keys F1 Press VOLUME MENU PUSH button the main menu will pop up from the left top of the screen to display the current working s...

Страница 10: ...iagram 1 2 3 4 5 Exit Status is only displayed and cannot be set changed Exit Status HDMI User Pro le Color Temp Scan Mode Freeze Frame F1 F2 F3 F4 F5 System Version Picture Exit Contrast Brightness S...

Страница 11: ...CVBS YPbPr VGA Color Temp Time Code Zebra To do Return Main Menu Assign functions to the function keys F1 F5 on the front key board Item Exit GPI Control 1 1 Pin 2 Pin 3 Pin 4 Pin 5 Pin 6 Pin Setting...

Страница 12: ...Display Type to UMD 3 Set Serial Port to RS485 or RS232 according to the port type of external control equipment 4 Make sure the address Baud Rate Parity the same 5 Adjust the external control equipm...

Страница 13: ...t channel number displays green and the right channel number displays red Audio Bar 09 20 48 1 2 04DB 06DB Red Yellow Green Bar Frame On 1 2 Bar Frame Off 09 20 48 1 2 04DB 06DB Audio Alarm On Audio A...

Страница 14: ...e time to enter Energy Save mode Setting value 16 9 4 3 Normal Factory User1 User2 User3 OverScan Native Zoom1 Zoom2 Display Waveform Audio Bar Vector Zebra Focus Assist Time Code Histogram False Colo...

Страница 15: ...ck the keyboard for safety operation If the Key Inhibit is On there is no response when all the buttons expert VOLUME MENU PUSH are pressed the sreen will be displayed as Key Inhibit Main Menu Exit St...

Страница 16: ...Scan Mode value changes in the order of Normal Overscan Native Off H Llip V Flip H V Flip order of Off Odd Mode Even Mode Zoom1 Zoom2 For every short circuiting the value changes in the order of On Fo...

Страница 17: ...l of the monitor becomes hot The monitor emits a cracking noise The monitor emits a mechanical noise Symptom Probable cause and corrective action press POWER button Firmly insert the AC power plug Sel...

Страница 18: ...rnal dimensions excluding protruding parts Weight 4 65 kg 10 25lbs with the stand Accessories AC power cord x 1 17 3 wide active matrix TFT Width 381 89 mm 15 Height 214 81 mm 8 7 16 Diagonal 439 42 m...

Страница 19: ...5 16 15 16 303 8 11 15 16 349 4 13 3 4 310 4 12 1 4 179 2 7 1 16 328 7 12 15 16 100 100 106 135 5 5 16 73 2 7 8 21 13 16 14 9 16 90 70 DT N17H Front view Side view Rear view VESA mounting holes Size M...

Страница 20: ...2048 1080 24p 2048 1080 25p 2048 1080 29 97p 2048 1080 30p 2048 1080 50p 2048 1080 59 94p 2048 1080 60p NTSC NTSC PAL PAL PAL SECAM 480i59 94 480i59 94 576i50 480p59 94 480p59 94 576p50 640 480 640 48...

Страница 21: ...T M D S Data 0 16 SDA 3 T M D S Data 2 10 T M D S Clock 17 DDC CEC GND 4 T M D S Data 1 11 T M D S Clock shield 18 5 V Power 5 T M D S Data 1 shield 12 T M D S Clock 19 Hot Plug Detect 6 T M D S Data...

Страница 22: ...22 MEMO...

Страница 23: ...swit cc This model is manufactured warranted and supported by SWIT Electronics Co Ltd SWIT Electronics USA LLC and distributed in North America by JVCKENWOOD USA Corporation To obtain service or for...

Отзывы: