background image


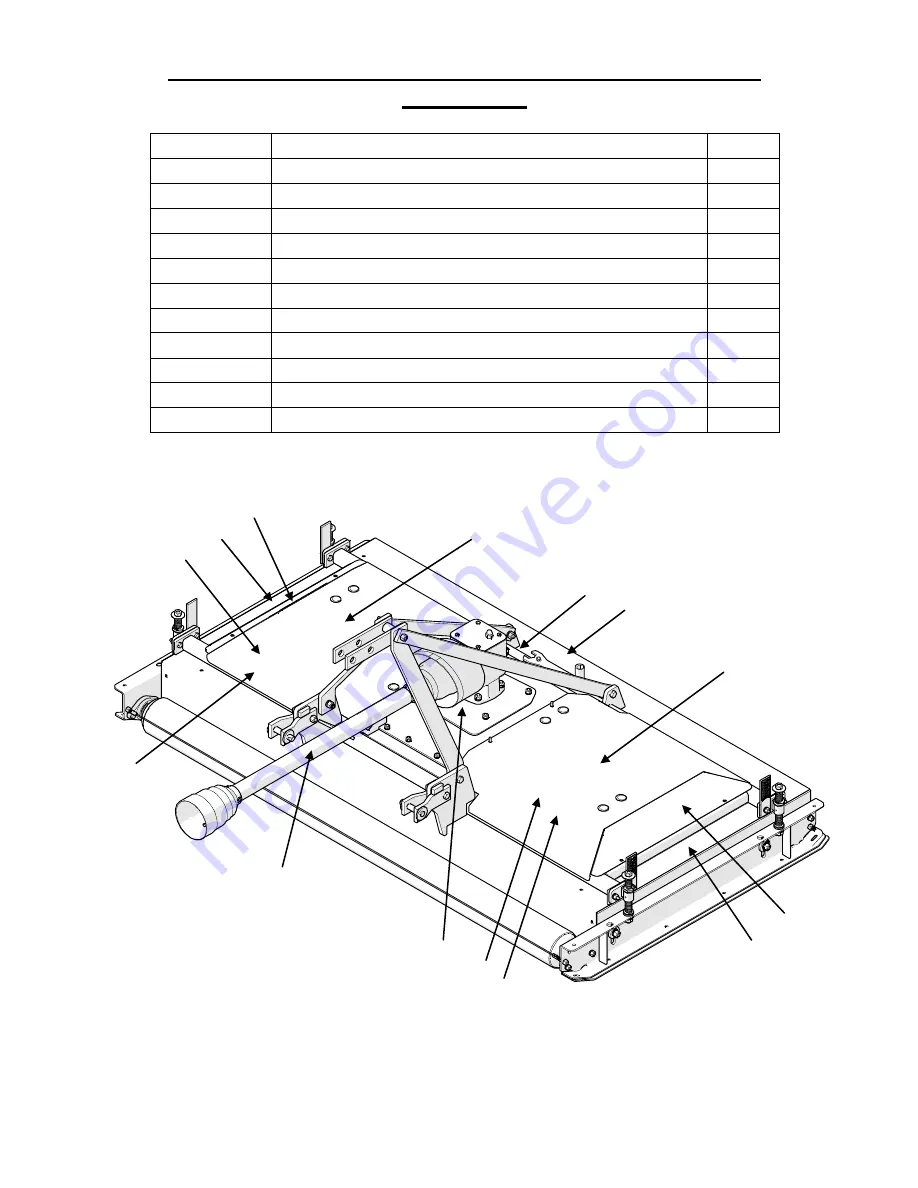
SAFETY & MAINTENANCE DECAL LOCATIONS ON 

MACHINE


ITEM NO. 

DESCRIPTION 

QTY 

DANGER – READ MANUAL 

CAUTION – REPLACE SHIELDS 

DANGER – BLADE HAZARD 

WARNING – OEM PARTS 

CAUTION – DISENGAGE PTO 

PTO GREASING 

COMPANY NAME 

MOWER MODEL 

DANGER – OUTER TUBE 

10 

DANGER – OUTER SHIELD 

11 

DECAL - PRO-EZ BLADE HARDWARE 


10 

11 

Содержание SDR 65

Страница 1: ...RESSIVE TURF EQUIPMENT INC 137 WEST WILLIAM STREET SEAFORTH ONTARIO CANADA N0K 1WO PHONE 519 527 1080 SERIAL _____________________ TOLL FREE 800 668 8873 WEB www progressiveturfequip com ISSUE DATE May 2017 P N 120521 Si No Lee Ingles Pida Ayuda a Alguien Que Se Lo Lea Para Que le Traduzca Las Medidas de Seguridad ...

Страница 2: ......

Страница 3: ...1 ...

Страница 4: ...CHING MOWER TO TRACTOR 13 CONNECTING THE PTO SHAFT 13 Adjusting the PTO shaft to the correct length 14 CUTTING HEIGHT ADJUSTMENT 15 TRANSPORTING MOWERS 16 POWER TAKE OFF 16 MAINTENANCE 17 LUBRICATION 17 BLADE SPINDLE GREASING 18 GREASE COMPATIBILITY 19 GEARBOX OIL LEVEL 20 DECK GEARBOX 20 BLADE SERVICING 21 SPINDLE SERVICE 24 SPINDLE INSPECTION 24 SPINDLE ASSEMBLY REMOVAL 24 SPINDLE ASSEMBLY INSTA...

Страница 5: ...3 ...

Страница 6: ... of blade producers are capable of this process Always insist on purchasing and using OEM blades for your own protection and that of your employees ATTENTION This safety symbol means your personal safety is involved Be sure to observe and follow these instructions DANGER An extreme intrinsic hazard exists which would result in high probability of death or serious injury if proper precautions are n...

Страница 7: ...cular situation Throughout this manual references are made to right and left directions These are determined by standing at the rear of the equipment and facing the direction of forward travel Blade rotation is counter clockwise as viewed from the top of the mower For quick reference record the following information MODEL ___________________________ DATE PURCHASED ___________________________ SERIA...

Страница 8: ...actor into neutral and disengage power take off before starting tractor Never allow riders on tractor or equipment Use extreme care when operating on uneven terrain Immediately stop mower and shut off tractor upon striking any object Inspect mower and repair any damage before you continue mowing Always turn off tractor before making any adjustments to mower if operator has to dismount tractor If m...

Страница 9: ...ings from 1 2 to 4 Deck Drive PTO shaft to right angle gear box driving B section belts to heavy duty spindles Blade Support 3 4 x 1 2 x 8 long bar welded to spindle and machined for balance Two 1 2 bolts hold blade rigid to provide a clean level cut Deck Construction A single piece of 3 16 steel plate formed and welded with supporting members at high stress areas to achieve maximum structural str...

Страница 10: ...GER READ MANUAL 1 2 CAUTION REPLACE SHIELDS 2 3 DANGER BLADE HAZARD 3 4 WARNING OEM PARTS 1 5 CAUTION DISENGAGE PTO 1 6 PTO GREASING 1 7 COMPANY NAME 1 8 MOWER MODEL 2 9 DANGER OUTER TUBE 1 10 DANGER OUTER SHIELD 1 11 DECAL PRO EZ BLADE HARDWARE 1 3 3 3 6 2 2 4 1 7 8 8 5 9 10 11 ...

Страница 11: ...ce immediately Order decals according to corresponding Part below Complete decal kits are also available SDR Decal Kit 531002 ITEM 1 ITEM 2 ITEM 3 209172 209113 209173 ITEM 4 ITEM 5 209115 521820 ITEM 6 ITEM 7 521119 521817 ITEM 8 SDR 90 ITEM 8 SDR 65 209133 209135 ...

Страница 12: ...10 ITEM 9 ITEM 10 521451 521455 ITEM 11 SDR 65 ITEM 11 SDR 90 209182 209196 ...

Страница 13: ...t lists the correct tightening torque for fasteners on Progressive Turf Equipment mowers When bolts are to be tightened or replaced refer to this chart to determine the proper torque except when specific torque values are assigned in the manual Only SAE grade 5 fasteners are to be used in the assembly of this machine or as otherwise specified in this manual Bolt Head Markings SAE Grade 2 SAE Grade...

Страница 14: ...Check that mower is properly and securely attached to tractor with a safety chain 3 Ensure all safety shielding is properly installed and check that all nuts and bolts are secure and pins are properly cotter pinned 4 Check condition of blades and security of attachment 5 Ensure mower is properly mounted adjusted and in good operating condition 6 Clear area of stones branches or other debris that m...

Страница 15: ...t off and the parking brake is locked b Holding the PTO against the end of the tractor PTO shaft rotate the tractor PTO by hand until the shaft slides on slightly c Slide the locking collar on the PTO backwards releasing the locking mechanism Hold and slide the PTO on d Release the locking ring and pull the PTO shaft backwards until the locking mechanism snaps into place e Push the shaft forward a...

Страница 16: ...arbox shaft c Hold driveline shaft halves side by side to determine if they are too long The shields on each half should end approximately 3 from the universal joint shield Measure 3 back from the universal joint shield dimension X on Diagram 2 and mark that location on the inner and outer shields d Cut off the outer shield at dimension A Measure dimension A from the end of the outer shaft and cut...

Страница 17: ...ustments available from 1 2 to 4 Moving the adjuster up and down moves a side channel that mounts the front and rear rollers The height decals at the back of the deck are set 1 4 lower so that the back actually cuts 1 4 higher this will provide a better but prolong the life of the blades and reduce horsepower requirement To make a height adjustment follow these steps 1 Loosen the 2 locking bolts o...

Страница 18: ...n 2300 DO NOT TOW CAUTION Always have safety chain attached to towing vehicle POWER TAKE OFF CAUTION Keep all safety shields in place CAUTION When operating the power take off be sure the tractor shield is always in place covering the exposed power take off shaft WARNING Before dismounting from the tractor stop the power take off put tractor in neutral set brakes in lock position and shut off engi...

Страница 19: ...ll safety shields are installed before placing mower in service LUBRICATION A properly maintained lubrication schedule will provide a smooth running machine for many years The following information shows and describes where all lubrication points are located DECK P T O SHAFTS Spindles See Manual As Required Main Input See Below Pull Apart Sliding Tubes once per week and lubricate As Required CHECK...

Страница 20: ...pindle housing when greasing Greasing of blade spindles should continue until grease can be seen exiting between the top bearing and the bottom of hub on pulley Some working conditions will require this operation to take place every 4 to 5 running hours because of hot working areas Cooler working areas will only require greasing every 8 to 10 hours A proper greasing schedule can only be determined...

Страница 21: ...n lithium is used including lithium complex the existing grease will be contaminated and the lubrication properties may be lost leading to component damage 2 Molybdenum Disulfide Moly is an additive used in slow moving extreme load applications The particles in the Moly grease can actually increase bearing wear in a high speed mower application Generally speaking Moly based greases will be grey in...

Страница 22: ... Gearboxes all have an oil level plug located on the side of the gearbox Oil should reach the bottom of this hole If oil level is low add oil through top plug hole of casing until oil just starts to flow out of side oil level hole Replace and tighten plugs Use 80W90 gear oil or equivalent Filler Plug Level Plug ...

Страница 23: ... SELECTION SDR 90 Only We offer four blade styles for use with this mower Fixed high lift Combined with Progressive s high tip speed the fixed High Lift blade stands grass blades up for a clean cut even in damp conditions or at high mowing speeds Fixed low lift Developing less lift than the High Lift blade Progressive s Low Lift fixed blade is ideal for both new growth or sandy soils where abrasio...

Страница 24: ...s lock washers and nuts when replacing blades Tighten bolts to proper torque as listed on Page Error Bookmark not defined Replace any blade that is bent nicked deeper than excessively worn or has any other damage Small nicks can be ground out during sharpening Always balance blades before use In abrasive soil conditions monitor condition of the blade wing If erosion of the steel is evident at the ...

Страница 25: ...r file blades following original pattern as shown Sharpen to a razor edge Do not sharpen back side of blade Use the supplied cone balancer pn 209000 to verify blade balance When the blade is correctly balanced the blade will remain horizontal Failure to properly balance blades after sharpening can cause vibration leading to premature component damage Pro EZ Change blades must be balanced as a comp...

Страница 26: ...oper setting Periodically inspect blade spindles by grasping blade and moving from side to side If any free play is noted replace or repair SPINDLE ASSEMBLY REMOVAL 1 Remove blade from spindle 2 Remove belt shield Loosen 4 bolts that hold gearbox to mount 3 Loosen 1 2 x 3 1 2 tap bolts and slide gearbox toward front until belt is easy to remove 4 Remove belt 5 Remove 4 bolts attaching spindle asse...

Страница 27: ...e You must use a tube Note both ends must be square which will slide over spindle and press on inner race of bearing until seated against shim Insert bearing spacer tube with hole end up Set remaining bearing with shield side up open side on first onto spindle Press on inner race this bearing will be a loose fit in the hub so it will seat itself properly When all parts have been installed on spind...

Страница 28: ...26 For maintenance free spindle bearings both top bottom bearings are the same Shield seal orientation is the same on both sides of these bearings ...

Страница 29: ...proper belt tension the following procedure is recommended CHECKING BELT TENSION At the mid point of the span apply a deflection force with a spring scale in the direction perpendicular to the span until the belt is deflected the 3 8 The recommended force to deflect the belt is a minimum of 4 9 lbs to a maximum of 7 3 lbs The first 24 to 48 hours of operation is the belt run in period To ensure sa...

Страница 30: ...r deck has 2 belts to transmit power from the gear box to the blade spindles Each drive belt utilizes an adjustable sliding tensioner idler to set belt tension In the event that belt adjustment must be made follow these steps for each belt Loosen the jam nut on the adjusting screw Loosen the nut fixing the tensioning idler to the mower deck Set desired belt tension by turning the adjusting nut Clo...

Страница 31: ...ease tension Over heated bearings Belt slippage excessive drive tension Increase Tension Tension drive properly Input shaft does not collapse easily on turning Premature spindle bearing failure Lack of grease at intermediate location of drive shaft Lack of lubrication or grease is contaminated Remove driveshaft and pull apart Grease splines Grease every 8 hours See grease information and ensure gr...

Страница 32: ...30 ...

Страница 33: ...Parts List SDR 90 Effective serial number 17390106 and up Part 120521 Issue Date February 2018 Si No Lee Ingles Pida Ayuda a Alguien Que Se Lo Lea Para Que le Traduzca Las Medidas de Seguridad ...

Страница 34: ...ways state this information when contacting your selling dealer and when ordering spare parts Parts Information Use only Genuine Original Equipment Manufacturers O E M replacement parts The use of will fit parts may reduce machine performance void machine warranties and present a safety hazard Use Genuine OEM parts Progressive Turf Equipment Inc 137 West William Street Seaforth Ontario Canada N0K ...

Страница 35: ...ks before performing maintenance Block and or support machine using equipment designed for the task When maintaining blades or spindles always ensure locks are seated correctly in place When performing hydraulic maintenance ensure that pressure has been released It is imperative that the operator or qualified service technician reads and understands all the safety information in the Operator s Man...

Страница 36: ...Address of the person or organization ordering the parts who should be charged and if possible the serial number of the machine for which the parts are being ordered 3 The purchase order must clearly list the quantity of each part the complete and correct part number and the basic name of the part 4 The manufacturer reserves the right to substitute parts where applicable 5 Some parts may be unlist...

Страница 37: ...CATION II 1 DECK ASSEMBLY 2 1 1 BLADE SPINDLE ASSEMBLY 2 1 2 BLADE OPTIONS 3 1 3 GEAR BOX MOUNT 4 1 4 DECK ASSEMBLIES 5 1 5 DECK DRIVE 6 1 6 DECK ROLLER 7 1 7 BELT DRIVE ASSEMBLY REAR 8 2 FRAME ASSEMBLY 9 2 1 3 PT HITCH LINKAGE 9 2 2 PTO SHAFT 10 3 DECALS 11 ...

Страница 38: ...SDR 90 Parts Manual 2 1 DECK ASSEMBLY 1 1 Blade Spindle Assembly ...

Страница 39: ...SDR 90 Parts Manual 3 1 2 Blade Options ...

Страница 40: ...SDR 90 Parts Manual 4 1 3 Gear Box Mount ...

Страница 41: ...SDR 90 Parts Manual 5 1 4 Deck Assemblies ...

Страница 42: ...SDR 90 Parts Manual 6 1 5 Deck Drive ...

Страница 43: ...SDR 90 Parts Manual 7 1 6 Deck Roller 2 2018 ...

Страница 44: ...SDR 90 Parts Manual 8 1 7 Belt Drive Assembly Rear ...

Страница 45: ...SDR 90 Parts Manual 9 2 FRAME ASSEMBLY 2 1 3 PT Hitch Linkage ...

Страница 46: ...KIT GOLD METAL 1 521727 COLLAR KIT CO2 BLACK PLASTIC 1 11 521470 1 2 FEMALE SHAFT WITH SHIELDING 1 12 521471 1 2 MALE SHAFT WITH SHIELDING 1 13 521463 PLASTIC SHIELD BOLT 6PC KIT 1 KIT 14 521472 1 2 FEMALE SHIELD WITH LABEL 1 14B 526049 1 2 FEMALE SHIELD CE 1 15 521473 1 2 MALE SHIELD North American 1 15B 526053 1 2 MALE SHIELD CE 1 16 521467 SAFETY CHAIN North American 2 17 521455 DANGER LABEL FO...

Страница 47: ... SDR Decal Kit 531002 209172 209113 209173 GENERAL SAFETY REPLACE SHIELD ROTATING BLADE HAZARD 209115 521820 OEM REPLACEMENT PARTS DISENGAGE PTO 521119 521817 PTO LUBRICATION COMPANY INFO 209133 209135 SDR 90 MODEL DECAL SDR 65 MODEL DECAL ...

Страница 48: ...SDR 90 Parts Manual 12 521451 521455 PTO INNER WARNING PTO OUTER WARNING 209182 SDR 65 209196 SDR 90 BLADE HARDWARE BLADE HARDWARE ...

Отзывы: