background image

B2 250 AirTTL

5

www.profoto.com

Table of Contents

General safety instructions ........................................................................................4
Nomenclature ...........................................................................................................7
Operation ................................................................................................................11

Quick guide ...............................................................................................11
Power on/off ..............................................................................................11
Set light output in manual mode (Energy level) ..........................................11
Select Sync setting ....................................................................................12
Modeling light ............................................................................................13
Select Freeze/Normal mode .......................................................................13
Select Ready signal ...................................................................................14
Turn On/Off lamp head ...............................................................................14
Wrong exposure alarm ...............................................................................14
Quick burst ................................................................................................14
TTL ............................................................................................................14
HSS ...........................................................................................................15

Handling .................................................................................................................16

Battery status and charging .......................................................................16
Battery mounting .......................................................................................16
Stand mounting .........................................................................................16
Mounting Profoto Light Shaping Tools ........................................................17
Lamp head connection ..............................................................................17
Extension cable connection ........................................................................18
Replacement of protective glass, flash tube, modeling light LED ................18

Other ......................................................................................................................19

Temperature limit indicator ........................................................................19
Check Firmware ........................................................................................19
Upgrade Firmware .....................................................................................19

Technical data ........................................................................................................20
Regulatory information ...........................................................................................22

Содержание B2 250 AirTTL

Страница 1: ...ügbarunterprofoto com de support ES Estaguíadeusuarioestádisponibleenotrosidiomasenprofoto com support FR Cemanueld utilisationestégalementdisponibleend autreslanguessurprofoto com fr support IT Questaguidapergliutentièdisponibileinaltrelinguesuprofoto com it support JP このユーザーガイドはprofoto com ja supportに他の言語でもご用意しています RU Инструкция пользователя на других языках доступна на profoto com ru support ...

Страница 2: ...B2 250 AirTTL 2 www profoto com ...

Страница 3: ... Asaresult weareconfidentthatyournewProfotoproductwill staywithyouforyearsandhelpyougrowasaphotographer But getting the product is only the beginning of that journey Using it for light shaping is the real adventure That is why we takeprideinprovidingyouwithsuchawideassortmentoflight shaping tools allowing you to shape the light in any way you canimagine Thealmostinfinitepossibilitiesmightseembewil...

Страница 4: ...atteries installed shall not be exposed to excessive heat such as direct sunlight fire orthelike Safety advices for Lithium Ion batteries Do not crush Do not heat or incinerate Do not short circuit Do not dismantle Do not immerse in any liquid asthismaycausethebatterytoventorrupture Caution Burn Hazard Hot Parts Donottouchhotpartswithbarefingers Modelinglamps flashtubes protectiveglass andcertainm...

Страница 5: ...lect Ready signal 14 Turn On Off lamp head 14 Wrong exposure alarm 14 Quick burst 14 TTL 14 HSS 15 Handling 16 Battery status and charging 16 Battery mounting 16 Stand mounting 16 Mounting Profoto Light Shaping Tools 17 Lamp head connection 17 Extension cable connection 18 Replacement of protective glass flash tube modeling light LED 18 Other 19 Temperature limit indicator 19 Check Firmware 19 Upg...

Страница 6: ...B2 250 AirTTL 6 www profoto com ...

Страница 7: ...Display 6 SYNCbutton 7 SETbutton 8 ONbutton 9 MODELbutton1 10 MODEbutton 11 READYbutton 12 MODELbutton2 13 ENERGY SETTINGSdial1 14 ENERGY SETTINGSdial2 15 16 17 18 19 20 15 Syncconnector 16 USBport 17 Battery 18 Batterychargingconnector 19 BatteryCHECKbutton 20 Batteryreleasebutton 1 2 3 4 5 6 7 8 9 10 11 12 13 14 ...

Страница 8: ...Lightoutputsetting visibleonlywhen lampheadisconnected 25 Sync Airsetting 26 Batterylevelindicator 27 Modelinglightsetting1 28 Modesetting 29 Readysignalsetting 30 Modelinglightsetting2 31 Temperaturelimitindicator 21 22 23 24 25 26 27 28 29 30 31 32 Lampheadplug 33 Protectiveglass 34 Umbrellaholder 32 33 34 ...

Страница 9: ...B2 250 AirTTL 9 www profoto com 35 Standattachmentscrew 36 Tilt lockhandle 37 Clampscrew 38 Standadapter 39 ProfotoBatteryCharger2 8A 37 36 35 38 ...

Страница 10: ...B2 250 AirTTL 10 www profoto com 40 ProfotoCarCharger1 8A optional 41 B2AirTTLExtensionCable3m optional ...

Страница 11: ...ingtheTESTbutton 4 seepage7 10 Turn on off the modeling light of the connected lamp head by the corresponding MODELbutton 9 or 12 seepage13 11 SelectFreeze NormalmodebypressingtheMODEbutton 10 seepage13 12 SelectReadysignalsettingwiththeREADYbutton 11 seepage14 13 MountLightShapingTools seepage17 Poweron off Toswitchon offtheB2unit pressandholdtheONbutton 8 for1second When the B2 unit is switched ...

Страница 12: ...IR isshownintheSync Airsettingsection 25 theB2issettobetriggeredand or controlled from any of the optional ProfotoAir transceivers offered by Profoto The B2 supportsallavailableAiraccessoriesofferedbyProfoto includingthoselistedinthetable below 1 ActivateAirbypressingtheSYNCbutton 6 until AIR isdisplayed 2 Toviewthecurrentchannelsetting presstheSETbutton 7 once Thechannelsetting isdisplayedwithabl...

Страница 13: ...ibleinallsyncmodes Connectasynccablefromthecameraorflash metertotheSyncConnector 15 Modelinglight To turn on off the modeling light on a lamp head press the corresponding MODEL button 9 or 12 Themodelinglightsareautomaticallyturnedoffafterasettableperiodofinactivity 1 30 minutes 1 Tosetthetimer presstheSETbutton 7 until SETTIMER isdisplayed 2 TurntheENERGY SETTINGSdial2 14 tochangethetime SelectFr...

Страница 14: ...ethattheflashlightdoesnotfullycorrespondtothesetvalue The B2 will always flash even if the set light output cannot be met as the image may still beusableifthecatchofthemomentwasperfect Note that the sound alarm only will be activated when the Ready signal is set to BEEP or DIMBEEP Quickburst Quickburstisanautomaticallyactivatedfunctionthatallowsaseries burst offlashesto befiredatafasterpacethanthe...

Страница 15: ...flashoutputisset automatically by the camera The indicator is lit for fifteen seconds after receiving aTTL flashcommandfromtheremote HSS Profoto B2 supports HSS High Speed Sync with the optional Air Remote TTL enabling shutter time faster than the fastest x sync of the camera For compatible cameras visit Profoto com DuringaHSSflash theflashispulsingtogetaconstantlightoutputduringthetimewhen the sh...

Страница 16: ...eavethebatteryunchargedforalongtime Batterymounting 1 To mount the battery fit the battery pack in place and push firmly until the battery pack locks in place Make sure there is a click sound indicating that the battery packisproperlysecured 2 To dismount the battery first switch off the B2 unit Press the battery release button 20 andpulloutthebatterypack Standmounting The B2 lamp heads can be mou...

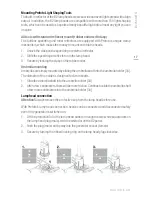
Страница 17: ...ead 3 Securebylockingtheclaspontherubbercollar Umbrellamounting Umbrellasaresimplymountedbyslidingtheumbrellashaftintotheumbrellaholder 34 Thediameteroftheholderisdesignedfor8mmshafts 1 Slidetheumbrellashaftintotheumbrellaholder 34 2 Afterafewcentimeters therewillbemorefriction Continuetoslidetheumbrellashaft afewmorecentimetersintotheumbrellaholder 34 Lampheadconnection Attention Alwaysremovethep...

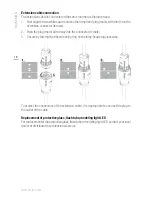
Страница 18: ...emale 2 Pushtheplug male allthewayintotheconnector female 3 Securebyturningtheribbedlockingringonthelampheadplugclockwise To protect the connectors of the extension cable it is appropriate to connect the plug to theoutletofthecable Replacementofprotectiveglass flashtube modelinglightLED Forreplacementoftheprotectiveglass flashtubeormodelinglightLED contactyourlocal dealerordistributorforprofession...

Страница 19: ...onthegenerator 8 2 Thecurrentfirmwareversionisshownonthedisplay 5 forexample A7 UpgradeFirmware WerecommendthatyouregularlylookforfirmwareupgradesonProfoto com With a personal account at My Profoto you can register your product and be sure you get noticed when important firmware updates are released Create an account at Profoto com myprofototoregisterandupdateyourproduct Upgradeoffirmwareismadevia...

Страница 20: ...nFreezemode t0 5 1 15000s 1Ws 1 1 000s 250Ws EnergystabilityNormalmode 1 20f stopflashtoflash EnergystabilityFreezemode 1 20f stopflashtoflash ColorstabilityNormalmode 150Koverrange 20Kflashtoflash ColorstabilityFreezemode 800Koverrange 50Kflashtoflash Lightspreadwithbuilt inreflector 70degrees Guidenumber 2m 100ISOwith Magnumreflector 322 10 Battery Model ExchangeableLi Ionbattery4S1P Type PCA132...

Страница 21: ...tedonthedisplay 3sections 100 70 2sections 70 40 1section 40 10 Blinking 10 Batterychargingtime 1h Autopoweroff Yesafter60minutes Sleepmodeactivated after30minutes Wirelesssync Yes viaallAircameratransmittersorIR Slave AllfiguresaretobeconsideredasnominalandProfotoreservestherighttomakechanges withoutfurthernotice ...

Страница 22: ...ceived including interference that may causeundesiredoperation Warning Part 15 21 Changes or modifications not expressly approved by the party responsible for compliance could void the user s authoritytooperatetheequipment Ce dispositif est conforme aux normes RSS 210 d Industrie Canada L utilisation de ce dispositifestautoriséeseulementauxconditionssuivantes 1 ilnedoitpasproduiredebrouillageet 2 ...

Страница 23: ...設備の種類 Classificationofspecifiedradioequipment Article2 Clause1 Item19 2 4GHzWideBandLowPowerDataCommunication 上記のとおり 電波法第38条の24第1項の規定に基づく認証を行ったも のであることを証する Thisistocertifythattheabove mentionedcertificationbytypehasbeengrantedin accordancewiththeprovisionsofArticle38 24 Paragraph1oftheRadioLaw R 202WW08109201 ...

Страница 24: ...B2 250 AirTTL 24 www profoto com ...

Страница 25: ...B2 250 AirTTL 25 www profoto com ...

Страница 26: ...nted in Sweden Technical data and product information are subject to change without notice ProfotoAB P O Box1264 SE 17265Sundbyberg SWEDEN Visitingaddress Landsvägen57 Sundbyberg Phone 4684475300 info profoto com www profoto com ...

Отзывы: