background image

12

MAINTENANCE AND TROUBLE-SHOOTING

Most treadmill problems can be solved by following the steps below. Find the symptom that applies, and
follow the steps listed. If further assistance is needed, please call our Customer Service Department toll-
free at 1-800-999-3756, Monday through Friday, 6 a.m. until 6 p.m. Mountain Time (excluding holidays).

PROBLEM: The power does not turn on

SOLUTION: a. Make sure that the power cord is plugged into a surge protector, and that the surge protector is

plugged into a properly grounded outlet. (See HOW TO PLUG IN THE POWER CORD on page
7.) Use only a UL-listed surge protector, rated at 15 amps, with a 14-gauge cord of five feet or
less in length. 

b. After the power cord has been plugged in, make sure that the key is fully inserted into the con-

sole. (See step 1 on page 8.)

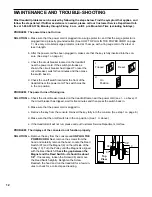
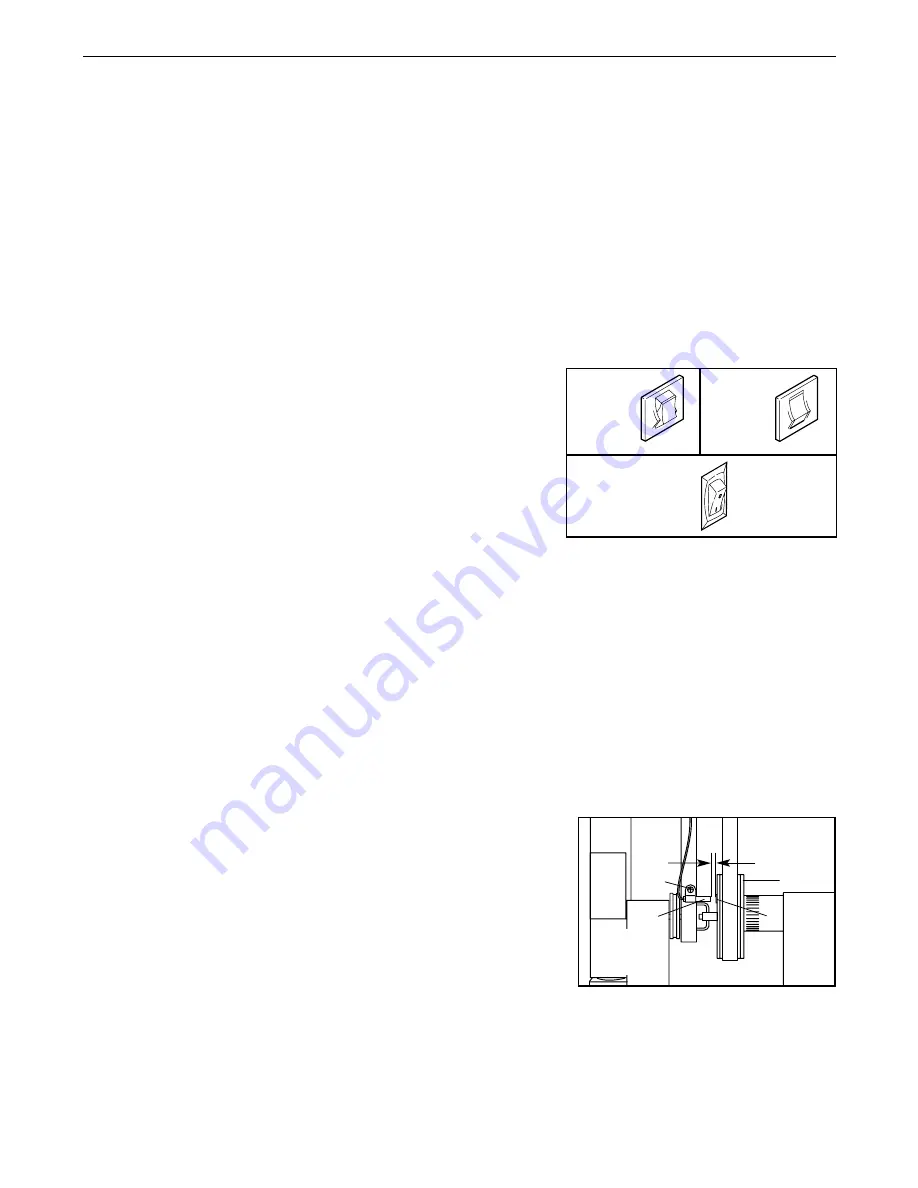
c. Check the circuit breaker located on the treadmill

near the power cord. If the switch protrudes as
shown, the circuit breaker has tripped. To reset the
circuit breaker, wait for five minutes and then press
the switch back in. 

d. Check the on/off switch located at the front of the

treadmill near the power cord. The switch must be
in the on position.

PROBLEM: The power turns off during use

SOLUTION: a. Check the circuit breaker located on the treadmill frame near the power cord (see 1. c. above). If

the circuit breaker has tripped, wait for five minutes and then press the switch back in.

b. Make sure that the power cord is plugged in.

c. Remove the key from the console. Reinsert the key fully into the console. (See step 1 on page 8.)

d. Make sure that the on/off switch is in the on position. (See 1. d. above.)

e. If the treadmill still will not run, please call our Customer Service Department, toll-free.

PROBLEM: The displays of the console do not function properly

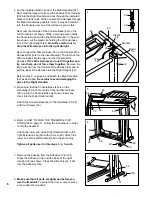
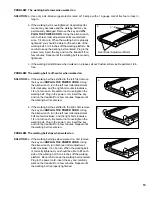
SOLUTION: a. Remove the key from the console and UNPLUG THE

POWER CORD. Next, remove the screws from the
hood and carefully remove the hood. Locate the Reed
Switch (97) and the Magnet (9) on the left side of the
Pulley (10). Turn the Pulley until the Magnet is aligned
with the Reed Switch. Check the gap between the
Magnet and the Reed Switch—it should be about
1/8”. 
If necessary, loosen the Screw (98) and move
the Reed Switch slightly. Retighten the Screw.
Reattach the hood and run the treadmill for a few min-
utes to check for a correct speed reading.

97

98

Top

View

1/8”

9

10

Tripped

Reset

Tripped

c

Reset

On
Position

d

Содержание PFTL62581

Страница 1: ...hrough direct assistance from our factory TO AVOID UNNECESSARY DE LAYS PLEASE CALL DIRECT TO OUR TOLL FREE CUSTOMER HOT LINE The trained techni cians on our Customer Hot Line will provide immediate as...

Страница 2: ...l should not be used by persons weighing more than 250 pounds 8 Never allow more than one person on the treadmill at a time 9 Wear appropriate exercise clothing when using the treadmill Do not wear lo...

Страница 3: ...oving the treadmill make sure that the storage latch is fully closed 22 Inspect and tighten all parts of the treadmill regularly 23 Never insert any object into any opening 24 Always unplug the power...

Страница 4: ...e at 1 800 999 3756 Monday through Friday 6 a m until 6 p m Mountain Time excluding holidays To help us assist you please note the product model number and serial number before calling The model numbe...

Страница 5: ...atch to the left Upright with four Screws 33 Make sure that the Screws are tight but do not over tighten them if the Screws are overtightened the Latch will not slide smoothly After the Latch is at ta...

Страница 6: ...rail 62 Next feed the large wire tie and the Console Wire Harness 90 into the Right Handrail and out through the indicated bracket Pull as much of the Console Wire Harness through the Right Handrail a...

Страница 7: ...rly installed and grounded in accordance with all local codes and ordinances This product is for use on a nominal 120 volt circuit and has a grounding plug that looks like the plug illus trated in dra...

Страница 8: ...he foot rails of the treadmill Find the clip attached to the key see the drawing above and slide the clip onto the waistband of your clothing Follow the steps below to operate the console Insert the k...

Страница 9: ...raphs on the left side of the console The time remaining in the program will be shown in the TIME display During the last few seconds of each one minute period of the program four tones will sound to...

Страница 10: ...the pulse sensor as shown The pulse sensor is pressure acti vated fully press it down Do not press too hard or the circulation in your thumb will be restricted and your pulse will not be de tected Ne...

Страница 11: ...the treadmill convert the treadmill to the stor age position as described above Make sure that the stor age latch is closed fully over the catch 1 Hold the handrails as shown and place one foot agains...

Страница 12: ...treadmill near the power cord The switch must be in the on position PROBLEM The power turns off during use SOLUTION a Check the circuit breaker located on the treadmill frame near the power cord see 1...

Страница 13: ...ler adjustment bolt clockwise and the right bolt counterclockwise 1 4 of a turn each Be careful not to overtighten the walking belt Plug in the power cord insert the key and run the treadmill for a fe...

Страница 14: ...cise If your goal is to strengthen your cardiovascular sys tem your exercise must be aerobic Aerobic exercise is activity that requires large amounts of oxygen for prolonged periods of time This incre...

Страница 15: ...for 15 counts then relax Repeat 3 times for both legs To cause further stretching of the achilles tendons bend your back leg as well Stretches Calves achilles tendons and ankles 4 Quadriceps Stretch W...

Страница 16: ...companied by sufficient proof of pur chase All returns must be pre authorized by ICON This warranty does not extend to any product or damage to a product caused by or attributable to freight damage ab...

Страница 17: ...D DRAWING AND PART LIST FROM THE MANUAL Save this page for future reference Note Specifications are subject to change without notice For information about ordering replacement parts see the back cover...

Страница 18: ...Leg Endcap 62 1 Right Handrail 63 1 Rear Endcap 64 1 Console Assembly Key No Qty Description 65 2 Front Wheel 66 1 Motor Pulley Flywheel Fan 67 1 Motor Pivot Bolt 68 1 Motor Tension Nut 69 1 Motor Sta...

Страница 19: ...7 10 4 6 6 8 7 18 76 78 15 15 15 15 17 12 12 16 1 81 54 35 54 80 108 36 37 37 9 102 101 96 98 97 83 82 11 66 73 75 78 100 14 24 24 105 77 98 42 50 98 98 94 109 54 54 54 44 5 34 29 28 17 88 30 33 31 33...

Отзывы: