3
English
Safety Precautions
1. Please read the manual carefully prior to operating the device.
2. Follow all directions and instructions for the device.
3. For safety purpose, keep all loose articles of clothes (long sleeves, ties, scarves, etc.), long hair,
and jewelry away from the feeder opening. In the event that any of these are caught in the device,
immediately turn off or unplug the shredder.
4. Do not put any other materials into the shredder, except regular paper. Do not attempt to shred
paper clips, staples, nails, metallic pieces, wet or copy paper, or photographic or laminating film.
5. Keep the shredder away from children or anyone not capable of operating the device according
to the safety precautions.
6. Switch off the device when not in use or before maintenance or cleaning.
7. Do not expose to water (or other liquids).
8. During shredder operation, DO NOT:
- Place more sheets of paper into the feeder opening than is indicated on the label or in the user
manual.
- Run the shredder non-stop for longer than 30 minutes. It is advisable to pause every 10 minutes.
- Switch on the device if the power cord is damaged or if the device has been dropped or damaged
and has visible mechanical damage.
- Use the device unless it is on a stable and level surface.
- Rest anything on the power cord or place the device in a location where it may be kicked or
otherwise interfered with by people.
- Disassemble or repair the shredder on your own.
- Use the device close to water or explosive and highly inflammable matters.
- Operate the shredder with wet hands.
Maintenance
1. Disconnect the power cord prior to maintenance.
2. User maintenance refers to external cleaning only. All internal maintenance should be conducted
by a licensed technician only.
3. Wipe the outside of the paper shredder with a wet cloth.
4. Persistent stains can be cleaned with a soft wet cloth or detergent. After cleaning with the
detergent, make sure to remove all remaining residue from the surface. Do not use a wet cloth to
clean the feeder opening or the output tray.
Содержание PRO KGB C-11CC
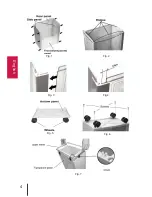
Страница 4: ...4 English Fig 1 Fig 2 Fig 3 Fig 4 Fig 5 Fig 6 Fig 7...
Страница 10: ...10 Deutsch Fig 1 Fig 2 Fig 3 Fig 4 Fig 5 Fig 6 Fig 7...
Страница 15: ...15 1 2 3 4 5 6 7 8 30 10 1 2 3 4...
Страница 16: ...16 1 2 3 4 5 6...
Страница 17: ...17 1 1 2 3 12 4 2 5 3 6 4 7 5 8 1 2 3 4 80 4 5 8...
Страница 18: ...18 1 2 3 4 5 8 1 2 2 1 4 60000 3 0 8 1 2 30 1 2 3...
Страница 19: ...19...
Страница 20: ...PRO INTELLECT TECHNOLOGY www pro intell com...


