


8
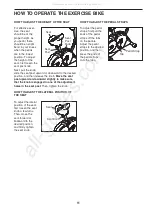
7. While another person holds the Console (6)
near the Upright (3), connect the console wires
to the Upper Wire Harness (32) and to the
pulse wires.
Tip: Avoid pinching the wires.
Insert the
excess wires downward into the Upright (3).
Attach the Console (6) to the Console Bracket
(55) with four M4 x 16mm Screws (40).
See step 5.
Tighten the M4 x 16mm Screw
(40).
7
6.
Tip: Avoid pinching the wires.
Orient the
Console Bracket (55) as shown and then insert
the Upper Wire Harness (32) and the left and
right pulse wires through the Console Bracket.
Attach the Console Bracket (55) to the Upright
(3) with two M8 x 25mm Patch Screws (50).
6
55
55
40
50
6
32
32
Pulse
Wires
Pulse
Wires
Console
Wires
Console Wire
3
3
Avoid pinching
the wires
Avoid pinching
the wires
8. The Console (6) requires four D batteries (not
included); alkaline batteries are recommended.
IMPORTANT: If the Console has been
exposed to cold temperatures, allow it to
warm to room temperature before inserting
batteries. Otherwise, you may damage the
console displays or other electronic compo-
nents.
Remove the battery cover and insert the
batteries into the battery compartments.
Make
sure to orient the batteries as shown by the
diagrams inside the battery compartments.
Then, reattach the battery cover.
Note: The battery cover may be attached with
screws.
6
Batteries
Batteries
Battery
Cover
8
All manuals and user guides at all-guides.com