


14
To use iFIT.com CDs, the elliptical trainer must be con-
nected to your portable CD player, portable stereo, home
stereo, or computer with CD player. See pages 14 and
15 for connecting instructions. To use iFIT.com video-
cassettes, the elliptical trainer must be connected to
your VCR. See page 16 for connecting instructions. To
use iFIT.com programs directly from our Web site,
the elliptical trainer must be connected to your computer.
See page 15.
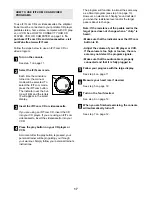
HOW TO CONNECT YOUR PORTABLE CD PLAYER
Note: If your CD player has separate LINE OUT and
PHONES jacks, see instruction A below. If your CD
player has only one jack, see instruction B.
A. Plug one end of the audio cable into the jack
beneath the console. Plug the other end of the
audio cable into the LINE OUT jack on your CD
player. Plug your headphones into the PHONES
jack.
B. Plug one end of the audio cable into the jack
beneath the console. Plug the other end of the
audio cable into the splitter. Plug the splitter into the
PHONES jack on your CD player. Plug your head-
phones into the other side of the splitter.
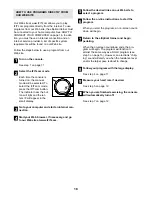
HOW TO CONNECT YOUR PORTABLE STEREO
Note: If your stereo has an RCA-type AUDIO OUT
jack, see instruction A below. If your stereo has a
3.5mm LINE OUT jack, see instruction B. If your
stereo has only a PHONES jack, see instruction C.
A. Plug one end of the audio cable into the jack
beneath the console. Plug the other end of the
audio cable into the adapter. Plug the adapter into an
AUDIO OUT jack on your stereo.
B. See the drawing above. Plug one end of the audio
cable into the jack beneath the console. Plug the
other end of the audio cable into the LINE OUT jack
on your stereo. Do not use the adaptor.
C. Plug one end of the audio cable into the jack
beneath the console. Plug the other end of the
audio cable into the splitter. Plug the splitter into the
PHONES jack on your stereo. Plug your head-
phones into the other side of the splitter.
HOW TO CONNECT YOUR CD PLAYER, VCR,
OR COMPUTER
LINE OUT
PHONES LINE OUT
PHONES
Audio
Cable
Head-
phones
A
PHONES
PHONES
Audio
Cable
Splitter
Headphones
B
AUDIO OUT
RIGHT
LEFT
Audio
Cable
Adapter
A/B
PHONES
Audio
Cable
C
Splitter
Headphones


