Pro-face PL-HD220 Скачать руководство пользователя страница 7

-7-

When using a PL-5900/PL-5910/PL-X920 series unit:

Even though the BIOS screen shown below is for PL-5900 Series unit, the PL-5910
and PL-X920 Series setup procedures is the same.

1)

Connect a keyboard to the PL.

2)

Turn the PL unit’s power ON.

3)

When the Start-up Screen appears, press your PC’s F2 key or DEL key to go to
the BIOS Setup Screen.
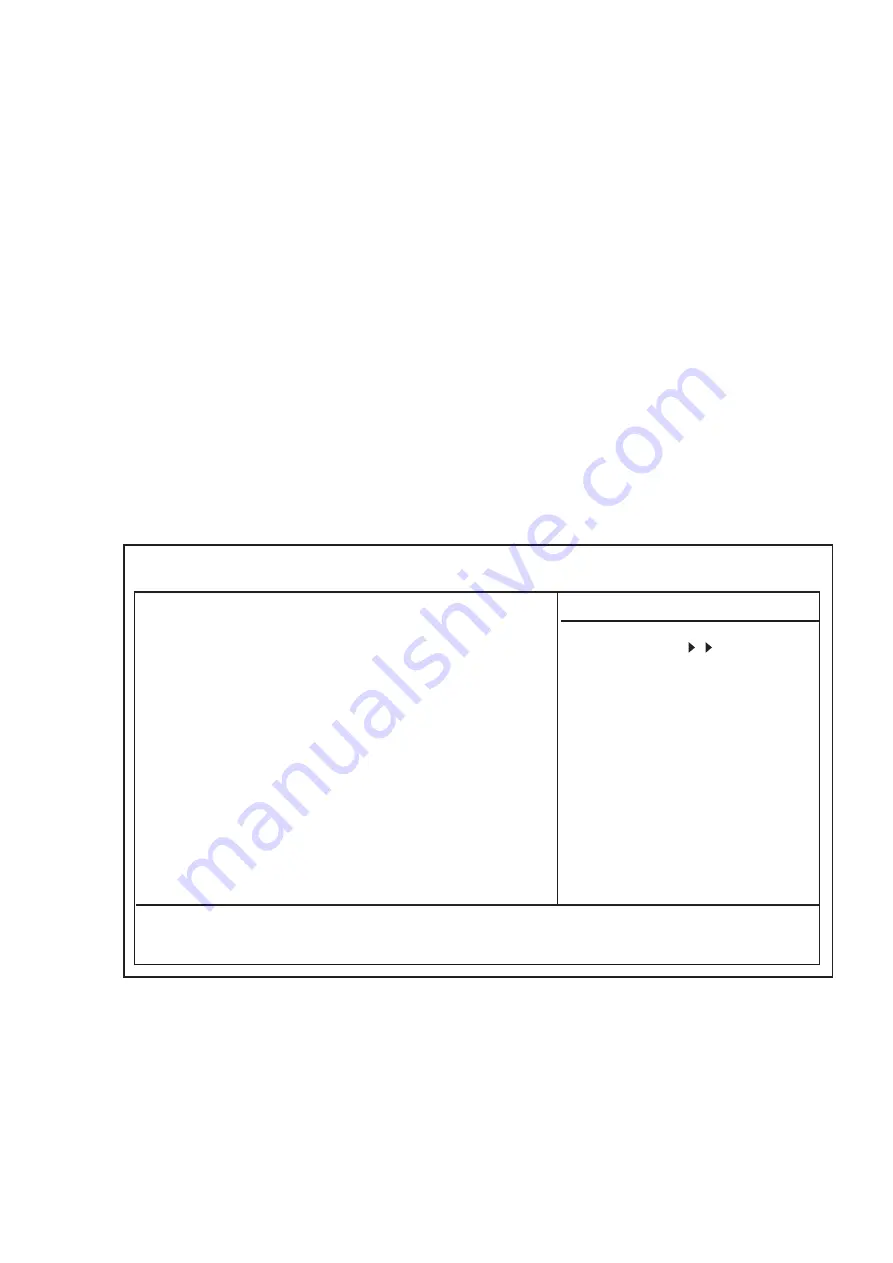
In the Setup Screen, select the  [STANDARD CMOS SETUP] screen, and from
there, select either the IDE Primary Master or IDE Primary Slave menus. Next, the
following screen will appear.


IDE HDD Auto-Detection

Press Enter

   IDE Primary Master

Auto

   Access Mode

Auto

   Capacity

0 MB

   Cylinder

0

   Head

0

   Precomp

0

   Landing Zone

0

   Sector

0

↑↓→←

:

Move   Enter:Select   +/-/PU/PD:Value   F10:Save   ESC:Exit   F1:General Help

F5:Previous Values    F6:Fail-Safe Defaults     F7:Optimized Defaults

CMOS Setup Utility - Copyright (C) 1984-2000 Award Software

IDE Primary Master


Item Help

Menu Level

To auto-detect the
HDD's size, head...on
this channel

4)

 Confirm whether "AUTO" is selected in the Master and Slave screens. If AUTO is

not selected, change these settings to AUTO. If AUTO is selected in both, disk
parameters will be automatically read when the PL is turned ON. The factory set-
ting is AUTO and recommended for most users. (When using together with HDD
unit.)

5)

 After changing all settings, press the ESC key and select [Save & EXIT Setup] to

save the settings.

4)

 Confirm that both the C and D drives are set to [Auto]. If [Auto] is not selected, be

sure to change this setting to [Auto]. This designates that when the PL is started
up, the hard disk's parameters are automatically read out and used. The [Auto]
setting is factory set and recommended for most users.

5)

 Press the [ESC] key, select [SAVE & EXIT SETUP] and save the settings data.

Содержание PL-HD220

Страница 1: ...uld be removed and packed separately prior to shipping Be sure water liquids or metal particles are not allowed to enter the PL HD220 Any of these may cause either a breakdown or an electrical shock D...

Страница 2: ...here corrosive gasses are present since they can lead to a hard disk breakdown To prevent damage to file data be sure to shut down the PL unit s OS before turning OFF the main power To extend the life...

Страница 3: ...HDD Power Down setting to turn the HDD unit s power OFF when the HDD is not being used Rec ommended setting is the factory setting of 5Min When using Win dows 2000 use the Start Settings Control Panel...

Страница 4: ...using the PL HD220 as a Master be sure to remove the jumper plug as shown in the left side figure All Pro face PL units have a built in hard disk This hard disk when shipped is set as the PL s Master...

Страница 5: ...xpansion slot until the rear face connector is completely inserted into the slot s connector pins When installing an HDD unit in Expansion Slot 0 use the above installation proce dures Installation 3...

Страница 6: ...enabled during Setup and their function s Help Information Display Area Provides detailed information about the currently highlighted cursor position item System Settings Area Displays the current Sy...

Страница 7: ...afe Defaults F7 Optimized Defaults CMOS Setup Utility Copyright C 1984 2000 Award Software IDE Primary Master Item Help Menu Level To auto detect the HDD s size head on this channel 4 Confirm whether...

Страница 8: ...rtitions and format initialize the unit Please consult your OS s operation manual for details about these proce dures Note Please be aware that Digital Electronics Corporation shall not be held liable...

Отзывы: