background image


6


6


USAGE 

This product is for overhead mounting only. For safety purposes, this projector should be mounted 
on steady elevated platforms or sturdy overhead supports using suitable hanging clamps. In all cases, 
you must use safety cables. 

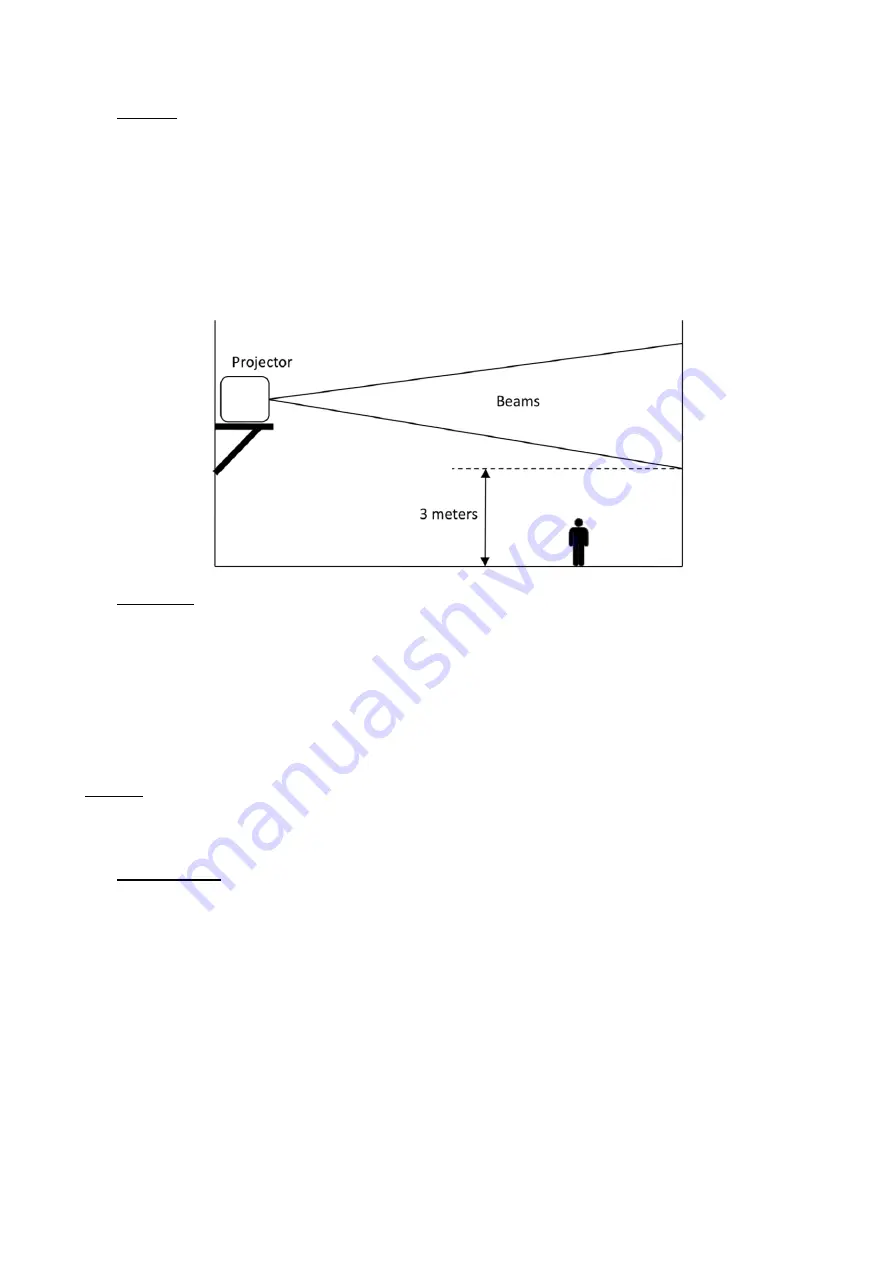
International laser safety regulations require that laser products must be operated in the fashion 
illustrated below, with a minimum of 3 meters (9,8 ft.) of vertical separation between the floor and 
the  lowest  laser  light  vertically.  Additionally,  2,5  meters  of  horizontal  separation  is  required 
between laser light and audience or other public spaces. 


7


RIGGING 


Be sure that the structure onto which you are mounting this product can support its weight. 


Mount the product securely. You can do this with a screw, a nut, and a bolt. You may also use 
a mounting clamp if rigging this product onto a truss. The U-shaped support bracket has three 
mounting holes which may be used to secure the clamps to the projector. 


When mounting this product overhead, always use a safety cable. 


Always consider ease of access to the unit before deciding on a location for this product. 

Caution

: use of controls or adjustments or performance of procedures other than those specified 

herein may result in hazardous radiation exposure. 
This laser product is designated as Class 4 during all procedures of operation. 

8


OPERATION 

8.1


INSTRUCTIONS FOR POWERING ON THE LASER SYSTEM


1.


Connect the power cable. 

2.


Connect the 2-pin interlock bypass plug to the rear of the projector. (Or if you have E-STOP BOX, 
connect the box to the projector, pull up the red switch and turn on the key switch). 

3.


Turn on the key switch on the projector to allow laser output. 

4.


Choose  the  running  programs  on  LED  screen  (see  following  detailed  instructions  of  the  LED 
control system), it can run with auto, sound or DMX. 

5.


Or  if  you  connect  the 

ILDA  cable  to  the  projector,  then  it’s  under  laser  software  control,  fo

example Pangolin Quickshow. Select the pattern on software. Notice: 

please choose “Allow laser 

output” in software.


Содержание DMX RGB 2

Страница 1: ...LASER SHOW SYSTEM DMX RGB 2 MANUAL ...

Страница 2: ...E LASER SYSTEM 6 8 2 FRONT REAR PANEL 7 8 3 PRODUCT SPECIFICATION 7 9 LED FUNCTION SETTING 7 9 1 INSTRUCTION DMX 12 CHANNELS 8 9 2 INSTRUCTION FOR DMX 23 CHANNELS 9 10 TECHNICAL INFORMATION MAINTENANCE AND SERVICE 12 10 1 GENERAL CLEANING INSTRUCTIONS TO BE DONE BY USER 12 10 2 LASER BEAM ALIGNMENT TO BE DONE BY USER OR MANUFACTURER 12 11 INSTRUCTIONS FOR BEAM ALIGNMENT 12 12 SERVICE 13 ...

Страница 3: ...have any questions or find any errors please contact us directly to help address this 2 WHAT S INCLUDED NAME PCS Remark Laser projector 1 Power cord 1 Keys for projector key switch 2 2 pin interlock bypass plug 1 Plug into the interlock socket on the projector in order to be able to activate the laser User guide 1 3 UNPACKING INSTRUCTIONS Open the package and carefully unpack everything inside Ens...

Страница 4: ...a dimmer pack Make sure the power cord is not crimped or damaged Never disconnect the power cord by pulling or tugging on the cord Never carry a product from the power cord or any moving part Always use the hanging mounting bracket or the handles Always avoid eye or skin exposure to direct or scattered light from this product Lasers can be hazardous and have unique safety considerations Permanent ...

Страница 5: ...n stand See the USAGE section later in this manual After set up and prior to public use test the laser to ensure proper function Do not use if any defect is detected Laser Light Avoid Eye or Skin Exposure to Direct or Scattered Light Do not point lasers at people or animals Never look into the laser aperture or laser beams Do not point lasers in areas where people can potentially be exposed such a...

Страница 6: ...sed to secure the clamps to the projector When mounting this product overhead always use a safety cable Always consider ease of access to the unit before deciding on a location for this product Caution use of controls or adjustments or performance of procedures other than those specified herein may result in hazardous radiation exposure This laser product is designated as Class 4 during all proced...

Страница 7: ...DB25 interface in and out for ILDA mode 8 DMX in out 3 pin XLR interface for DMX 9 Power in out AC100 240V power input and output socket 8 3 PRODUCT SPECIFICATION Total Laser power 2W Laser source 400mW Red 638nm 500mW Green 520nm 1100mW Blue 455nm Voltage AC 100 240V 50 60Hz T3A Power rate 200W Unit Dimensions 238 192 5 114mm without the bracket Net Weight 4 2KG Scanner system 25Kpps 60 scanning ...

Страница 8: ... One beam protect OFF ON One beam protect ON SETC Master unit setting OFF ON SETD Set DMX channel mode 12CH 23CH DEFA YES NO 9 1 INSTRUCTION DMX 12 CHANNELS CH1 LASER OFF 0 41 LASER OFF Auto Activate 42 83 DMX mode CH2 CH13 valid 84 167 Build in graphics auto running mode Sound Activate 168 251 Build in graphics sound activated mode 252 255 DMX mode CH2 CH12 valid under sound activate CH2 Pattern ...

Страница 9: ...ng speed select 128 255 CH11 Display dot 1 127 Scanning speed select 128 255 CH12 Color setting 0 7 Original color 8 63 Select every single color 64 95 Select color changing effects and speed 96 127 128 159 Select flowing color effect speed 160 191 192 223 224 255 Select color drawing effect speed CH1 LASER OFF 0 41 LASER OFF Auto Activate 42 83 DMX mode CH2 CH23 valid 84 167 Build in graphics aut...

Страница 10: ...8 Pattern A size 1 127 Select pattern size the biggest size according to CH9 selection Zooming 128 159 Auto zooming from slow to fast 160 191 Auto zooming from slow to fast 192 223 Zooming speed select 224 255 CH9 Pattern A size 1 255 Select pattern A size CH10 Pattern A Drawing 1 127 Drawing speed select 128 255 CH11 Pattern A Display dot 1 127 Scanning speed select 128 255 CH12 Pattern A Color s...

Страница 11: ...Pattern B vertical moving 1 127 Manual moving 128 159 Moving speed select 160 191 192 223 224 255 CH19 Pattern B size 1 127 Select pattern size the biggest size according to CH21 selection Zooming 128 159 Auto zooming from slow to fast 160 191 Auto zooming from slow to fast 192 223 Zooming speed select 224 255 CH20 Pattern B size 1 255 Select pattern B size CH21 Pattern B Drawing 1 127 Drawing spe...

Страница 12: ...void accidental exposure to Class 4 laser radiation There is all in one RGB laser module inside this laser projector The module has one of each primary colors of red green and blue The goal is to have all 3 colors overlay each other as perfectly as possible The easiest way to test and achieve alignment is to project a large circle onto a suitable surface fire safe surface It is recommended to have...

Страница 13: ...ur manufactures warranty In the unlikely event your unit may require service please contact us directly or your local distributor who will help you with a repair or replacement We will not accept any liability for any resulting damages caused by the non observance of this manual or any unauthorized modification to this unit ...

Отзывы: