Bench Grinder Stand
3
Visit www.princessauto.com for more information
8343030
V 2.8
USE AND CARE OF STAND
This stand was designed for a specific function. Do not modify or alter this stand or use it for an
unintended purpose.
PARTS IDENTIFICATION
Remove the parts and accessories from the packaging and inspect for damage. Make sure that all items in the parts
list are included.
WARNING! Do not operate the tool if any part is missing. Replace the missing part before operating. Failure to
do so could result in a malfunction and personal injury.
ASSEMBLY
NOTE: When this manual refers to a part number, it refers to the
included Parts List section.
ASSEMBLING THE STAND
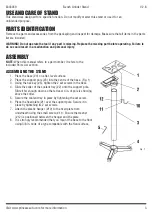
1. Place the base (#4) on a flat, level surface.
2. Place the support pole (#3) into the centre of the base. (Fig. 1)
3. Using the hex key (#5), tighten the 2 set screws in the base.
4. Slide the collar of the coolant tray (#2) onto the support pole.
Slide it far enough down so that at least 4 in. of pole is showing
above the collar.
5. Secure the coolant tray in place by tightening the set screw.
6. Place the fixed plate (#1) over the support pole. Secure it in
place by tightening its 2 set screws.
7. Attach the plastic hanger (#10) to the fixed plate from
underneath using the small screw (#11). Ensure the washer
(#12) is positioned between the hanger and the plate.
8. It is strongly recommended that you mount the base to the floor
using 3/8 in. bolts of a type compatible with the floor surface.
Fig. 1


