background image

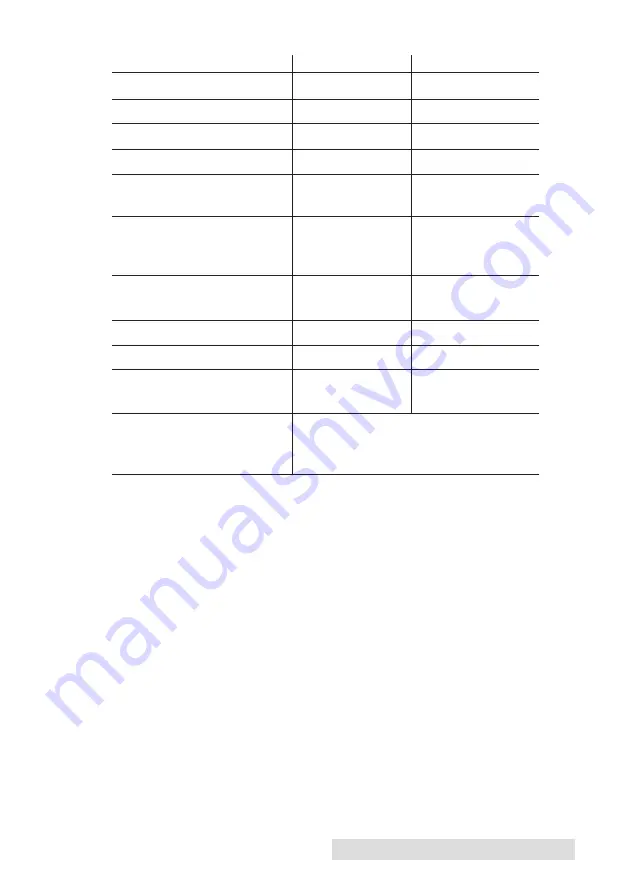
Label Stock

7

Max

Min

Label width

8.25" (209mm)

0.75" (19mm)

Liner/media width

8.375" (212mm)

1.5" (38mm)

Label height/length

17" (431mm) 

0.75" (19mm)

Gap between labels

10" (253mm)

0.10" (2.5mm)

Width of thru-hole 

0.5" (12.65mm)

0.25" (6.325mm)

opening

Distance from edge of 

2.25" (57mm)

0.20" (5.06mm)

media to edge of 
thru-hole

Reflective/Black 

N/A 

0.1" (2.54mm)  

Mark Width*

Max Outer Diameter (OD) 6.0" (152.4mm) 

N/A 

Inner Core Diameter (ID)

3.0" (76.2mm)

3.0" (76.2mm)  

Total Thickness 

.0075” 

N/A 

(Liner + Label)**

(7.5 mil)

Distance from edge of 

Printer driver assumes 2 mm gap. 

media to edge of label

However, this is adjustable via the 
left margin offset. 

* The Reflective/Black Mark should be opaque to infared light. The
mark should be between the labels. The end of the mark should 
correspond with the beginning of the label. 

**There are two factors that determine whether the printer will accept
any particular stock thickness. 

1.  The ability for the printer to pull the paper through the print area. 

2.  The ability for the sensor to read through the backing if the 

sensor is set to diecut. 

If you are printing in continuous or reflective label sensing mode
number 2 does not apply.  The fact that the printer must read through
the backing in die-cut mode will limit the thickness much more than
the printers ability to pull the paper through the print area. However,
if you adjust opacity level of the liner enough to allow the label to be
seen by the stock sensor, the thickness will only be limited by the
printers ability to pull it through the printer area.  For these reasons
the weight or thickness of the liner is a variable that can not easily be
defined. Primera recommends and uses 40# liner with all label stock.

It is important to test all label stock with the intended printer
before ordering large quantities!

Содержание RX900e

Страница 1: ...User s Manual 2011 All rights reserved For the most recent version of this manual please visit http www primera eu manuals html 280711 511287...

Страница 2: ......

Страница 3: ...2 B Using the Cost Estimator 23 C Replacing Ink Cartridges Low Ink Warning 24 Section 5 Printing 27 A Using NiceLabel 27 B Creating Barcodes in NiceLabel 33 C Printing from Other Programs 36 D Adjusti...

Страница 4: ...iv...

Страница 5: ...t build up Do not place the printer near heat sources such as radiators or air ducts or in a place subject to direct sun light excessive dust mechanical vibration or shock Allow for adequate clearance...

Страница 6: ...owing items are included in the supply box Power Adapter Separate Power Cord USB Cable Software Installer CD Cyan Magenta Yellow and Black Ink Cartridges This Manual and other Printed Information The...

Страница 7: ...se one label to be fed from the printer The Ink Low LED will illuminate when a cartridge has 10 or less of its ink remaining The Unload Button will unload the installed label stock by reversing it thr...

Страница 8: ...and power switch found on the rear panel of the printer This illustration shows the interior of the printer Power Input Port USB Port Auxilary Port Power Switch Sensor Position Adjustment Roll Arm Fix...

Страница 9: ...For optimal printing speed you must have a PC with the following recommended specifications Pentium Dual Core Processor 2 GB of RAM 10 GB of Free Hard Drive Space RFID Reader Writer Position Adjustmen...

Страница 10: ...ordering large quantities Primera will only assume responsibility for custom label stock ordered from Primera Label Width Liner Width Width of Opening Black Mark Width Gap Between Labels Label Height...

Страница 11: ...e two factors that determine whether the printer will accept any particular stock thickness 1 The ability for the printer to pull the paper through the print area 2 The ability for the sensor to read...

Страница 12: ...pplicator to apply your labels be sure to order label stock with the correct orientation for your applicator For example most applicators will apply the side of the label first so you will want to pri...

Страница 13: ...CK The following steps will guide you through loading label stock in your printer Make sure power is connected and printer is on 1 Open the Top Cover 2 Lower the Roll Guide and pull it outward to make...

Страница 14: ...p 5 Flip up the Roll Guide and slide it inward until it touches the label stock The Roll Guide will automatically pull back slightly to the correct position There should be approxi mately a 1mm gap be...

Страница 15: ...t not close enough to pinch the label stock 0 1 mm gap on either side If the label stock is pinched by the guides poor print quality or feeding problems could result 9 Feed the label stock further int...

Страница 16: ...asure the distance from the edge of the label stock to the correct position on the stock Set the sensor to this measurement Important Note You must adjust the Stock Sensor before loading non standard...

Страница 17: ...bel stock This means that you must change the Stock Sensor Mode to Reflective The printer will now look for the black mark representing the beginning of the next label instead of the diecut For more i...

Страница 18: ...rograms Primera Technology PTStatus 3 Click on the Alignment Tab 3rd tab from top 4 Click on the Stock Sensor Mode button 5 Select the Stock Sensor Mode by clicking on graphic that most closely corres...

Страница 19: ...e sensor is sensing the correct point on the label stock E SET THE OUTPUT MODE Toggle the Output Mode to set whether or not the last label printed will be presented or left inside the printer To adjus...

Страница 20: ...ent to the printer within one second after the last label has printed the last printed label will present for tear off Present labels No Use with Rewinder In this mode the label stock does not move af...

Страница 21: ...the inside cover of your RX900e and found in Section 2B 2 Before you start printing adjust the slide bar so the Reader Writer marker is approximately 1 8 3mm left or right from center chip of the ant...

Страница 22: ...ess may take up to three minutes During this time the stock position and antenna power are automatically adjusted After this ten write and ten verification reads are performed on the same label 5 Writ...

Страница 23: ...D printing A trial version of Bartender is includ ed on the installa tion disc To add RFID encoding to a label design using Bartender once the label size has been chosen and the blank label is on scre...

Страница 24: ...D module via text commands Do not use this interface unless directed to do so by tech support Advanced Options Access advanced options by clicking the icon on the top right side of the status monitor...

Страница 25: ...imera Technology PTPStatus Once open the Status Monitor consist of four tabs that are arranged on the left side of the window Each tab opens a screen that has various similar functions The tabs will o...

Страница 26: ...double up arrows to expand the window to standard mode Click the double down arrows to revert to the smaller mode In the standard mode the ink percentages will be displayed along with four tabs and th...

Страница 27: ...of last print is displayed at the top of the window Adjust the cartridge costs according to the actual price paid for them The estimate does not take currency into account so you can assume that what...

Страница 28: ...ches 0 during a job you will be prompted to change that cartridge At this point you can change or ignore Under normal circumstances this will be your first warning The 10 warning is only triggered at...

Страница 29: ...p slightly 3 Remove the cartridge 4 Locate a new cartridge and remove it from its packaging Remove the foil outer package and the clear plastic shrink wrap Also remove the cartridge cap Note If you op...

Страница 30: ...to its corresponding colored slot Press down near the back of the cartridge until it clicks into position Important Note Make sure the cartridge is securely in place An improperly positioned cartridge...

Страница 31: ...to guide you through creating and printing a sample label Launch NiceLabel from your computer s Start Menu Note You are not required to print from the NiceLabel software You can print from any applic...

Страница 32: ...ext There is no need to be exact once you enter your text it can easily be resized and or moved about the label Upon clicking in the Document Window you will see a prompt to start typing your text b W...

Страница 33: ...n be positioned anywhere within the Document Window Position your cursor in the general area where you wish your barcode to print and click to start entering your barcode information There is no need...

Страница 34: ...o enter the data to be used in the barcode For this we are doing a simple UPC A barcode For more information on other types of barcodes please see Section 3B Creating Barcodes in NiceLabel c Click OK...

Страница 35: ...ts NiceLabel will accept universal graphic files such as BMP JPG TIF WMF and PNG It will not accept AI PDF PSD CDR or any proprietary format from design applications or label layout programs Note Obje...

Страница 36: ...n 3C for more information Click File then Print from the main menu Choose your number of copies and click OK The following actions will occur during normal operation Approximately every five passes th...

Страница 37: ...al area where you wish your barcode to print and click to start entering your barcode information Once clicked you will see the Barcode Wizard i The first screen in the Barcode Wizard will allow you t...

Страница 38: ...E 5 digit supplement EAN UCC 128 SSCC Bookland Addon 2 Addon 5 Linear Interleaved 2 of 5 ITF 14 ITF 16 Code 39 Code 39 Tri Optic Code 39 Full ASCII Code 32 Code 93 CODE 128 A B and C subsets MSI Codab...

Страница 39: ...of the barcode presentations on the printer These settings are listed here Include Quiet Zones will enable the software to automati cally create the necessary amount of free space before and after th...

Страница 40: ...mply set the custom page size just as you would set print quality in the print ing preferences In the example below the label size is 4 x 4 so the custom page size is set to 400 x 400 displayed in 01...

Страница 41: ...Standard printers feed a sheet and start printing based on the start of the sheet They also prohibit printing to the edge of the sheet This is to avoid any need for alignment The RX900e senses the beg...

Страница 42: ...ract from the current value to move the printed label to the left After adjusting the value click the Set button to send the value to the printer Note Before adjusting this value make sure the label s...

Страница 43: ...e label Try printing again to see if it covers the entire label If not move on to step two 2 Adjust these settings in the printer driver preferences to create a 05 1 2mm overbleed Page Size Increase t...

Страница 44: ...ssfully installed you will need to setup the driver with the appropriate print options Refer to the following steps to change or verify your default printer driver preferences These settings will appl...

Страница 45: ...and select Printing Preferences from the drop down menu The preferences screen will appear NOTE on PC Settings Most applications allow you to change these same printer driver options from their Print...

Страница 46: ...to right or as shown on the screen select portrait If you wish your printing to rotate 90 degrees from what you see on the screen so it is printing horizontally select landscape as your orientation R...

Страница 47: ...s for faster black printing but at a lower dpi Using just the black cartridges for such images may result in a grainy image Media Type There are multiple media type options which correspond with the v...

Страница 48: ...ted output can look entirely different Ink Saturation This option controls the amount of ink used when printing an image The default setting is 100 which will provide the most accurate color matching...

Страница 49: ...ne tuning is needed increase this setting to move the image down on the label decrease this setting to move the image up on the label The unit of measure is 0 1mm This setting is found on the Alignmen...

Страница 50: ...ls across will require precise adjustment of the label sensor If you are using circular or other non rectangular die cut labels see Section 2C for instructions The image is printing horizontally offse...

Страница 51: ...n with certain label stock Increasing the quality increases print time because the printer makes more horizontal move ments across the label 2 Clean the Printhead Run an automatic printhead cleaning p...

Страница 52: ...the driver Try Color Black or Color only To change the cartridge set ting right click on the printer in the Printers and Faxes area choose preferences click cartridge set it to Color Black or Color C...

Страница 53: ...g Faulty cables or cables that are too long interrupt communications which can result in print quality issues 13 Saturation If ink is bleeding decrease saturation in driver preferences 14 Change the P...

Страница 54: ...process 3 Image File Format Most graphics are created in a graphic application Since this graphic application is not usually on the same computer as the label printer doing the printing it is necessar...

Страница 55: ...pe setting in the printer preferences Section 4F to achieve the best color matching There are multiple media type options which correspond with the various types of label stock sold by Primera Match t...

Страница 56: ...e create on your desktop E CLEANING THE PRINTER If any ink has gotten on to the printer casing itself the case of the printer can be cleaned with an ammonia based window cleaner and a lint free cloth...

Страница 57: ...y for printing However this will only occur if you leave it plugged in and turned on 2 Purchase a backup print head to maintain uniter rupted printing capability Part Number 053450 Automatic method 1...

Страница 58: ...ly clean the copper contacts on the back of the printhead and on the carriage G REPLACING THE PRINTHEAD Regular replacement of the printhead is not necessary However it may become necessary if you not...

Страница 59: ...hooting and Maintenance 55 2 Remove all cartridges Press the release tab at the front of the carriage to release the latch 3 Remove the printhead Grasp the printhead near the back as shown in the illu...

Страница 60: ...56 Troubleshooting and Maintenance 4 Locate a new printhead and place it in the carriage 5 Close the latch until you hear a click...

Страница 61: ...tatus Monitor application However if the error prevents communication with the computer the LED lights may be used to help diagnose the problem LED Explanation Intermittent Flashing Printer is doing m...

Страница 62: ...you still have difficulty con tact the technical support number using one of the methods listed below Source Location Primera Knowledge Base www primera com knowledgebase html NiceLabel Software Help...

Страница 63: ...rough sensor for die cut labels reflective sensor for labels and tags with black stripe can use continuous and pre printed labels and tags Supply Roll 6 152mm maximum diameter on 3 76mm core Ink Level...

Страница 64: ...y a UL listed Direct Plug In Power Supply marked Class 2 or a UL listed ITE Power Supply marked LPS with output rated 12VDC 4 5A or higher This equipment has been tested and found to comply with the l...

Страница 65: ...XTERIOR PANELS NO USER SERVICEABLE PARTS INSIDE REFER SERVICING TO QUALIFIED SERVICE PERSONNEL OPERATE THE UNIT WITH ONLY THE PROPER ELECTRICAL SPECIFICA TIONS AS LABELED ON THE PRINTER AND AC ADAPTER...

Страница 66: ...Die Cut 14 DPI 43 49 50 Fixed Throat Guide 38 Full Bleed 39 Human Readable Tab 35 Ink Low LED 3 Ink Saturation 44 Ink Tab 21 Installing Label Stock 9 Label Cost 23 Label Size 19 36 Label Tear Bar 3 L...

Страница 67: ...47 53 Replacing 49 Printing 19 27 36 PTStatus 14 21 Resolution 49 50 RFID 17 Sensor Type 15 Sensor Position 11 46 Status Monitor 21 Reflective 7 14 Roll Arm 10 Roll Guide 9 Roll Specifications 6 8 Rol...

Страница 68: ...P N 511287...

Отзывы: