background image

 18  

Printing

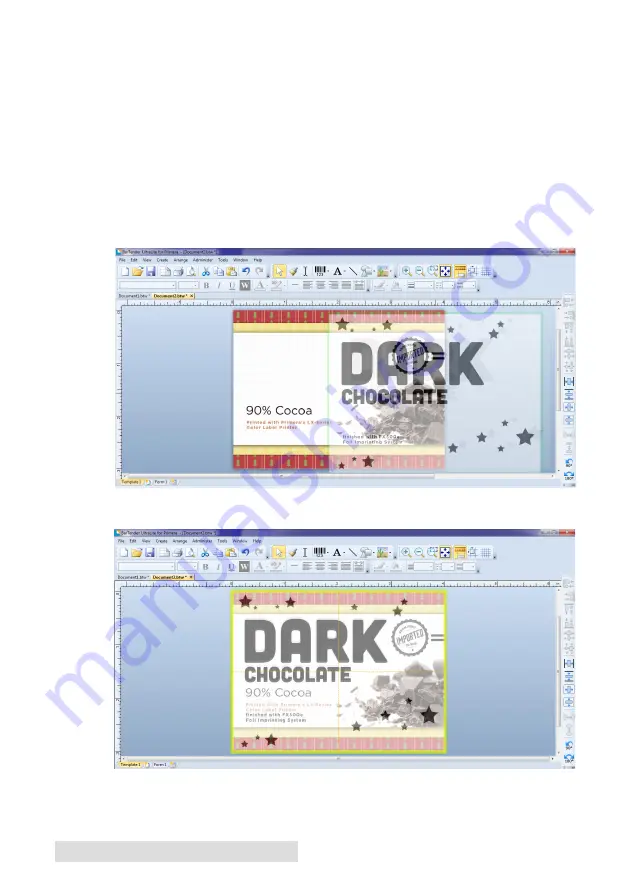
If you are adding metallic or colour highlights to a label you can 

open the label file that you have used to print the labels. Afterward 

you can add the picture for the highlights for easier positioning of 

the highlights. While dragging the box with the highlights, it 

becomes transparent and you can easily position it at the desired 

position. 
By using the label file you can make sure, that the highlights will be 

printed at the desired position. This helps you saving time and 

money.
While dragging:

At desired position:

Содержание FX500E

Страница 1: ...User s Manual 201017 FX500E User s Manual 2017 All rights reserved For the most recent version of this manual please visit http primeralabel eu europe manuals html...

Страница 2: ...Compliance Statement This device complies with part 15 of the FCC rules Operation is subject to the following two conditions 1 this device may not cause harmful interference and 2 this device must ac...

Страница 3: ...ter Driver Settings 20 E Printing from other Programs 22 Section 4 Troubleshooting 23 A Creating a Full Bleed Print Clear Film Sealing 23 B Cleaning the Printer 23 C Factory Defaults 24 D Printer Cont...

Страница 4: ...iv...

Страница 5: ...printer on a flat surface in a location with adequate air circulation to prevent internal heat build up Do not place the printer near heat sources such as radiators or air ducts or in a place subject...

Страница 6: ...with your unit The follow ing items should be included Foil Imprinter Power Adapter Separate Power Cord USB Cable Four sample rolls One Ribbon Rewind Paper Core Two Ribbon Core Spindle One Internal La...

Страница 7: ...ation shows the input ports and power switch found on the rear panel of the printer Parallel Port and RS 232 Serial not necessary it is there because the printer was originally designed for extended p...

Страница 8: ...ew of the printer Media Hanger Media Compartment Module Release Latch Push Ribbon Pick up Holder Media Shields Ribbon Supply Holder Ribbon Supply Holder Media Shaft Transmissive Sensor Print Head Medi...

Страница 9: ...off 2 Connect the printer to the host computer with the USB cable 3 Plug the power cord into the power jack connector at the rear of the printer then plug the power cord into a properly grounded outl...

Страница 10: ...Finish 8 Select Install printer drivers and Click Next 9 On the Seagull Driver Wizard promt select the first radio button to attach the printer via USB 10 Connect the FX400e to the PC and turn it on I...

Страница 11: ...Note We recommend renaming the printer s name to FX500e to simplify the workflow 11 Check all the data on the showing screen if it is correct click Finish 12 After the related files have been copied t...

Страница 12: ...void dragging adhesive or dirty media between the print head and platen roller When loading media it must be placed onto the media hangers 1 Open the Top Cover 2 Put the Media Hanger through media sup...

Страница 13: ...h until you hear a click 8 Press the FEED button to feed labels out of the printer D ADJUSTING THE LABEL STOCK SENSOR If you are using label stock with black marks on its back it may become necessary...

Страница 14: ...ter 1 Find the two Ribbon Core Adaptors in printer package and fix them into new ribbon rolls from the left to the right 2 Open Top Cover of the printer 3 Push the Release Latch to open the printer mo...

Страница 15: ...e The Ribbon Pick up Holder accepts the coated side of ribbon to be wound ink side IN or wound ink side OUT 6 Close the printer module and then press firmly at the both sides to properly latch it unti...

Страница 16: ...wing is a BarTender Ultralite tutorial to guide you through creating and printing a sam ple label Note You are not required to print from the BarTender or NiceLabel software You can print from any app...

Страница 17: ...Printing 13 3 Select FX500e Click Next 4 Select Specify Custom Settings Click Next...

Страница 18: ...14 Printing 5 Select Single item per page Click Next 6 Select No it does not Click Next...

Страница 19: ...Printing 15 7 Select Rectangle Click Next 8 Set the page size width and height to match labels installed in the printer Click Next...

Страница 20: ...sh the remaining default wizard options will be set and no picture will be added 10 Select Embedded Picture Click the File Button to browse to the location of your photo graphic file Set the Size Meth...

Страница 21: ...ton bar at the top of the screen Tip Double click any object to open settings for that object Tip Go to the Help menu to access the BarTender Manual and Tutorials Add Graphic Click the Image button No...

Страница 22: ...picture for the highlights for easier positioning of the highlights While dragging the box with the highlights it becomes transparent and you can easily position it at the desired position By using t...

Страница 23: ...ar 2 Select the FX500e 3 Set the number of copies 4 Click Document Properties to adjust darkness speed etc These settings are explained in Section 3D 5 Click Print Congratulations You have successfull...

Страница 24: ...GS Once the printer driver has been successfully installed you will need to setup the driver with the appropriate print options Refer to the following steps to change or verify your default printer dr...

Страница 25: ...m what you see on the screen so it is printing horizontally select landscape as your orientation Remember this does not change the width and height in the Paper Size setting It is only a tool for view...

Страница 26: ...ake it much easier 1 Set the Page Label Size in the Driver BarTender automatically prompts you for the size of the label that you are using When printing from any other program you must do this manual...

Страница 27: ...arTender simply change the size under the File Menu Label Setup Increase the size of the image to fit the new larger page size If you are using other graphics programs you will need to change the page...

Страница 28: ...f the FEED button is pressed for 8 seconds print er will reset first feed blank labels as media calibration and then print configuration self test labels 3 Once Power indicator becomes lit again relea...

Страница 29: ...Gap Not Found or Ribbon Out has been detected It will blink as soon as the printer module is opened Note When the print head is over heated printers thermal protection function will be activated and...

Страница 30: ...nk alternately Power LED Ready LED ON OFF OFF ON Possible Problems Solutions Remarks Ribbon out Install a new ribbon roll Set Direct Thermal printing by driver or com mands if no ribbon is required LE...

Страница 31: ...module to prop erly latch Printer is in PAUSE status Press FEED button to resume printing Printer is receiving data As soon as all the data has been received Ready LED will stay solid green and automa...

Страница 32: ...support using one of the methods listed below Source Location Primera Knowledge Base http kb primera com BarTender Software Help files Open the software Click on the Help Menu BarTender Help NiceLabe...

Страница 33: ...ritical applications and environments or if it s found that print quality is degraded please clean print heads more frequently Cleaning Material Surface of print head s heating element is very fragile...

Страница 34: ...ns Section 6 Label Specifications Important Test all custom made label stock with the intended printer before order ing large quantities Primera will only assume responsibility for custom label stock...

Страница 35: ...e next label This is the recommended maximum There are two factors that determine whether the printer will accept any particular stock thick ness 1 The ability for the printer to pull the paper throug...

Страница 36: ...7 10 Minimum System Pentium IV computer or better 512MB RAM Requirements 5GB free hard drive space USB 2 0 port Data Interface USB 2 0 Label Design NiceLabel Free 2017 Primera Edition BarTender Ultral...

Страница 37: ...abel Stock 8 Installing the Printer 5 Installing the Printer Driver 5 Label Specifications 30 LED Indicator 25 Loading Ribbon 10 Location 1 Parts 2 Power LED 3 Power Switch 3 Printer Driver Settings 2...

Страница 38: ......

Страница 39: ...P N FX500E...

Страница 40: ......

Отзывы: