background image

A

DJUSTING

 S

CANNER

 S

ETTINGS

14

Selecting the proper scanner setting before scanning produces the best 
results for a scanned item. The scanner setting determines the resolution 
of the item and the number of possible shades of gray or color. The 
symbols next to the setting names indicate the scan mode—color, 
grayscale, or black and white. The scanner settings affect the speed of 
the scan and the file size. The Scan Manager shows the approximate file 
size of a scanned item to help you decide whether to use a particular 
scanner setting.

S

ELECTING

 S

CAN

 C

ONFIGURATION

 O

PTIONS

The scan configuration options provide you with additional settings 
when scanning an image. Note that when you select one of the 
predefined scanner settings, these options show what is already selected 
for that setting, but you can change them as you wish.

The options are:

Mode

—Shows the scan mode such as color, grayscale, and black-and-

white. Click the drop-down arrow to see your choices for the scan mode. 
The symbols next to the selections indicate their mode setting. Choose 
one of the modes for scanning from the list.

Res

—This is the resolution setting for the scan in dots-per-inch (dpi). 

The higher the dpi, the sharper the image. But higher dpi settings also 
produce larger files sizes. Usually the higher resolution settings are used 
for precision work, such as photographs or fine artwork. Click the drop-
down arrow and choose one of the resolution settings from the list.

Size

—The page size for the image. If you want to use one of the 

preset sizes, click the drop-down arrow and choose the size from the 
list. If you want to create a custom size, click on the picture window 

Color Grayscale 

Note

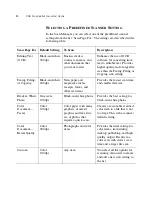
: Your scanner is initially set to scan with the setting Color 

Document—Faster. To scan at a higher resolution, select Color 
Document—Better Quality. Note, however, that scanning at a higher 
resolution creates a larger file size, takes longer to scan, and may not 
print any better. To minimize the file size and the time required to get a 
better quality scan, select just the area of the item that you want to 
scan. For more information about selecting the area of an item, see 
“Selecting the Area of the Item You Want to Scan” on page 19.

Содержание 2600 -

Страница 1: ...USB Scanner Installation Guide F O R W I N D O W S...

Страница 2: ...ING ANY WARRANTY OF MERCHANTABILITY FITNESS FOR A PARTICULAR PURPOSE OR NON INFRINGEMENT ARE EXPRESSLY EXCLUDED AS A RESULT EXCEPT AS SET OUT ABOVE THE PRODUCT IS SOLD AS IS AND YOU ARE ASSUMING THE E...

Страница 3: ...talling the Software 5 Setting Up the Scanner 7 Scanning an Item 9 Adjusting Scanner Settings 12 Selecting a Predefined Scanner Setting 13 Selecting Scan Configuration Options 14 Customizing a Scanner...

Страница 4: ...nic images on your computer WHAT S IN THE BOX Before starting the installation check the contents of the box to make sure that all parts are included If any items are missing or damaged contact the de...

Страница 5: ...wer left corner Reference frame Place items face down within this frame Markings for inches and centimeters appear along the border of the frame Universal Serial Bus USB port Plug the scanner end of t...

Страница 6: ...rt on your computer 32 megabytes MB or more of available internal memory RAM 70 MB of free hard disk space A VGA or SVGA monitor Recommended settings for your monitor are as many colors as possible Hi...

Страница 7: ...puter yet Later after Windows 98 or Windows 2000 finds the scanner you can install the other applications on the CD Note You must install the scanner software before connecting the scanner to your com...

Страница 8: ...e into the USB port on the back of the scanner If the plug does not attach easily make sure that you are plugging it in correctly Do not force the plug into the connection Note You do not have to shut...

Страница 9: ...at the USB scanner has been found The scanner is now correctly installed 3 From the CD install the other software applications to your computer Make sure to install the application named MGI PhotoSuit...

Страница 10: ...set up the scanner with the MGI PhotoSuite III SE application 1 From the Windows Desktop click the Start button select Programs and select MGI PhotoSuite III SE 2 After the MGI PhotoSuite III applica...

Страница 11: ...THE SCANNER 8 The panel on the left side of the window shows several buttons for getting photos or other images 3 Click the Scanner Twain button The panel shows options for choosing the scanner and fo...

Страница 12: ...all business cards to A4 sized pages Your USB scanner also has special settings for scanning color photos and text documents For more information about scanner settings see Adjusting Scanner Settings...

Страница 13: ...ning In the example above the selected setting is Color Document Faster 4 Click the Preview button The scanner scans a preview of the item on the scanner glass and displays it in the Scan Manager In t...

Страница 14: ...lect only a certain area of an item to scan Selecting an appropriate scan area can result in a faster scan and a smaller file size The scanned image s file size and available space on your computer s...

Страница 15: ...Choose Open from the PhotoSuite File menu and open the scanned image file See the PhotoSuite help information for more details about opening scanned images If you re using another application to scan...

Страница 16: ...e articles receipts forms and other text items Provides the fastest scan time and smallest file size Black White Photo Grayscale 100 dpi Black and white photos Provides the best setting for black and...

Страница 17: ...the selections indicate their mode setting Choose one of the modes for scanning from the list Res This is the resolution setting for the scan in dots per inch dpi The higher the dpi the sharper the im...

Страница 18: ...wo passes the first pass senses the item s size and the second pass scans the image This option overrides the selections for Size Adv Settings Click this button to see advanced settings for scanning S...

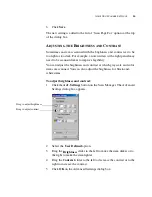
Страница 19: ...ss and contrast at which grayscale and color items are scanned You can also adjust the brightness for black and white items To adjust brightness and contrast 1 Click the Adv Settings button on the Sca...

Страница 20: ...s of the rectangle click the rectangle and then drag the borders of the rectangle to resize it This effectively allows you to crop the item The dimensions of the selected area appear in the Scan Confi...

Страница 21: ...er dimensions Height 3 4 inches 8 5 cm Width 11 4 inches 29 0 cm Length 17 5 inches 45 0 cm Weight 5 6 pounds 2 5 kg Operating temperature 50 104 F 5 35 C without condensation Relative humidity 20 80...

Отзывы: