background image

>

Setting up the speakers

16

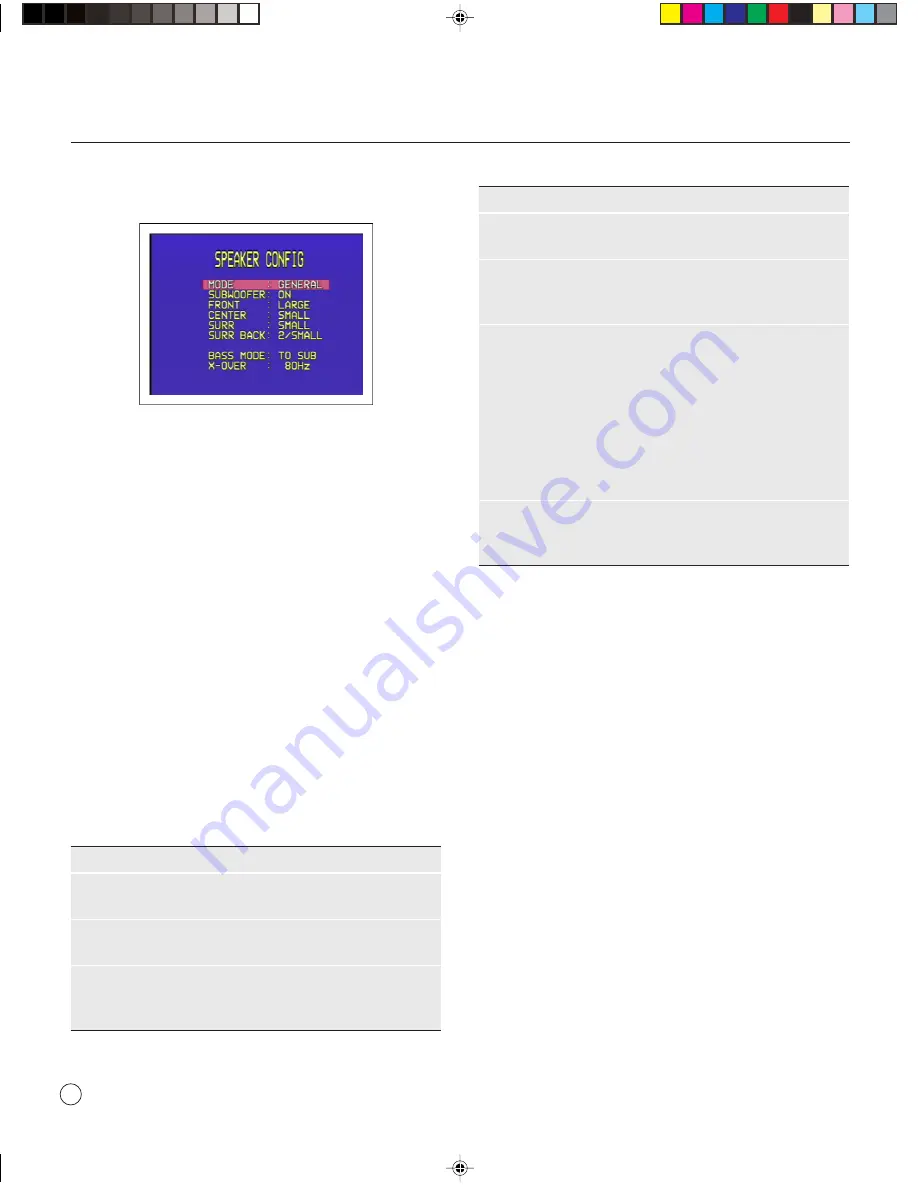
The 

SPEAKER CONFIG

 menu will be displayed:

To define the GENERAL layout

First define the 

GENERAL

 layout; the other layouts will all

be based on this.

With 

MODE

 highlighted use the 

VOLUME

 control on

the front panel or the 

<

 and 

>

 buttons on the remote

control to select 

GENERAL

.

Use the 

INPUT SELECTOR

 on the front panel or the 

A

and 

V

 buttons on the remote control to highlight each

menu option in turn.

Use the 

VOLUME

 control on the front panel or the 

<

and 

>

 buttons on the remote control to select the

appropriate value for each option.

If you select 

SMALL

 for a channel, frequencies below the

X-OVER

 setting are sent to the speaker(s) specified by the

BASS MODE

 option.

The options are explained in the following table:

Option

Description

SUBWOOFER

Select 

OFF

 or 

ON

 to specify whether the layout

should include a subwoofer.

FRONT

Select 

SMALL

 or 

LARGE

 to specify whether the

front speakers can handle bass.

CENTER

Select 

NONE

SMALL

, or 

LARGE 

to specify

whether there is a center speaker in the system,

and whether it is small or large.

Option

Description 

(continued)

SURR

Select 

NONE

SMALL

, or 

LARGE

 to specify

information about the surround speakers.

SURR BACK

Select 

NONE

1/SMALL

1/LARGE

2/SMALL

,

or 

2/LARGE

 to specify the number and size of

the surround back speakers.

BASS MODE

Specifies how to handle the bass from channels

defined as 

SMALL

TO SUB

 sends it to the

subwoofer, along with the LFE channel. 

TO

LARGE

 divides it between the channels defined

as 

LARGE

TO BOTH

     sends it to both the

subwoofer and the channels defined as 

LARGE

.

EXTRA

 sends all bass information below the 

X-

OVER

 setting to the subwoofer, along with the

LFE channel.

X-OVER

Allows you to define the crossover frequency (40

— 200Hz) used for speakers defined as 

SMALL

,

and by the 

BASS MODE EXTRA 

setting.

Press the 

MENU

 button on the front panel or remote

control to return to the 

SETUP MENU

.

To define other layouts

You can now optionally define layouts 

DD

DTS

, and

OTHER

 which modify the 

GENERAL

 layout when the

source is Dolby Digital, DTS, or two-channel. For example,

you can add a subwoofer to the 

DD

 layout for use with

movie soundtracks.

SETTING THE SPEAKER DELAYS

The next step in setting up the loudspeakers is to set the

speaker delays to ensure that the sound image is correctly

focused.

Delaying the sound from a speaker by 1 millisecond is

equivalent to moving the speaker one foot (0.3m) further

away from the listener.

Because the center speaker is usually physically closer to the

listener than the main left and right speakers you should add

a delay to the center speaker to ensure that the sound from

§5 Setting up

26/7/02, 12:51 pm

16

Содержание SP31.7

Страница 1: ...SP31 7 Multi Channel Processor User Guide 0 Preface 26 7 02 12 50 pm 1...

Страница 2: ...Laboratories Inc All rights reserved LaserDisc is a trademark of Pioneer Electric Corp All other product names are trademarks or registered trademarks of their respective owners FCC Warning This equip...

Страница 3: ...g the display Configuring the on screen display 23 Configuring the front panel display 23 Configuring the remote control 23 Introduction Using the SP31 7 with other Primare products 2 Technical specif...

Страница 4: ...Preface iv Saving the configuration Introduction 25 Index 0 Preface 26 7 02 12 51 pm 4...

Страница 5: ...discrete output channels for up to eight loudspeakers in a surround system The SP31 7 provides a wide range of processing options to allow you to choose the ideal mode for each type of material includ...

Страница 6: ...ith the simplest possible user interface TECHNICAL SPECIFICATION General Analog inputs 1 XLR 7 RCA left and right Digital inputs 1 AES EBU 5 RCA 2 TOSlink Video inputs 4 composite 3 S Video 2 componen...

Страница 7: ...n D The LEVEL button selects which setting you change with the VOLUME control E The STANDBY button switches the SP31 7 to standby F The VOLUME control changes the volume changes a setting selected wit...

Страница 8: ...n be defined using analog inputs 5 to 8 When the SP31 7 Multi Channel Processor is first supplied the eight standard sources shown opposite are already set up for you You can simply disable any of the...

Страница 9: ...surround system Changing the balance alters the level of both the left and right main loudspeakers to shift the position of the stereo image keeping the overall level of the sound the same The other a...

Страница 10: ...Using the SP31 7 Multi Channel Processor 6 2 Using 26 7 02 12 51 pm 6...

Страница 11: ...elect a menu option and change its value using either the front panel controls or the remote control To select a menu option Either Turn the INPUT SELECTOR to highlight the menu option you want to sel...

Страница 12: ...he following options are available Option Description BYPASS The inputs are fed directly to the output with no decoding for the most faithful possible reproduction of stereo or multi channel sources S...

Страница 13: ...rce you want to record from Or Press the MENU button on the front panel or remote control to display the MAIN MENU Use the INPUT SELECTOR on the front panel or the A or V buttons on the remote control...

Страница 14: ...Advanced use 10 3 Advanced 26 7 02 12 51 pm 10...

Страница 15: ...R CENTER SUB SURR BACK REC MIC 12V OUT REMOTE N O P Q S T U R I L M F K G E H J D C B A A Digital AES EBU input B Digital SPDIF inputs C Digital optical TOSlink inputs D Digital SPDIF and TOSlink outp...

Страница 16: ...up Digital inputs The SP31 7 Multi Channel Processor provides one AES EBU digital input five SPDIF digital inputs and two optical TOSlink digital inputs Analog inputs The SP31 7 provides eight analog...

Страница 17: ...primaresystems com CONNECTING TO THE PRIMARE A30 5 MULTI CHANNEL AMPLIFIER The Primare A30 5 Multi Channel Amplifier is an ideal component for a surround system since it provides five discrete power...

Страница 18: ...Connecting the SP31 7 14 4 Connecting 26 7 02 12 51 pm 14...

Страница 19: ...hannel is handled by a subwoofer You can define four speaker layouts labelled GENERAL DTS DD and OTHER These are selected automatically for the appropriate source material To specify the speaker confi...

Страница 20: ...2 LARGE to specify the number and size of the surround back speakers BASS MODE Specifies how to handle the bass from channels defined as SMALL TO SUB sends it to the subwoofer along with the LFE chan...

Страница 21: ...ould next set the speaker levels so that the sound from each speaker is equally loud at the listening position The SP31 7 allows you to set the levels for the GENERAL layout in two alternative ways Th...

Страница 22: ...el or the and buttons on the remote control to adjust the level When you have adjusted each speaker to balance the levels press the MENU button on the front panel or remote control to exit SETTING THE...

Страница 23: ...set to balance the loudness when switching between sources If this standard set of sources meets your requirements you will get excellent results by using them and you can ignore the remainder of this...

Страница 24: ...panel or the and buttons on the remote control to modify them as required The options are explained in the following table Option Description STATUS ENABLED or DISABLED to specify whether the source c...

Страница 25: ...allows you to do this The following example shows how to define two sources with aliases MOVIES and MUSIC designed for use with a DVD player Choosing the MOVIES source selects the PLII CINEMA surroun...

Страница 26: ...Setting up the sources 22 You can use the OFFSET option to adjust the relative level of the multi channel source compared with the other analog sources 6 Sources 26 7 02 12 52 pm 22...

Страница 27: ...splayed TV SYSTEM Specifies the TV system to ensure the correct size and position of the on screen displays Can be set to NTSC or PAL Option Description continued OSD POSITION Specifies the position o...

Страница 28: ...Configuring the display 24 7 Configuring 26 7 02 12 52 pm 24...

Страница 29: ...ACTORY SETTINGS option is provided to return the SP31 7 to the default factory settings After saving or recalling settings always wait at least 10 seconds before switching off the unit using the mains...

Страница 30: ...made You should save your settings first if you have not already done so Highlight RECALL INSTALLER SETTINGS or RECALL FACTORY SETTINGS in the MEMORY MENU and press the SELECT button on the front pane...

Страница 31: ...dimming 4 G GENERAL layout 16 I INPUT MODE option 7 INPUT SELECTOR 3 INPUT SETTINGS menu 20 inputs 12 13 L layouts speaker 16 LEVEL button 3 levels changing 5 M MAIN MENU 7 MEMORY MENU 25 MENU button...

Страница 32: ...nformation 8 editing 20 examples 21 multi channel 21 recording 9 removing 19 selecting 4 sharing inputs 21 SPEAKER CONFIG menu 16 speakers changing the levels automatically 17 changing the levels manu...

Отзывы: