background image

20

www.pridemobility.com

Quantum Jazzy 1650 Series

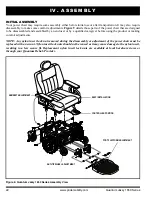
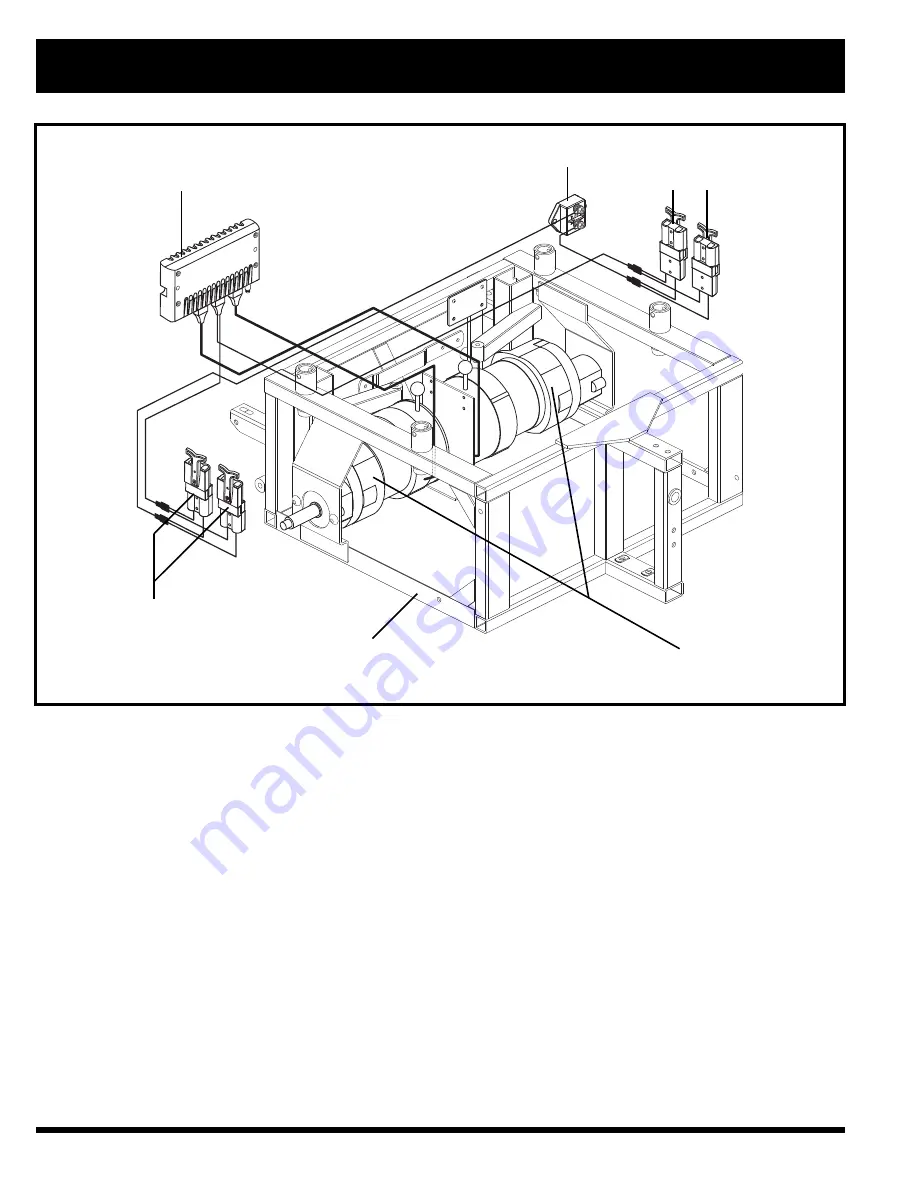
BATTERY CONNECTORS

THERMAL FUSE

Figure 7. Quantum Jazzy 1650 Series Electrical Components (4-battery configuration shown)

POWER MODULE

BATTERY CONNECTORS

MOTORS

POWER BASE FRAME

I I I .   Y O U R   P O W E R   C H A I R

Содержание Jazzy 1650 Series

Страница 1: ...QUANTUM JAZZY Including Models Quantum 1650 2SPVHD Quantum 1650 3SPVHD Jazzy 1650 2EHD Jazzy 1650 3EHD SERIES 1 800 800 8586 US 1 888 570 1113 Canada...

Страница 2: ...n the product this icon is represented as a white symbol on a blue dot with a white border PROHIBITED These actions are prohibited These actions should not be performed at any time or in any circumsta...

Страница 3: ...ies www pridemobility com 3 I INTRODUCTION 4 II SAFETY 5 III YOUR POWER CHAIR 18 IV ASSEMBLY 22 V COMFORT ADJUSTMENTS 24 VI BATTERIES AND CHARGING 29 VII CARE AND MAINTENANCE 33 APPENDIX I SPECIFICATI...

Страница 4: ...is product you promise that you will not change alter or modify this product or remove or render inoperable or unsafe any guards shields or other safety features of this product fail refuse or neglect...

Страница 5: ...ow unsupervised children to play near the power chair while the batteries are charging Maximum seating weight Keep your hands away from the tires when driving Be aware that loose fitting clothing can...

Страница 6: ...er Removal of grounding prong can create electrical hazard If necessary properly install an approved 3 pronged adapter to an electrical outlet having 2 pronged plug access Wear safety goggles Corrosiv...

Страница 7: ...ry terminals Contact with tools can cause electrical shock Four 4 Battery Configuration Positive Terminal Negative Terminal Connect Red wire to positive terminal Connect Black wire to negative termina...

Страница 8: ...replace both batteries at the same time Pinch Crush point Battery charger for indoor use only Disposal and recycling Contact your Quantum Rehab Provider for information on proper disposal and recyclin...

Страница 9: ...F E T Y Do not place power chair in freewheel mode on a decline Do not place power chair in freewheel mode on an incline Contains Lead Do not expose to heat source such as open flame or sparks Do not...

Страница 10: ...ome practice Simply take your time and you will soon be in full and confident control as you maneuver through doorways on and off of elevators up and down ramps and over moderate terrain Below are som...

Страница 11: ...ind the bar or kPa rating bar psi x 0 06895 kPa psi x 6 89476 Incline Information More and more buildings have ramps with specified degrees of inclination designed for easy and safe access Some ramps...

Страница 12: ...ewheel mode while seated on it Ask an attendant for assistance if necessary WARNING Do not place your power chair in freewheel mode while on an incline This could cause the chair to roll uncontrollabl...

Страница 13: ...e electrical system Maintain and store your power chair in a dry and clean condition WARNING Prolonged exposure to hot or cold conditions may affect the temperature of upholstered and non upholstered...

Страница 14: ...g travel you may find it necessary to use a vehicle mounted lift system or elevation product to aid in transportation Pride recommends that you closely review the warnings instructions specifications...

Страница 15: ...one traveling in a vehicle should be properly belted into seats approved by the vehicle manufacturer Batteries In addition to following the warnings below be sure to comply with all other battery hand...

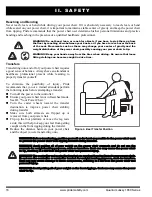
Страница 16: ...controller Ensure your power chair is not in freewheel mode See III Your Power Chair Turn the caster wheels toward the transfer destination to improve power chair stability during transfer Make sure...

Страница 17: ...io frequency waves can have an adverse effect on the performance of electrically powered mobility vehicles Electromagnetic and Radio Frequency Interference can come from sources such as cellular phone...

Страница 18: ...he seat assembly includes the armrests seatback and seat base The power base assembly includes two motor brake assemblies two drive wheels two anti tip wheels two caster wheels two batteries and the e...

Страница 19: ...to the electronic controller by 60 The current will automatically return to 100 when the fuse cools to within its normal operating temperature range Power Module The power module supplies battery pow...

Страница 20: ...um Jazzy 1650 Series BATTERY CONNECTORS THERMAL FUSE Figure 7 Quantum Jazzy 1650 Series Electrical Components 4 battery configuration shown POWER MODULE BATTERY CONNECTORS MOTORS POWER BASE FRAME I I...

Страница 21: ...n error code nine flashing lights on the controller To clear this code turn off the controller and place the power chair in drive mode Then turn on the controller The error message should be cleared I...

Страница 22: ...aregiver before using the product or making comfort adjustments NOTE Any nylon insert lock nut removed during the disassembly or adjustment of the power chair must be replaced with a new nut Nylon ins...

Страница 23: ...er until the seat is at the desired height 5 Insert the safety snap pins into each seat receiver 6 Install the armrests if necessary See figure 11 7 Loosen the setscrews on the controller mount See fi...

Страница 24: ...ome power chair components are heavy You may need assistance to lift or carry them Please refer to the specifications table for specific component weights before you disassemble the power chair WARNIN...

Страница 25: ...ard or rearward To adjust the armrest position 1 Remove the armrest from the armrest lock 2 Loosen the hardware that fasten the armrest lock to the seat base side rail See figure 12 3 Slide the armres...

Страница 26: ...rest 7 Tighten the mounting screws 8 Secure the controller harness to the armrest with wire ties 9 Plug the controller harness back into the power base Foot Platform Height Adjustment The foot platfor...

Страница 27: ...aces The anti tip wheels are preset at the factory for smooth surfaces or indoor use only If you plan on using your power chair on rough surfaces it may be necessary to adjust the anti tip wheels to b...

Страница 28: ...e down or forward in the seat The positioning belt is not designed for use as a restraining device To install the positioning belt 1 Remove the rearmost screw that holds the seat hinge to the seat bas...

Страница 29: ...utlet having 2 pronged plug access PROHIBITED Never use an extension cord to plug in your battery charger Plug the charger directly into a properly wired standard electrical outlet PROHIBITED Do not a...

Страница 30: ...ains a charge but does not overcharge the battery Can I use a different battery charger You should use the charger supplied with the power chair It is the safest most efficient tool to charge the batt...

Страница 31: ...maintenance free Both AGM and Gel Cell are deep cycle batteries that are similar in performance WARNING Corrosive chemicals contained in battery Use only AGM or Gel Cell batteries to reduce the risk o...

Страница 32: ...g your power chair for an extended period fully charge the batteries prior to storage Disconnect the battery harnesses and store the power chair in a warm dry environment Avoid temperature extremes su...

Страница 33: ...our Quantum Rehab Provider Power chairs that are frequently exposed to sources of water such as incontinence should be inspected often for corrosion and electronic components may need to be replaced f...

Страница 34: ...ect and inspect the controller harness and the charger harness from the power base Look for corro sion Contact your Quantum Rehab Provider if necessary Ensure that all parts of the controller system a...

Страница 35: ...ics batteries neoprene silicone and polyure thane materials Cleaning and Disinfection Use a damp cloth and mild non abrasive cleanser to clean the plastic and metal parts of your power chair Avoid usi...

Страница 36: ...e wheel axle and tighten WARNING Make sure both the nut and washer are reinstalled and tightened properly 11 Inflate the pneumatic tire to the psi bar kPa air pressure rating indicated on each tire 12...

Страница 37: ...ay from battery terminals Contact with tools can cause electrical shock To replace the batteries 1 Turn off the power to the controller 2 Make sure that the power chair is in drive mode See III Your P...

Страница 38: ...ayed harnesses Cracked or broken connectors Uneven wear on any of the tires Jerky motion Pulling to one side Bent or broken wheel assemblies Does not power up Powers up but does not move Loose seat or...

Страница 39: ...SNA testing requirements and ISO 7176 series EN12184 standards All specifications subject to change without notice SPECIFICATIONS Suspension Limited Drive Wheels 16 in 40 64 cm pneumatic or solid cent...

Страница 40: ...E C I F I C A T I O N S TURNING RADIUS WIDTH 30 5 in 77 47 cm LENGTH WITHOUT FRONT RIGGINGS 46 75 in 118 75 cm Figure 25 Quantum Jazzy 1650 Series Dimensions and Ground Clearance 26 25 in 66 68 cm GRO...

Страница 41: ...Quantum Jazzy 1650 Series www pridemobility com 41 N O T E S...

Страница 42: ...42 www pridemobility com Quantum Jazzy 1650 Series N O T E S...

Страница 43: ...ol Quantum Jazzy 1650 Series Inclusion of all Parts Joystick Serial Number Controller Serial Number Left Motor Serial Number Right Motor Serial Number Fit and Finish Performance Product Serial Pride k...

Отзывы: