background image

MBOX

® 

DIRECTOR USER MANUAL

55

PLAYBACK

Overview

Once scenes have been created and stored in a show file, they can be played back individually using manual control 
or played back automatically using timecode, autofollows, and/or triggers.

Guidelines:

  +

A scene with an assigned timecode value will take precedence over its autofollow time.

  +

Triggers take precedence over both timecode and autofollow.

To see a preview in the Mbox server window, be sure that the Mbox tab is selected. Refer to 

"Enabling 

Feedback" 

on page 34.

Training Video: Simple Playback: 

http://www.youtube.com/watch?v=916vFB0wAwY

Training Video: Director Interface: 

http://www.youtube.com/watch?v=a-J41U-VRtg

Training Video: Cueing in Director: 

http://www.youtube.com/watch?v=SbN_Xk6HLJI

Training Video: Scene Timing: 

http://www.youtube.com/watch?v=Dv-_mGw1sgs

Training Video: Advanced Cueing: 

http://www.youtube.com/watch?v=rgdE7N3glxo

Playback Using Manual Control

Regardless of whether timecode or autofollow information is provided, scenes can be played back individually by 
manually selecting them.

Note:  

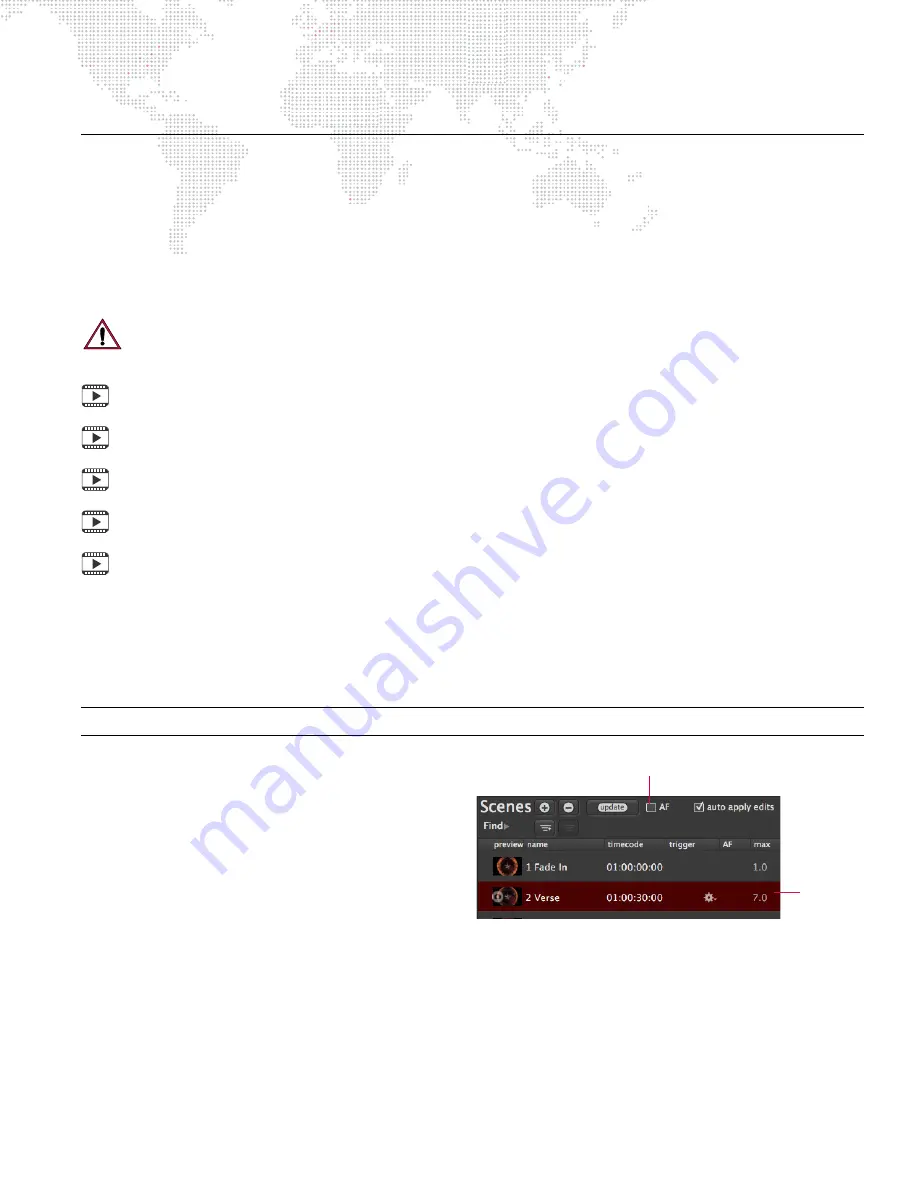
If autofollow times have been programmed, uncheck the AF box to disable autofollows.

To play back scenes manually:

Step

1. At Scene List, click on any scene. The scene 

will begin to playback immediately.

Step

2. Use keyboard up and down arrow keys to 

move forward or backward in the Scene List.

Playback Using Autofollows

Scenes can be configured to playback in sequence using autofollow times. This feature is useful for looping between 
two scenes or for automating shows when timecode is not available. The autofollow time occurs at the end of the 
scene. For example, if an autofollow time of 2 seconds is specified, the scene will start immediately and run for 2 
seconds before advancing to the next scene. An autofollow time can be entered directly in the Scene List using the 
format: 

Minutes:Seconds.

The AF Play/Pause checkbox is used to enable or disable the autofollow feature. This is useful during editing to 
prevent a scene from automatically advancing.

Selected 
Scene

AutoFollow Enable/Disable

Содержание MBOX DIRECTOR

Страница 1: ...SOFTWARE VERSION 3 10 WWW PRG COM MBOX DIRECTOR USER MANUAL...

Страница 2: ...ks or registered trademarks of their respective companies This manual is for informational use only and is subject to change without notice Please check www prg com for the latest version PRG assumes...

Страница 3: ...al Independent Mode 18 Adding Dual Independent Fixtures 18 Switching from Dual Independent to Other Modes 18 Switching to Dual Independent from Other Modes 19 General Operation Mbox Director Window 20...

Страница 4: ...ng Relative Offset Across Layers 52 Fanning Layers 53 Copying Multiple Layers From One Server to Another 54 Playback Overview 55 Playback Using Manual Control 55 Playback Using Autofollows 55 Playback...

Страница 5: ...Control by an External Console Passthrough 91 Controlling an External Projector Serial Over Ethernet 93 Troubleshooting Network Configuration Errors 94 DHCP Networks 94 IP Address Changed 95 No Reply...

Страница 6: ...6 2012 Updated to software version 3 5 1 3 6 January 08 2013 Updated to software version 3 6 3 6 A May 22 2013 Updated to software version 3 6 1 3 7 January 6 2014 Updated to software version 3 7 3 8...

Страница 7: ...box Studio User Manual 02 9800 0003 xx Mbox Mini User Manual 02 9800 0004 xx Mbox Remote User Manual 02 9800 0005 xx PRG Lighting Systems Networking Guide 02 3004 1000 0 Vx76 Software User Manual 02 9...

Страница 8: ...ctor http www youtube com watch v SbN_Xk6HLJI Scene Timing http www youtube com watch v Dv _mGw1sgs Advanced Cueing http www youtube com watch v rgdE7N3glxo Image Remapping playlist https www youtube...

Страница 9: ...to communicate properly with an Mbox server both software versions must match For example Mbox Director v3 10 and Mbox Designer v3 10 Communication Protocol Mbox Director communicates with Mbox server...

Страница 10: ...structions to accept license and choose destination It is recommended that Director be installed on the main Mac hard drive Mbox Director will be installed into the Mac s Applications folder Step 4 Af...

Страница 11: ...ed Mbox Daemon This software is required on all Mbox servers to enable remote feedback When the Mbox application is launched on the Mbox server it will automatically launch the last version of Mbox Da...

Страница 12: ...shown below Figure 2 Sample Mac to Mbox Connection Diagram More Information For additional information and concepts specific to setting up an Mbox network refer to Appendix B Networking For Mbox on p...

Страница 13: ...not affect performance of the server In order to guarantee this Mbox Director can sacrifice the amount of time it spends drawing on its own graphical user interface This setting can be adjusted in the...

Страница 14: ...ox Daemon application Confirm that Mbox Daemon is running by pressing D while Mbox server is in Window mode Step 8 At Mbox Daemon window verify that Network Interface reads Local It should update auto...

Страница 15: ...eparate computer At Mac computer running Mbox Director Step 1 At Mac desktop select System Preferences from Apple menu Step 2 At System Preferences window click on Network Step 3 At Network window set...

Страница 16: ...d unless the network administrator can guarantee that your IP addresses will not change dynamically The network administrator should also verify that the subnet mask will allow the two machines to see...

Страница 17: ...t Mbox Daemon is running by pressing D while Mbox server is in Window mode Step 10 At Mbox Daemon window verify that Network Interface reads Ethernet 1 It should update automatically Step 11 At Mbox s...

Страница 18: ...anoramic Dual Dual Independent etc For more information refer to Changing Configuration Using Dual Output Features on page 15 Note Refer to Important Concepts on page 3 for definitions of Fixture and...

Страница 19: ...e changed at the actual Mbox server Step 4 At Name field enter custom name if desired The name can be edited after the fixture has been created Step 5 Use optional checkboxes to designate as Monitor O...

Страница 20: ...add patch the fixture Step 9 If connecting to multiple Mbox servers repeat steps 1 7 until all servers have been added When finished close Add Fixture window The main window will now reflect the added...

Страница 21: ...s Setup window This configuration is pulled into Mbox Director when a fixture is added patched If any part of the DMX Profile is changed at the Mbox server Setup window the Change Configuration featu...

Страница 22: ...menu select Change Configuration Step 2 At Change Configuration window conflicting settings will be highlighted in green Click Use Detected Settings from Mbox button to pull in new settings from Mbox...

Страница 23: ...boxes will reflect the new DMX Profile setting In this example the window is setup for the Panoramic Dual mode with two server icons and two master icons Notice also that the Master now has two Shutt...

Страница 24: ...ng because there are two servers involved If the second server is deleted it will discard any stored data for that server Because of this a warning dialog is displayed when switching away from Dual In...

Страница 25: ...IP address such as 127 0 0 2 Switching to Dual Independent from Other Modes When switching to Dual Independent mode a dialog provides two setup options as shown below These options allow the Alfa ser...

Страница 26: ...ow buttons to increment decrement data values Many operations can also be done using the drop down menu and or hot key combinations For example playback can be toggled by pressing the play button in t...

Страница 27: ...Layer S Layer Select Server Next Server Previous Server Select Server 1 9 1 9 Layer Navigation Show Intensity Opacity T Full Intensity or Opacity option Out Intensity or Opacity option Show Color C S...

Страница 28: ...et Zoom Timeline Editing Create New Scene at Playhead S Move Selected Scene to Playhead option S Nudge Left option Nudge Left 10 Frames option Nudge Left 1 Second option Nudge Right option Nudge Right...

Страница 29: ...ious Scene in Timeline If a scene is selected in the timeline this selects the previous scene in the timeline Rewind Home key Goes to first event in the timeline Forward To End Goes to the last event...

Страница 30: ...specifies a file path Help Popups Sets the delay time for the tooltip help pop up feature in milliseconds Director CPU Throttle Configures the performance percentage of Mbox Director When running Mbo...

Страница 31: ...Automatically turn off Follow Updates when browsing option checked Note Refer to Media Picker on page 32 for more information about this window MIDI Preferences When receiving MIDI timecode from an ex...

Страница 32: ...be enabled at the OSC tab To enable and configure OSC Step 1 At OSC tab check OSC Enabled checkbox The window will now display configuration settings Step 2 At Input Port field enter the port number w...

Страница 33: ...the end of this manual Refer to OSC Syntax on page 99 To copy an OSC path to clipboard Right click on a parameter name in the main window to copy the appropriate syntax for that parameter selected or...

Страница 34: ...55 or 0 to 65535 Paths ending in label are for feedback only OSC apps cannot send labels to Director For example if you choose Effect saturation then Director will send back the md selected effect1 la...

Страница 35: ...are mapped to the keys Option 0 through Option 9 and are also available in the Edit Keyboard Macros menu The Keyboard Macros tab can be used to customize these shortcuts To customize a keyboard macro...

Страница 36: ...els starting at a specified channel offset The five incoming channels are split into three parts one channel to enable disable the trigger two channels to provide a value before the decimal point and...

Страница 37: ...selections on the Cue Fraction Digits pop up free form 2 digits 3 digits and 4 digits The 2 3 and 4 digit options can be used to make exact numerical matches to cue numbering sequences on lighting co...

Страница 38: ...icker any time it is opened To refresh the thumbnails in the Media Picker window click the Refresh Thumbnails icon This will take about 10 seconds Follow Updates On Off When this feature is enabled th...

Страница 39: ...ng generated or if you have added changed deleted media on the server then the box needs to be checked When two or more servers are patched the Media Picker displays the content of the server and laye...

Страница 40: ...the Mbox Director layer preview area Training Video CITP Streaming Feedback Thumbnails http www youtube com watch v ZQMg9VmJYNM Using Fullscreen Mode in Local Configurations If Mbox Director and Mbox...

Страница 41: ...to where you were if you decide you don t like the look The following edits can be undone Scene List edits Mbox Master Layer parameter edits including manual parameter changes Timeline edits Palette e...

Страница 42: ...h more complex layer configurations Quick Start Step 1 Install Mbox Director and set up proper communication between the application and at least one Mbox server Refer to Installation and Setup on pag...

Страница 43: ...Thumbnails icon Wait about 10 seconds for thumbnails to appear Step 8 Select a texture by clicking directly on its thumbnail Step 9 Return to Mbox window to view results The texture should be visible...

Страница 44: ...hard drive and can be opened and or edited at any time Use the options at the File menu to create new show files open existing show files or save show files Show files can also be copied from one com...

Страница 45: ...nd layers For the selected server press number keys 1 9 to select different layers Press 0 to return to the master control settings Adjusting Master Control Settings Each server has a set of master co...

Страница 46: ...ayer content will appear in the Mbox preview window The opacity can be set to a level between 0 not visible and 255 full The lowest numbered layer is the one in the background For example in a three l...

Страница 47: ...fields Note that in order for the current text entry to be accepted the Tab or Enter key must be pressed Tab will accept the entry and move to the next field while Enter will accept the entry and stay...

Страница 48: ...elected scene If no scene is selected then it will be added at the end of the list Delete Scene To delete a scene first select it in the list then click the Delete button The scene will be removed fro...

Страница 49: ...conds and a Scale change of 7 seconds then the 7 second time would be used displayed in the max field Adding or Deleting Scenes By default the Scene List starts with one scene labeled 1st Scene This s...

Страница 50: ...es are selected Director will circle the parameters that will be changed in the event of an update either manually or by auto apply To edit an existing scene with manual update Step 1 At Scene List se...

Страница 51: ...e To reset the default value click the dot The dot above the Opacity slider resets ALL layer values to their default Also see page 40 Training Video Cueing in Director http www youtube com watch v SbN...

Страница 52: ...ade to a timing value while the Time tab is active and you switch back to the Value tab before saving the change Director will still circle the parameter s name to indicate that a change is pending Th...

Страница 53: ...ist button and choose a separator Searching the Scene List Find The Find feature can be used to search the Scene List Scenes can be searched by name or number If the exact scene button is checked Dire...

Страница 54: ...hat position If the layer is blank it will be new content if the layer already has data its data will be overwritten To create a duplicate layer on the same server Using cursor click on an existing la...

Страница 55: ...t up to the target layer s icon box For example dragging the Size tab of Layer 1 to the layer icon box of Layer 3 will overwrite Layer 3 s Size settings with those of Layer 1 Adding Layers to Scenes L...

Страница 56: ...ore a parameter group tab an entire layer or multiple layers into a scene To perform a selective store Using cursor click on a parameter group tab layer or multiple layers and drag it on top of a scen...

Страница 57: ...g on layer icon boxes to select individual layers Note When multiple layers are selected and different layers have different parameter values the numeric value will be italicized Refer to Adjusting Re...

Страница 58: ...de The number of values changing and the values will be shown as text at the bottom of the window When multiple layers are selected and different layers have different parameter values the value will...

Страница 59: ...all other selected layers will change The number of values changing and the values will be shown in text at the bottom of the window When multiple layers are selected and different layers have differ...

Страница 60: ...g the multiple selection feature Even if the servers are configured differently Director will duplicate the parameters that are common to both To copy multiple layers Select multiple layers and drag t...

Страница 61: ...whether timecode or autofollow information is provided scenes can be played back individually by manually selecting them Note If autofollow times have been programmed uncheck the AF box to disable au...

Страница 62: ...Select first scene Step 5 At Timeline click Play button Scenes will play back in sequence using their autofollow times It is not necessary to click the Play button again as long as an autofollow time...

Страница 63: ...have an autofollow time of 2 seconds while the Bridge scene has a timecode 30 seconds later In this case the Verse scenes will loop for 30 seconds until the Bridge timecode is reached at which time th...

Страница 64: ...om level Prev Next The Zoom undo buttons will undo the previous zoom level or advance to the next zoom level 24hr Sequence Frames Sets the zoom level to 24 Hour Sequence or Frames Important Zoom Contr...

Страница 65: ...00 00 00 could be entered as just 1 If a timecode entry is out of sequence its timecode will be displayed in yellow as shown below Note that in a completely timecoded show having the scenes out of or...

Страница 66: ...res timecodes in a high precision format so that when different FPS settings are chosen Director can display the frames as accurately as possible in relation to real time For example if there are alre...

Страница 67: ...mecode source option This will typically be Audio Left for SMPTE input Step 5 Connect timecode audio signal to LINE IN port of the Mac computer Step 6 At Mac desktop select System Preferences from App...

Страница 68: ...nrise a sunset or sunrise prefix should be added to the timecode entry For example sunset 00 30 00 00 will recall the scene 30 minutes before sunset sunset 06 00 00 00 will recall the scene 6 hours af...

Страница 69: ...shown below To deactivate scrubbing click outside the timeline Another method of scrubbing is to drag the playhead to the left or right The scrub arrow will be visible on top of the playhead during th...

Страница 70: ...is is best used when the pop up menu is accessed at the Scene List table right click in the Scene List When a scene in the table is selected and Select in Timeline is chosen the selected scene will be...

Страница 71: ...imeline Overlapping Scenes Scenes can become overlapped when the length of a scene exceeds the timecode start time of the next scene This situation will be indicated in the timeline by a small white i...

Страница 72: ...ble in the menu If not the option will be grayed out by default When selected this will initiate a GO command for the last received cue number Latest Received MIDI Control Change Same as the above opt...

Страница 73: ...0 127 For example NT 101 No Trigger Clears the scene s trigger field Note Some consoles support cue format In this case Director will ignore the third digit after the decimal Training Video Scene Timi...

Страница 74: ...hat have been programmed in the Scenes table refer to Creating and Editing Scenes on page 42 The other two options Trigger Selected Fixtures and Trigger Specific Fixtures are used to control individua...

Страница 75: ...menu select Settings Step 2 At Settings window select Midi tab Step 3 At MIDI Output section choose an output using drop down menu This setting will depend on your own particular setup IAC Driver Bus...

Страница 76: ...o its default patch and to preset 1 If the unit has been custom configured then it may need to be reset Encoders 1 8 When LAYER is selected 1 Audio Volume 2 Red 3 Green 4 Blue 5 Play Speed 6 Scale 7 X...

Страница 77: ...ng those presets would automatically reflect the change rather than having to individually change the scale position parameters in every scene A Preset window available from the Media Picker contains...

Страница 78: ...nu is also available by right clicking in the preset banks Store and Recall The following section provides basic instructions for storing and recalling presets To store a preset Step 1 Open Preset win...

Страница 79: ...meter values the Preset View Mode shows parameter value information and information specific to the mode preset name information in this case The parameter value is shown in white below the parameter...

Страница 80: ...re the preset data is used Press the Cancel button to return to the main editing window and manually remove unlink preset data from each of the affected scenes Manual unlinking and updating is recomme...

Страница 81: ...In the case of unlinking it is not changing the data stored in the preset it is choosing not to use it for that parameter on that fixture in that scene 2 In the case of deleting it is changing the dat...

Страница 82: ...ves the preset reference from that parameter in addition to other parameter adjustments like timing delay etc The preset Recall buttons have a white ring around them to show which one was last clicked...

Страница 83: ...tte data can be exported and imported into other Mbox Director files To open the Palette window press the Palette button on the Media Picker or use keyboard Y Guidelines The Palette window is scalable...

Страница 84: ...s pin icon Step 2 At main Director window select an individual parameter or parameter group tab and drag to a palette button For example drag the Keystone tab to Palette 12 as shown below Step 3 Doubl...

Страница 85: ...right side of window Then click a palette button c To recall a palette s values only simply click on the palette button To delete a palette Step 1 Open Palette window Step 2 Do one of the following a...

Страница 86: ...be stored into these individual groups for later recall They can also be deleted or edited at any time To open the Group window press the Group button on the Media Picker or use keyboard Y Guidelines...

Страница 87: ...yers 1 3 and 5 and drag to Group 1 as shown below To label a group Step 1 Open Group window Step 2 Press Label button at right side of window then click on required group button Step 3 Edit label To r...

Страница 88: ...resets then the parameter value for all members will be stored In the example below a motley selection has been made and Opacity is being dragged onto the Alfa server There are two scenarios to consid...

Страница 89: ...p Hotkeys Hotkeys can be used to quickly recall groups To setup hotkeys open Preferences window and select the Keyboard Macros tab Edit fields to specify which groups can be recalled by keyboard comma...

Страница 90: ...between 0 opacity in Scene 1 to 100 opacity in Scene 2 By default the window displays Values This can be changed by clicking the Delay or Time tabs Delay is shown in number of seconds and displayed i...

Страница 91: ...ated by an E next to the parameter s time value The following diagram illustrates the concept of the Ease In Out sine curve with a delay added Note For more information about the Parameter pop up menu...

Страница 92: ...ne until Blind mode is deactivated A scene with the yellow blind text next to it is the scene that is currently playing while edits are being made in Blind mode If Blind mode is exited before the edit...

Страница 93: ...buttons provide a way to isolate or turn off different layers Hide Sets the output opacity of the selected layer to zero Solo Hides all layers except for the selected layer When a layer is in hide or...

Страница 94: ...on page 15 for more information Mbox Remote Settings This option allows the settings of the Mbox application to be changed remotely Force Restart Mbox Network Daemon This option restarts the Mbox Daem...

Страница 95: ...offer swap options as follows Swap With Layer Swaps the current values with the chosen layer Swap With Show Data Swaps the stored scene data with the chosen layer To access the first layer pop up menu...

Страница 96: ...display the value in degrees The default value is percentage The Copy OSC Path options are used with the Open Sound Control feature Refer to OSC Preferences on page 26 The Ease In Ease Out timing opt...

Страница 97: ...verse and output the remaining parameters to the Mbox Universe as normal The following diagram illustrates a Passthrough Art Net configuration using example universe values Note If the Passthrough Uni...

Страница 98: ...example right click on Opacity as shown below Step 5 Once an item is set for Passthrough its name will be displayed in tan Any changes made at the console would then be reflected in Director Step 6 T...

Страница 99: ...h will accept Serial Over Ethernet protocol To configure Serial Over Ethernet control Step 1 Open Add Fixture or Change Configuration window Refer to Adding Fixtures on page 12 for more information St...

Страница 100: ...server is plugged into a network that has an active DHCP server running i e computers connected to the network receive automatic IP address and subnet mask settings then Mbox Director will provide a...

Страница 101: ...r the network configuration has been changed To correct Step 1 Be sure your Ethernet cables are not swapped Step 2 Bring up the tooltip help and note the new IP address that is displayed Step 3 Click...

Страница 102: ...s displayed in the server icon this means that Mbox Director can hear the Mbox server over the network but has no way to reply because of the network settings To fix this first make sure your Ethernet...

Страница 103: ...Feedback on page 34 For more information refer to Working with the Dual Independent Mode on page 18 Passthrough Errors Passthrough universe not received Passthrough universe stale If Art Net sACN is n...

Страница 104: ...all setting are correct Refer to Art Net sACN Trigger Preferences on page 30 If the Art Net universe has never been received or has gone stale it will be indicated by yellow text in the Scene List If...

Страница 105: ...1 md palette 1 time no value recall palette 1 with timing md palette 1 timeonly no value recall palette 1 timing only not values md preset 1 no value recall preset 1 md group 1 no value recall group...

Страница 106: ...layer1 syncoffset dmx 0 to 255 md server1 layer1 aspect 0 0 to 1 0 md server1 layer1 aspect dmx 0 to 255 md server1 layer1 frameblend 0 0 to 1 0 md server1 layer1 frameblend dmx 0 to 255 md server1 la...

Страница 107: ...trlb dmx 0 to 255 md server1 layer1 objectxfade 0 0 to 1 0 md server1 layer1 objectxfade dmx 0 to 255 md server1 layer1 objectxfadetime 0 0 to 1 0 md server1 layer1 objectxfadetime dmx 0 to 255 md ser...

Страница 108: ...r lightingspot2ints dmx 0 to 255 md server1 master lightingspot2red 0 0 to 1 0 md server1 master lightingspot2red dmx 0 to 255 md server1 master lightingspot2green 0 0 to 1 0 md server1 master lightin...

Страница 109: ...md server1 master orbitx 0 0 to 1 0 md server1 master orbitx dmx 0 to 65535 md server1 master orbity 0 0 to 1 0 md server1 master orbity dmx 0 to 65535 md server1 master dolly 0 0 to 1 0 md server1 m...

Страница 110: ...0 md server1 master shutteredge dmx 0 to 255 md server1 master shuttershutter1a 0 0 to 1 0 md server1 master shuttershutter1a dmx 0 to 255 md server1 master shuttershutter1b 0 0 to 1 0 md server1 mas...

Страница 111: ...55 md server1 master edgeright 0 0 to 1 0 md server1 master edgeright dmx 0 to 255 md server1 master key1x 0 0 to 1 0 md server1 master key1x dmx 0 to 255 md server1 master key1y 0 0 to 1 0 md server1...

Страница 112: ...menu find md menu editfadetimemode md menu relativemovesholdvkey md menu fanmovesholdfkey md menu blindediting md menu resendallmidifeedback Keyboard Macros Menu md menu specialcharacters Select Layer...

Страница 113: ...menu nudgeleft10frames md menu nudgeleft1second md menu nudgeright md menu nudgeright10frames md menu nudgeright1second md menu selectnextsceneintimeline md menu selectprevioussceneintimeline md menu...

Страница 114: ...lectronic communication between them Subnet subnetwork a logical subdivision of a network such that multiple interfaces can be connected to the same physical network but are placed on different subdiv...

Страница 115: ...et broadcast IP address x 255 255 255 x x 255 255 or x x x 255 will only be received by interfaces on the matching subnet i e those with a subnet mask that places them into the same subnet This is one...

Страница 116: ...ead most Art Net devices use a subnet mask of 255 0 0 0 and generally use either 2 or 10 as the first octet in their IP address This places these devices into a specific subnet and they only talk to o...

Страница 117: ...kets are addressed to specific IP addresses This is efficient but as with Art Net unicast the user must know all of the IP addresses of the connected devices that they want to communicate with Also th...

Страница 118: ...112 MBOX DIRECTOR USER MANUAL Notes...

Страница 119: ...Mbox Director User Manual Version as of August 31 2015 PRG part number 02 9800 0002 31...

Страница 120: ...Production Resource Group LLC Dallas Office 8617 Ambassador Row Suite 120 Dallas Texas 75247 www prg com...

Отзывы: