background image


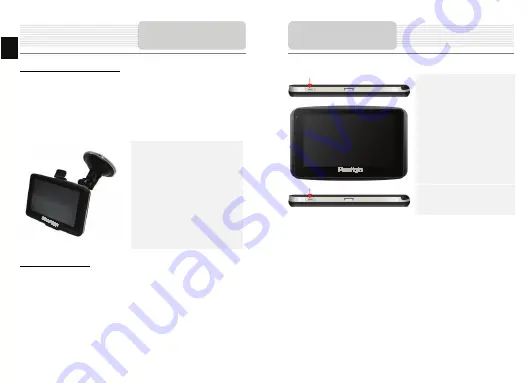
Device Mounting Procedures


The device can be securely mounted on vehicle dashboard or windshield with the 
mounting cradle included. Please follow procedures below to operate mounting cradle: 
 

1. 

Select an appropriate location on windshield or dashboard where the device and 
mounting cradle will not obstruct driver field of vision. 

2. 

Please also make sure that the device has a clear view of sky to attain best GPS 
reception. 


z

  Place device on the bracket with 

bottom positioned on the appropriate 
socket. 

z

  Push on the top edge to securely 

install device onto the cradle. 

z

  Lift the suction cup lever and press 

the suction cup at desired location. 

z

  Press down the suction cup lever to 

secure the mounting cradle on the 
surface. 

z

  Rotate the knob to adjust device to 

desired viewing angle. 


To Dismount Device


1. 

Push the tap on top of the mounting cradle to release the device. 

2. 

Lift the suction cup lever to easily remove the suction cup from windshield or 
dashboard. 


Using Mounting 

EN - 4 

EN


1.  Press and hold 

Power Button


to turn on device. 


2.  Shortly after the startup screen 

is shown, the main menu will be 
displayed. 

3.  Tap the corresponding buttons 

with touch pen included to 
navigate various functions. 

4.  Press and hold 

Power Button


to turn off the device or to allow 
device to enter sleep mode. 


Getting Started 

Содержание GeoVision 4150

Страница 1: ... liquids should be placed on the device To prevent the GPS from being damaged be sure to keep the GPS out of direct sunlight or heat Maintain well ventilated conditions around the unit to avoid overheating The exclamation point within an equilateral triangle is intended to alert the user to the presence of important operating and maintenance servicing instructions in the literature accompanying th...

Страница 2: ...wer ON OFF device 8 Speaker Emits sound voice or music 9 Stylus Pen Used for writing on the LCD Touch Screen 10 Backlight Button Auto adjust the screen brightness level View of Main Unit 1 2 4 5 3 6 7 8 9 10 EN 2 EN Inserting microSD Card z To insert a microSD card place connector towards device and card label towards the front side of the device z To remove a microSD card gently press the edge of...

Страница 3: ...om device speaker to earphone NOTE Excessively loud volume is potentially detrimental to hearing Please turn down the volume before connecting the earphone and gradually turn up the volume to a comfortable level Device Connection About Rechargeable Battery The device is equipped with a built in rechargeable battery Please fully charge the battery for at least 8 hours before initial use The battery...

Страница 4: ... onto the cradle z Lift the suction cup lever and press the suction cup at desired location z Press down the suction cup lever to secure the mounting cradle on the surface z Rotate the knob to adjust device to desired viewing angle To Dismount Device 1 Push the tap on top of the mounting cradle to release the device 2 Lift the suction cup lever to easily remove the suction cup from windshield or d...

Страница 5: ...point of the route The active 5 Route The active route 6 Navitel Events Event management button 7 GPS cursor Your location indicator 8 Menu Main menu opens by pressing this button Program interface No Name Function 9 Information panel Shows the name of the street you are currently driving along Available only if GPS GLONASS connection is established If there is no street name the direction will be...

Страница 6: ...ped 21 Traffic Jams Shows the current traffic jams on a 10 point scale 22 Navitel SMS This button is intended to read send SMS messages Near the icon you can see the number of unread messages 23 Software update Shows available updates 24 Go Marks the current position on the map as the end of the route 25 Route through Mark becomes the start point on the route You should turn off your GPS GLONASS r...

Страница 7: ... the Demo route button Autorouting 9 Route to the selected point on the map You can set the route to any point on the map This point will be the end of the route your current position will become the start of the route Create a mark on the route by pressing any place on the map 1 Press the Cursor then Go 2 The route is created 3 Route from point to point If you want to create a route from point to...

Страница 8: ...el software please refer to the complete user manual on CD or to www prestigio com Additional features EN 8 EN NOTE Do NOT store audio files in the built in flash storage for it may result in system malfunction The flash storage is used to store system data and should not be tempered at anytime Reminders regarding music playback function z Audio files should be loaded in the SD card before connect...

Страница 9: ...tem malfunction The flash storage is used to store system data and should not be tempered at anytime Reminders regarding video playback function z Video files should be loaded in the SD card before connecting to device z The loading process should be performed independently from the device z Do NOT attempt to use the device as a card reader device Playing Video z Insert SD card with video files lo...

Страница 10: ... used to store system data and should not be tempered at anytime Reminders regarding photo viewing function z High resolution image files may considerably slow down device reading speed Image files with resolution 640 X 480 or lower is recommended z Image files should be loaded in the SD card before connecting to device z The loading process should be performed independently from the device z Do N...

Страница 11: ...to store system data and should not be tempered at anytime Reminders regarding Document Viewer function z Document files should be loaded in the SD card before connecting to device z The loading process should be performed independently from the device z Do NOT attempt to use the device as a card reader device z The device supports the format of TXT only Reading Text z Insert SD card with text fil...

Страница 12: ...to enter submenu Language z Tap on on submenu to enter language setting z Tap on to cycle through language options z Tap on to cancel confirm Date Time z Tap on to enter date time setting z Tap on to adjust the corresponding date time z Tap on to cancel confirm Volume z Tap on to enter volume setting z Tap on to adjust volume z Tap on to cancel confirm Settings ...

Страница 13: ...evice is not working properly Never try to repair the unit without authorized professionals for it may damage the unit Troubleshooting PROBLEM POSSIBLE CAUSE POSSIBLE SOLUTION There is no sound The volume may be turned down or mute Turn up the volume or turn on the sound output Users can t turn on the unit The adaptor doesn t connect well Connect the adaptor correctly The built in rechargeable bat...

Страница 14: ...nnection with PC for data access and synchronization please execute setup file included in the Driver Documentation CD or download the file from Microsoft website to install Microsoft Active Sync software for operating system Microsoft XP or earlier versions http www microsoft com windowsmobile en us downloads microsoft activesync dow nload mspx and or Microsoft Mobile Device Center software for o...

Страница 15: ...Microsoft Window CE6 0 Microsoft Window CE6 0 Speaker 1w 8ohm built in speaker 1w 8ohm built in speaker Video formats supported AVI WMV 3GP MOV MP4 MPG AVI WMV 3GP MOV MP4 MPG Technical specifications MODEL GV4150 GV5150 Audio formats supported MP3 WMA MP3 WMA Earphone jack 2 5mm mini jack 2 5mm mini jack Operating Temperature 0 60ºC 0 60ºC Operating humidity 10 to 90 non condensing 10 to 90 non c...

Отзывы: