background image

75/112

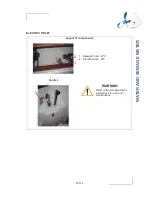
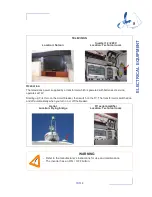
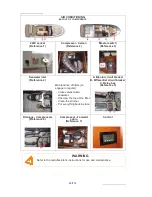
FLAPS

Control - Inside wheelhouse

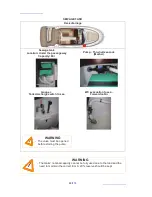
Control - Wheelhouse flying bridge

Location

Control box: Engine compartment

Location

WARNING

- Refer to the manufacturer's instructions for use and maintenance.

8

E

L

E

C

T

R

IC

A

L

 E

Q

U

IP

M

E

N

T

Содержание 350

Страница 1: ...PRESTIGE 350 OWNER S MANUAL S PORTS ET LOISIRS 123682 Index E ...

Страница 2: ......

Страница 3: ...plished sailor Even when your boat has been adapted for them the sea and wind conditions corresponding to the design categories A B C and D may vary ranging from severe conditions to strong storms subject to the risks of exceptional waves and gusts of wind this meaning they are dangerous conditions in which only an experienced fit and well trained crew manoeuvring a well maintained boat can sail i...

Страница 4: ......

Страница 5: ...fe navigation Always adapt the speed and direction of your boat to the conditions of the sea The boat shall not be loaded more with than the maximum load recommended by the builder in particular the total weight of the food supplies of the different equipment that are not supplied by the builder and of the persons on board The weight of the boat shall be properly distributed The stability is reduc...

Страница 6: ...hey may be modified without prior notice or up dates This owner s manual is designed in accordance with the ISO 10240 standard requirements it has a general purpose and it may sometimes list some equipment or accessories or deal with some points or questions that are not relevant to your own boat The different warnings used throughout this guide are broken down as follows DANGER Indicates the exis...

Страница 7: ...3 112 HISTORY OF UPDATES Index A 02 2011 Index B 10 2011 Index C 11 2012 Index D 03 2013 ...

Страница 8: ......

Страница 9: ...ge 35 Chapter 5 STEERING SYSTEM Page 45 Chapter 6 INTERIOR Page 47 Chapter 7 WATER AND SEWAGE WATER Page 53 Chapter 8 ELECTRICAL EQUIPMENT Page 67 Chapter 9 ENGINE Page 89 Chapter 10 LAUNCHING Page 101 Chapter 11 WINTER STORAGE Page 107 PERSONAL NOTES PRESTIGE 350 Anglais Update 03 2013 Index D Code 123682 Total number of pages 112 ...

Страница 10: ......

Страница 11: ...7 112 SPECIFICATIONS AND WARRANTY TECHNICAL SPECIFICATIONS DESIGN CATEGORY YOUR BOAT 1 ...

Страница 12: ... 110 A Battery capacity Bow thruster 50 A Battery capacity Generator 110 A Cabins 2 Sleeping capacity 4 Note The capacities indicated are maximum including options Architect Jernej JAKOPIN Interior design Garroni Design J F de Prémorel CERTIFICATION Including the mass of the persons who are authorized on board 75 kg 175 lbs per adult the supplies the liquids that can be used fresh water and fuel i...

Страница 13: ...cluding 4 metres the Flying Bridge crew must be limited to 5 persons of the 8 persons on board Design category Wind force Beaufort scale Significant height of waves to be considered in metres H 1 3 Vessel designed for navigation A At high sea B In open sea C Near to the coast D In sheltered waters Over 8 Up to and including 8 Up to and including 6 Up to and including 4 Over 4 Up to and including 4...

Страница 14: ...ghts significant wave height up to 2 m see Note 1 below You may meet with such conditions in exposed inland waters in estuaries and in coastal waters with moderate weather conditions Category D In sheltered waters This craft is designed to operate in winds up to Beaufort force 4 and the associated wave heights occasional maximum waves of 0 5 m height Such conditions may be encountered in sheltered...

Страница 15: ...STRATION NUMBER DELIVERY DATE DOOR KEY NUMBER MAKE OF ENGINE ENGINE SERIAL NUMBER ENGINE KEY NUMBER PRESTIGE Establishment of the company SPBI BP 529 85505 LES HERBIERS cedex FRANCE Tel 33 02 51 64 20 20 Fax 33 02 51 67 37 65 Internet http www jeanneau com fr Your agent 1 SPECIFICATIONS AND WARRANTY ...

Страница 16: ......

Страница 17: ...13 112 SAFETY SAFETY EQUIPMENT GENERAL INFORMATION GAS SYSTEM RECOMMENDATIONS FOR GAS FIGHT AGAINST FIRE BILGE PUMP SYSTEM INSTRUCTIONS IN THE EVENT OF STEERING GEAR FAILURE 2 ...

Страница 18: ... 112 SAFETY EQUIPMENT 1 Position of swimming ladder 2 Location of liferaft locker not supplied Note If over 10 persons on board 2 liferafts compulsory Swimming ladder means of coming back onboard Liferaft ...

Страница 19: ...der The swimming ladder must be in position as soon as you are onboard Reduce speed in waves WARNING Before you sail list the compulsory safety equipment Don t exceed the number of persons indicated in the chapter Specifications The total weight of the persons and equipment must never exceed the maximum load recommended by the manufacturer Use the seats provided ADVICE RECOMMENDATION When sailing ...

Страница 20: ...cate it easily Valve 6 Open valve 7 Closed valve WARNING For all recommendations concerning gas Refer to chapter 2 Safety Don t use a solution containing ammonia Don t use a flame to detect leaks Don t smoke don t use a naked flame when you change the gas cylinder ...

Страница 21: ...17 112 POSITION OF GAS BOTTLE 2 SAFETY ...

Страница 22: ...lve 2 Gas cylinder 3 Drain 4 Connection kit gas bottle 5 Rubber washers 6 Pictogram 7 Connection kit gas copper 8 PVC girdled sleeve 9 Gas appliance connection kit Cooker WARNING Make sure the temperature of the stove before you close the hood gaz 046443 GAZ 8 3 2 4 1 6 9 5 7 ...

Страница 23: ...ng water and soap or detergent closing the valves of the appliances and opening the valve on the cylinder If you detect a leak close the valve of the cylinder and repair before you use it again The appliances use the oxygen of the cabin and release combustible gases Ventilate your boat when using appliances Don t obstruct the air vents and at least leave the door open Don t use the oven or stove a...

Страница 24: ...20 112 EMERGENCY EVACUATION AND LOCATION OF EXTINGUISHERS Emergency exits in case of fire Companionway Sliding hatch Ladder Flying bridge p p p ...

Страница 25: ...21 112 Position of portable extinguishers not supplied Aft cabin closet Saloon seating Compartment Flying bridge p p p 2 SAFETY ...

Страница 26: ...or is Check the condition of the regulator every year and change it if necessary Use regulators identical to the ones that are fitted Have the repairs carried out by someone skilled POSITION OF GAS BOTTLE The locker for storing gas bottles can be reached through the cockpit The locker can accommodate a gas bottle The locker is equipped with bottle fastening straps REF Designation 1 Regulator valve...

Страница 27: ...he curtains open when the gas cooker is working For protection of the deck the vessel owner user should provide at least one fire bucket complete with rope in an immediately accessible position Do not store combustible materials in the engine compartment If non combustible materials are stored in the engine compartment they must be secured so there is no danger of them falling on machinery and the...

Страница 28: ...24 112 FIXED EXTINGUISHER SYSTEM Extinguisher remote control A pictogram helps to locate it easily Position of fixed extinguishers ...

Страница 29: ...irect or alternating current systems are incorrectly used Refer to chapter Electricity WARNING Do not obstruct the ways to the emergency exits Do not obstruct the safety controls fuel oil valves gas valves power switches Do not block the extinguishers placed on shelves Do not leave the vessel unattended when a cooker or heater is in use Do not use gas lamps in the vessel Do not alter the vessel sy...

Страница 30: ...OSITION OF FUEL SUPPLY VALVES 1 Opening valve Closure Diesel Port engine 2 Opening valve Closure Diesel Starboard engine 3 Remote pull switches for diesel shut off Remote pull switches Fuel supply valve Ref 1 2 ...

Страница 31: ...N THE ENGINE COMPARTMENT BILGE Stop the engine Switch off power and stop fuel supply Block off the air supply from the air inlets and outlets of the engine Activate the fixed extinguisher remote control Wait Open the access hatches and repair 2 SAFETY ...

Страница 32: ...tch on power to the electric bilge pumps If necessary activate the manual pump Identify the source of the leak by tasting the water and decide on the relevant action to be taken freshwater watertank leak seawater breach of hull Location Operation Capacity 31 5 litre minute ...

Страница 33: ...ic Mechanically operated In the automatic position each pump is set off automatically by a trip switch located in the sump area or in the bottom of the hull Electric bilge pump 12V Location Engine compartment Electric bilge pump 12V Location Plumbing board Control Inside wheelhouse Capacity 35 litre minute Capacity 15 litre minute Operation The electric bilge pumps are connected to the 12V service...

Страница 34: ...uoyancy to the boat in case of damage The bilge pump system is designed to drive out the water being either sea spray or leaks but absolutely not the water coming through a hole in the hull this hole being the result of a damage Do not let the pumps run while dry this may cause them damage The water in the bilge shall be kept at its minimum Check the functioning of each bilge pump regularly SAFETY...

Страница 35: ...31 112 HULL MAINTENANCE OF THE HULL LIFTING 3 ...

Страница 36: ...ors nor the anodes ADVICE RECOMMENDATION During the refit check the anodes See Motorisation chapter When the boat is stored at a dry dock the corrosion protection is not as effective due to oxidation of the anodes even the new anodes oxidize the surface Before returning the boat into the water clean the anodes Cleaning anodes Use sandpaper Do not use metal brushes or steel tools to clean the boat ...

Страница 37: ...f the anti fouling paint as well as the frequency of hull stripping and painting Do not hesitate to take advice from your specialists Refer to chapter 12 for launching instructions If cleaning of the anti fouling paint has to be done with a high pressure hose The water temperature must not exceed 15 C The water pressure must not exceed 150 bars The distance between the hose nozzle and the hull mus...

Страница 38: ......

Страница 39: ...35 112 DECK DECK LAYOUT MOORING LINES TOWING PREVENTION OF MAN OVERBOARD STABILITY MOORING MAINTENANCE OF THE DECK 4 ...

Страница 40: ...to be towed at the stern to tow C Swimming ladder means of coming back onboard WARNING The sudden closing of a locker due to a gust of wind or movement of the boat could result in injury ADVICE RECOMMENDATION Close the deck hatches and portholes before each trip including the sliding door window in heavy weather ...

Страница 41: ...es Make allowance for the variations in tides if need be TOWING TOWING BOAT Tow another boat at a reduced speed and as smoothly as you can Pay particular attention when you throw or catch the towing rope it may foul on the propeller Note The stability may be reduced when you tow a boat TOWED BOAT Keep steering your boat and see to it that you stay in the wake of the towing boat Inappropriate towin...

Страница 42: ... on the diagram below Aft quarterdeck Forward sun deck Arceau de fly DANGER Vessel use limitation when sailing in design category B When sailing in conditions of design category B wind force up to and including 8 Beaufort and significant wave height up to and including 4 metres the Flying Bridge crew must be limited to 5 persons of the 8 persons on board Access Cockpit Must be closed while sailing...

Страница 43: ...in water Close the companionway doors and hatches in heavy seas During sailing keep all the portholes windows and doors closed The stability is reduced when you add weight in the upper parts Stability may be reduced when towing a boat or when heavy weights are lifted with the davits 4 DECK ...

Страница 44: ...itting 2 Windlass 12V 1000W 3 Opening Mooring locker 4 Remote control 5 Handle 6 Chain lifter 10mm diameter Location Technical room 1 100A breaker 2 Operation relay Windlass control Inside wheelhouse Windlass control Wheelhouse Flying bridge ...

Страница 45: ...he remote control pressed down Let the chain out while moving backwards slowly and as straight as possible Once the anchor snags make it fast by reversing slightly Secure the hawser or the chain to the cleat WARNING Turn off all battery breakers before leaving the vessel risk of total battery park PRECAUTION Before anchoring check the depth of water the power of the current and the nature of the s...

Страница 46: ...gine Don t use your windlass to winch the boat Heave the anchor completely Visually check the last meters till the anchor gets into contact with the davit If you just change berth check the position of the anchor on the stem fitting For sailing store the anchor in the chain locker or fasten the anchor to its roller For electrical windlasses cut off the power supply as soon as the anchor has been l...

Страница 47: ...r using a sponge if need be add some gentle soap PLEXIGLAS Rinse plexiglas with fresh water Use a polish paste for thin scratches Consult your dealer concerning deep scratches STAINLESS STEEL Stainless steel is not incorruptible and requires a minimum of upkeep The use of chrome tools is preferable whenever handling stainless steel Re nourish the protective film regularly with passivation paste co...

Страница 48: ...44 112 Fixing PERFIX Press Pull WARNING Refer to the manufacturer s instructions for use and maintenance ...

Страница 49: ...45 112 STEERING SYSTEM STEERING GEAR 5 ...

Страница 50: ... Regularly check The tightness of the steering system components Lubricate all the elements Maintain the nylon ertalon or teflon bushes with only a suitable lubricant Note Do not hesitate to consult your dealer about system maintenance BASE ENGINE STERN DRIVE ...

Страница 51: ...47 112 INTERIOR INTRODUCTION INTERIOR MAINTENANCE MAINTENANCE OF FABRICS INTERIOR EQUIPMENT 6 ...

Страница 52: ...48 112 INTRODUCTION Saloon Cabins ...

Страница 53: ...poo Polish the interior varnishing with a chamois leather MAINTENANCE OF FABRICS STAIN REMOVAL Dab with a clean rag Remove the stain with a solvent poured onto a clean rag Never pour the solvent directly over the stain Rub with a clean and dry rag Brush the fabric against the grain Use the vacuum cleaner when the fabric is dry PVC OR COATED FABRICS Use a sponge and water and soap household soap ty...

Страница 54: ... C In both cases dry cleaning is possible Remove the stains as soon as possible with a damp rag COTTON JACQUARD Dry clean Do not iron Do not use hypochlorite Remove the stains with fractionated petrol LEATHER Use a leather cream for ordinary care Do not use detergent Do not use silicone based products Clean with a sponge and soapy water Remove ball point pen marks with methylated spirit Remove the...

Страница 55: ...51 112 INTERIOR EQUIPMENT Sink Sliding hatch Must be secured while sailing 6 INTERIOR ...

Страница 56: ...52 112 Mosquito net Blackout curtain Shower screen Fixing Access Technical room Under the starboard bench seat ...

Страница 57: ...53 112 WATER AND SEWAGE WATER WATER TANKS WATER SYSTEM DISTRIBUTION WASTE WATER DRAINAGE SYSTEM SEWAGE WC 7 ...

Страница 58: ...TER TANKS Deck filler Location Tank Location Aft cabin Capacity 250 litre Gauge Location On the fuel tank WARNING The tanks nominal capacity cannot be fully used due to the load and the need to maintain the correct trim A 20 reserve should be kept ...

Страница 59: ...outlets and vents Never insert the water filling hose deep down into the system in order to prevent any over pressure in the systems ADVICE RECOMMENDATION Pay attention to the quality of the water for the filling up Check if it is drinking water It is possible to sterilize the tanks with a Clonazione tablet sold at the Chemist s If the boat is not used for long purify the tanks and pipes with acet...

Страница 60: ...on tank Water unit Control Inside wheelhouse Water heater Operation The water heater works off the starboard engine system on 220V 1 Thermostatic mixer valve 2 Water heater 25L 220V Location Engine compartment Control Electrical panel Supply valve Water heater Starboard engine allows to isolate the hot water circuit of engine Location Engine compartment ...

Страница 61: ...n A non return flap in the distribution system enables shore water to be used directly without opening a valve Location Shower Socket Shore water Deck shower 1 Mixer tap 2 Cockpit shower spray Shore freshwater supply 7 WATER AND SEWAGE WATER ...

Страница 62: ...ater system Turn off shore water before leaving the vessel PRECAUTION Never operate the water system equipment when the valve is closed or the tank is empty the electrical equipment may be damaged Check the water filter for condition refer to manufacturer s instructions Close the taps of empty tanks ADVICE RECOMMENDATION Regularly check the valves and thru hull seacocks for proper operation and wa...

Страница 63: ...ASHBASINS AND SHOWERS Close the valves and turn off the taps after use WASHROOM DRAINING Shower draining Washbasin Under the cupboard Shower pump Drainage pump control Shower Galley draining Sink 7 WATER AND SEWAGE WATER ...

Страница 64: ...e absorbent paper in reasonable quantities Schedule a regular rinsing through of the heads with fresh water Close the valves after each use in particular when the boat is unattended WARNING Refer to the manufacturer s instructions for use and maintenance ADVICE RECOMMENDATION When you are in a marina use the club house sanitary facilities if there are Since it is prohibited to discharge sewage wat...

Страница 65: ...61 112 ELECTRIC TOILET Layout of components 1 Seawater inlet WC 2 Electric pump WC Control WARNING Refer to the manufacturer s instructions for use and maintenance 7 WATER AND SEWAGE WATER ...

Страница 66: ... Thru hull seacock Masher Gauge Tank discharge switch to sea WC evacuation to sea Forward cabin WARNING The tanks nominal capacity cannot be fully used due to the load and the need to maintain the correct trim A 20 reserve should be kept WARNING The valve must be opened before starting the pump ...

Страница 67: ...63 112 SCHEMATIC DIAGRAM 1 Filler cap Deck drainage 2 Thru hull fitting elbowed 3 Inspection hatch 4 Electrical gauge 5 Elbowed plunger 6 Elbowed plunger 7 Masher 8 Sewage tank 7 WATER AND SEWAGE WATER ...

Страница 68: ...e system with fresh water Always retain a little water in the bottom of the bowl to avoid smells To empty the tank In an authorized area open the draining valve In a marina equipped with a system to suck the waste waters put the sucking hose into the tank through the deck filler Start the pump of the sucking system The filler caps are opened and closed with an appropriate key When the tank is empt...

Страница 69: ... and follow them as far as possible ADVICE RECOMMENDATION Completely empty the black water system before leaving the vessel unattended in temperatures below freezing To prevent odors caused by organic waste in pipes one should clarify the circuit after each use For this procedure drive about ten times the manual pump of the toilet or for a minute if it is an electrical pump When you leave the ship...

Страница 70: ......

Страница 71: ...67 112 ELECTRICAL EQUIPMENT SYNOPTIC GENERAL GENERAL INFORMATION ELECTRICAL CIRCUIT 12 V ELECTRICAL CIRCUIT 110 220 V EQUIPMENT 8 ...

Страница 72: ...rt tank 11 Joystick 3 Tachometer Port side 12 VHF 4 Compass 13 Engine starter 5 Tiller angle indicator 14 Trim control 6 Tachometer Starboard 15 Engine control 7 Fuel gauge Starboard tank 16 Steering wheel 8 Trim indicators Starboard 17 Electrical controls 9 Repeater Engine 18 Electronic ...

Страница 73: ...fications of power overload protection devices Never modify an installation Use the services of a qualified marine electricity technician Never install or replace the electric appliances or any electric equipement by components exceeding the capacity amperage of the circuit Do not leave the vessel unattended when the electrical system is switched on Certain lights represent a significant heat sour...

Страница 74: ...ical battery switches Manual operation In case of power failure it is possible to initiate the battery switch manually by pressing the top 1 Positive Service 2 Positive Port engine 3 Positive Starboard engine 4 Negative terminal Common WARNING Never work on a live electric fitting Do not touch battery terminals risk of electric shock PRECAUTION Switch off the electrical system with the battery swi...

Страница 75: ...o sea BATTERY CHARGER Operation The battery charger operates based on a signal processor that converts alternating current 220V or 110V into a direct current 12V The operation of the charger is fully automatic after selecting the type of battery and load type Refer to the instructions for use ADVICE RECOMMENDATION It is recommended that you switch off all electrical devices before turning off the ...

Страница 76: ...RING STATION Demister 12V Location Engine compartment Control Demister outlets on the windscreen The demisting system is mechanical It operates when the port engine is warm and running Wiper tank Location Starboard saloon Control Wiper Control Location ...

Страница 77: ... operates at 12V Starting up First turn on the circuit breaker then switch on the TV The transformer is switched on and off automatically when you turn on or off the breaker Aerial Location Flying bridge TV aerial amplifier Location Technical room WARNING Refer to the manufacturer s instructions for use and maintenance The inverter has an ON OFF button 8 ELECTRICAL EQUIPMENT ...

Страница 78: ...74 112 CD PLAYER AND RADIO Location Port saloon BOW THRUSTER General view Control Steering station Anode ...

Страница 79: ...FLAPS Control Inside wheelhouse Control Wheelhouse flying bridge Location Control box Engine compartment Location WARNING Refer to the manufacturer s instructions for use and maintenance 8 ELECTRICAL EQUIPMENT ...

Страница 80: ...76 112 HYDRAULIC GANGWAY Location Maximum load 170kg Length Folded out 2 3m Control ...

Страница 81: ...ch Control Inside wheelhouse Control Wheelhouse exterior REVOLVING DECK SEARCHLIGHT Location Connection 8 1N7x bf 1 5 1N7x n 2 5 1N7x or 1 5 1N7x vi 1 5 1N7x gr 1 5 1N7x r 2 5 1N7x m 1 5 1N7x iv 1 5 10A 7 6 8 1 3 5 2 4 ELECTRICAL EQUIPMENT ...

Страница 82: ...ighting Galley Engine compartment Technical room 20 Lighting Aft cabin Forward cabin Head version 21 12V socket Steering station 22 12V socket Cabins 23 12V socket Swelling 24 Electric toilet 25 Masher Tank drain pump Sewage 26 Hifi 27 Inverter TV 28 Horn 29 Flaps 30 Windlass 31 Solenoid Gas US 32 VHF 33 Auto pilot 34 HUB Seatalk 35 Depth sounder 36 GPS Chart plotter 37 Radome OPERATION Circuit br...

Страница 83: ...cation interior Control directly on the device Location Outside Flying bridge Control directly on the device WARNING Must be secured while sailing During long absence leave the fridge and icebox doors open to avoid mould developing Defrost the fridge regularly 8 30A 30A 30A 30A 1 2 3 4 ELECTRICAL EQUIPMENT ...

Страница 84: ...odify the vessel shore supply line connections only use compatible connections Do not alter the vessel s electrical system The installation modifications and maintenance must be carried out by a qualified marine electricity technician Check the system at least twice a year Disconnect the vessel supply when the system is not being used This is to prevent the danger of fire Use double insulated or e...

Страница 85: ...ore you plug in or unplug the boat shore supply cable switch off the shut off device connected to the shore supply Plug in the boat shore supply cable in the boat before you plug it into the shore supply socket Unplug the boat shore supply cable on shore first Close the shore socket cover Do not modify the connections of the boat shore supply cable DANGER Unplug the dock before leaving the dock 8 ...

Страница 86: ... 1 Battery charger 1 2 Battery charger 2 3 Standard equipment Sockets 220V 4 Standard equipment Sockets 220V 5 Water heater Location Technical room C 16 C 16 C 16 C 16 C 16 C 16 C 16 C 16 C 16 2 4 6 8 1 3 5 7 A2 A1 9a WK 8L 9 9a 1 2 3 4 5 ...

Страница 87: ...gine cooling system On the 220 V circuit WATER HEATER 220V Location Engine compartment 1 220V socket 2 Water heater 25 litre 3 Thermostatic mixer valve SUPPLY VALVE WATER HEATER ENGINE Location Engine compartment This valve allows you to isolate a faulty circuit 8 ELECTRICAL EQUIPMENT ...

Страница 88: ... filters to engage in regular Close valves taken seawater Unscrew the top of the filter Clean the strainer Put everything back in place A Bipolar circuit breaker B Differential circuit breaker C Relay box Reference 5 Drainage Compressors Reference 6 Compressor Forward cabin Reference 7 Control WARNING Refer to the manufacturer s instructions for use and maintenance ...

Страница 89: ...er is evacuated through a through hull fitting equipped with a valve located above the waterline Each compressor has its own through hull evacuation fitting It is advisable to check the flow of water visually once the air conditioning starts running OPERATION Before starting the engine Open the raw water intake valves and evacuation valves Use the switch on the chart table to select the power sour...

Страница 90: ...1V is turned on Open the heater ventilation intakes Turn the control box at ON Adjust the temperature of the heater using the thermostat LOCATION EQUIPMENT HEATING 1 Joining Diesel 2 Mouth heating 3 Heater Heater Location Engine compartment Mouth heating Control WARNING Never switch off or de energise the electric system when the engine is running Imperatively operate the stop pull handle or butto...

Страница 91: ... on the Navigation circuit breaker on the electrical panel For use and maintenance of the material consult the manufacturer instructions MAINTENANCE Clean the transducer probe during each dry dock and the log sensor regularly Read the instructions for maintenance recommendations Refer to chapter 12 Launching for the precautions to be taken concerning the sensors during hoisting Clean the repeater ...

Страница 92: ...EMENTS AUTO PILOT Location Cockpit locker VHF Location Inside wheelhouse Location Wheelhouse exterior Elements VHF Location Technical room WARNING Refer to the manufacturer s instructions for use and maintenance ...

Страница 93: ...89 112 ENGINE GENERAL INFORMATION ENGINE INSTALLATION 9 ...

Страница 94: ...r if installed compartment are well cleared PRECAUTION Never run the engine when the boat is hauled out PRECAUTION Stop the engine before you open the companionway hatch and side hatches In case of an intervention when the engine is running Stay away from belts and hot or mobile parts Be careful with full clothes long hair rings etc you may be caught Wear appropriate clothes gloves caps etc ADVICE...

Страница 95: ...dels there is a fitted extinguisher system which enables a fire in the engine compartment to be put out Make sure you know where the activating mechanism is and how it works Refer to chapter 2 Filling Fill the fuel tank using the filler In order to protect the deck from possible fuel splash wet the area around the filler with sea water before you remove the filler cap In case of splashing rinse th...

Страница 96: ...92 112 MAIN COMPONENTS OF THE ENGINE Location Engine compartment Fuel filter Box Electronics Engine Hydraulic fluid tank Trim ...

Страница 97: ...spect and clean the seawater filter Engine operation Before starting the engine Turn on the fuel valve Open the seawater inlet valve located by the housings Operate the battery switches and energise the electric system Disengage the reverse gear it will make the acceleration possible when in neutral ADVICE RECOMMENDATION Get used to checking immediately after starting the engine if water is expell...

Страница 98: ...INE FITTING REF Designation 1 Engine 2 Engine control 3 Fuel filter 4 Fuel tank 5 Engine instrument panel 6 Filler cap Diesel 7 Batteries 8 Ventilation 9 Bow thruster 10 Steering 11 Vents 8 11 9 5 10 1 7 4 2 6 3 ...

Страница 99: ...95 112 POSITION OF FUEL SUPPLY VALVES SEA WATER INLET VALVE FOR ENGINE Fuel supply valve Sea water inlet valve for engine located directly on sockets 9 ENGINE ...

Страница 100: ...mes a year Change the anode if necessary Before it lost 50 of its weight Use anodes corresponding to the zone of navigation of the boat fresh water sea water If bases are raised anodes are outside the water respect the recommendations of the motoriste WARNING Change systematically anodes at the end of the first 3 or 4 months of launch of the new boat their wear is accelerated during this period ...

Страница 101: ... you have to change it please refer to the engine s manual The second filter is on the pipe that links the tank to the engine it plays the role of a water decanter and prefilter Drain by undoing the knurled screw at the base of the decantation bowl but not removing it Allow to flow into a box till the fuel looks clean Do this several times a year Change the pre filter at least once a year access t...

Страница 102: ...Inside wheelhouse Engine control lever Joystick For manoeuvring vessel at low speed Wheelhouse Flying bridge Engine control lever Joystick Electronics box Joystick Location Engine compartment WARNING Refer to the manufacturer s instructions for use and maintenance ...

Страница 103: ...f priority Make sure there is no other boat on your way The visibility from the steering station may be obstructed in the following conditions Speed Position of the upper and side awnings Load and load distribution Sea conditions rain spray fog or darkness Lights on inside the boat Persons and removable equipment in the helmsman s field of visibility ADVICE RECOMMENDATION When the engine is runnin...

Страница 104: ...tion with the engine manufacturer ADVICE RECOMMENDATION Have the whole driving and steering systems checked and maintained by a professional Refer to the manufacturers instructions supplied with your boat Regularly check the O ring of the filler for good condition in order to prevent water entries Do not turn off the fuel tap after each use except in case the boat is unattended for long Keep the f...

Страница 105: ...101 112 LAUNCHING LAUNCHING RECOMMENDATIONS 10 ...

Страница 106: ...102 112 POSITION OF HOISTING CRADLE AND STRAPS Note Measurements are expressed in mm ...

Страница 107: ...103 112 Implementation of transport cradles Vue Latérale 10 2 8 6 2 6 3 6 6 2 3 6 1 4 8 4 6 0 5 0 3 3 8 7 2107 3807 1231 LAUNCHING ...

Страница 108: ...104 112 Note Measurements are expressed in mm Vue avant 2950 389 389 3728 2600 2950 ...

Страница 109: ...eduction gear oil levels refer to engine manual Turn off the engine cooling water drain valves Retract the speedometer into its housing it may be damaged by the handling belts For the on line engines check the anode at the end of the shaft is in place Check the nut tightening the lock washer shall be turned over onto the nut The anode shall not be painted Turn off all the water inlet and drain val...

Страница 110: ... LAUNCHING Check the sounder and speedometer fittings for tightness if need be Open the valves and make sure that they are tight with the hull and relevant hose Before starting the engine refer to chapter 11 Engine ...

Страница 111: ...107 112 WINTER STORAGE LAYING UP PROTECTION AND MAINTENANCE 11 ...

Страница 112: ...back into the boat in the upright and side position in order to have minimum contact surfaces During long absence leave the fridge and icebox doors open to avoid mould developing EXTERIOR Thoroughly rinse the hull and deck Grease all moving and mechanical parts latches hinges locks etc Protect all ropes and mooring lines against chafing Protect the boat as well as possible with fenders Make sure t...

Страница 113: ...s grease the terminals and check the battery voltage Fill the fuel tanks to a maximum in order to avoid condensation Please refe to the engine manual for anything relating to the engine Ashore Take the batteries ashore and keep them on maintenance charge Change the anodes Carry out the winterization operations specified by the manufacturer keeping in mind that the freeze hazard is more significant...

Страница 114: ......

Страница 115: ...PBI BP 529 85505 LES HERBIERS cedex FRANCE Tel 33 02 51 64 20 20 Fax 33 02 51 67 37 65 Internet http www jeanneau com fr The present document is not contractual and since we constantly desire to improve our models we reserve the right to modify them without notice ...

Страница 116: ......

Отзывы: