background image

7

Getting Started 

2.3 

Step 3: Update Firmware 

StudioLive™ Series III Rack Mixers 

Owner’s Manual

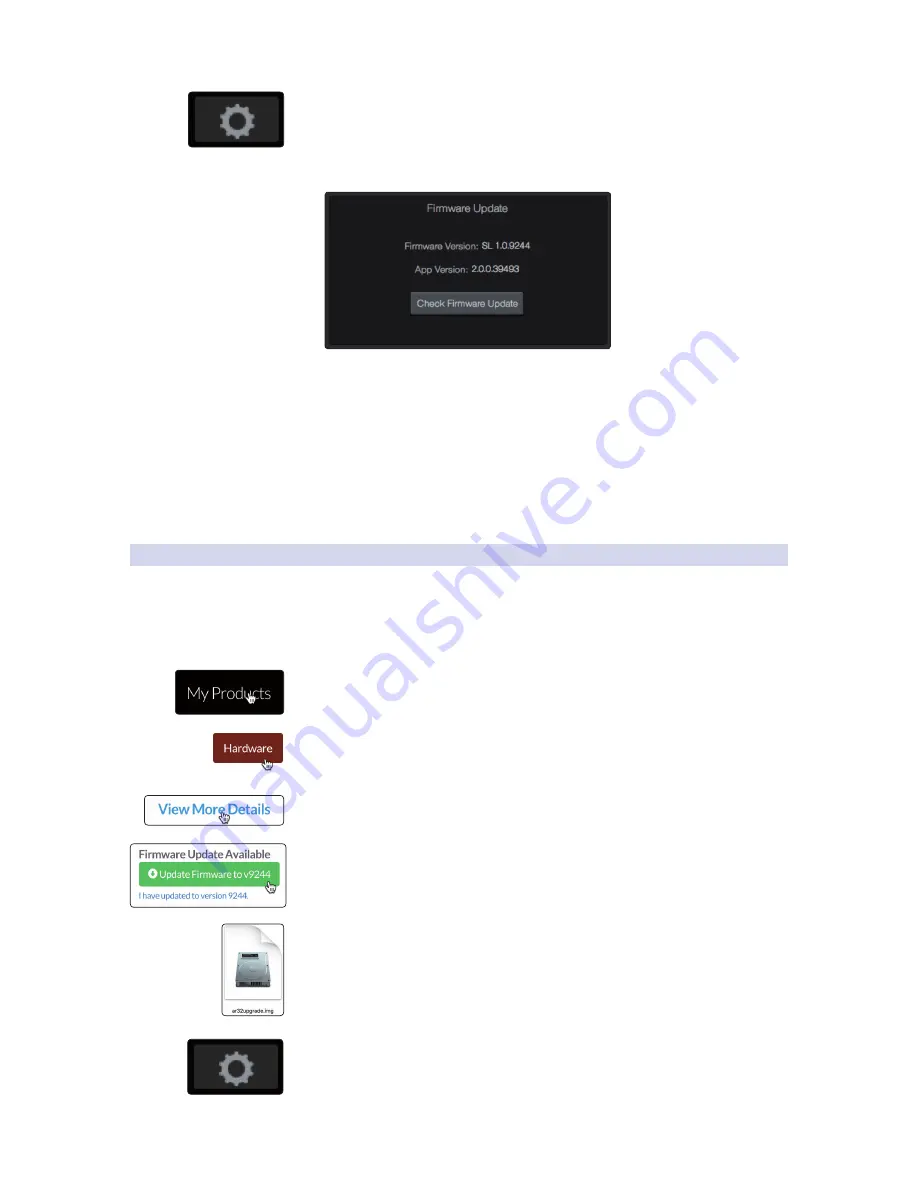
3.  Click or touch the Settings icon at the top right of the UC Surface window. 


4.  On the Device Settings tab, click “Check Firmware Update.”

5.  You will be asked if you would like to proceed 

with the firmware update. Click “OK.”

6.  A progress bar will be shown in UC Surface during the first part of 

the firmware update. Once it is complete, UC Surface will inform you 
that it is finished and will ask you to power-cycle the mixer.

7.  When you restart your mixer, verify that the last four digits of the firmware 

version on it are the same as the firmware files you downloaded.

For more information, 

see the StudioLive Software Library Reference Manual

.

2.3.2 

Manual Firmware Updates

To manually update your mixer’s firmware, you will need a computer 
with Internet access and a method to transfer the file from one 
computer to another (USB Thumb drive, SD card, etc.). 

1.  Log in to your my.presonus.com account.

2.  Once you have logged in, click the My Products button at the top of the page. 


3.  Click on the Hardware tab to view your registered hardware products. 


4.  Find your mixer model on the page and click the View More Details link. 

5.  Click on the update Firmware button to download the files to your computer. 


6.  When the download completes, open your Downloads folder. Depending on 

your computer’s system preferences, the firmware .zip archive file might not 
automatically decompress. If it doesn’t, double-click the file, and it will 
decompress. You will find a single .img file inside. Drag it to your  
removable media. 

7.  On the computer connected to your mixer, launch UC Surface and click on the 

Settings page button. 
 

Содержание StudioLive 16R

Страница 1: ...StudioLive Series III Rack Mixers Rackmount Digital Mixing and Remote I O System with AVB Owner s Manual www presonus com English ...

Страница 2: ...2 4 Step 4 Set Up an AVB Network 8 3 Hookup 9 3 1 Front Panel 9 3 2 Rear Panel 10 4 Connecting Your Audio System 12 4 1 Level Setting Procedure 12 4 2 Typical Setup Diagrams 14 4 2 1 Typical Band Setup StudioLive 32R 14 4 2 2 Typical Band Setup StudioLive 16R 15 4 2 3 Typical Church Setup StudioLive 32R 16 4 2 4 Typical Church Setup StudioLive 16R 17 5 Resources 18 5 1 Stereo Microphone Placement ...

Страница 3: ......

Страница 4: ......

Страница 5: ...he real experts our valued customers We appreciate the support you have shown us through the purchase of this product 1 2 About This Manual We suggest that you use this manual to familiarize yourself with the features and correct connection procedures for your mixer before trying to use it This will help you avoid problems during installation and setup Throughout this manual you will find Power Us...

Страница 6: ...re for Mac and Windows 4 4 Capture multitrack recording software for Mac and Windows 4 4 QMix UC aux control software for iOS and Android available free from Apple App Store and Google Play 1 4 What is in the Box Your StudioLive Series III rackmount mixer package contains the following PreSonus StudioLive 32R StudioLive 24R and StudioLive 16R digital recording and performance mixer USB cable IEC p...

Страница 7: ...loaded from the Apple App Store UC Surface and QMix UC for Android can be downloaded from the Google Play Store More details on the StudioLive Software Library can found in the Reference Manual at www presonus com 1 5 What You Will Need The following items are not included with your StudioLive Series III rackmount mixer but are needed to complete your new mixing system 4 4 LAN network with Interne...

Страница 8: ...ware In general you will need the following 4 4 LAN network connection and router 4 4 Internet connection for registration and firmware download 4 4 A device running UC Surface 2 1 Step 1 Register Your StudioLive Series III Rackmount Mixer 1 Go to my presonus com and log in or create a new user account if you don t have one 2 Once you have logged into your my PreSonus account click the Register a ...

Страница 9: ...ols consult the documentation for your router to learn how to change these settings 2 2 1 Wired LAN Networking Ethernet The easiest way to configure your control network is to connect your mixer and devices computer iPad or Android to a wireless router This allows you to quickly connect devices for remote control using UC Surface and QMix UC 1 Connect your StudioLive Series III Rackmount mixer to ...

Страница 10: ...e front of your StudioLive mixer will turn blue once it is connected and communicating properly to the computer 2 3 Step 3 Update Firmware 2 3 1 Direct Updating over the Internet The easiest way to update your StudioLive Series III rackmount mixer firmware is to connect your mixer to a device running UC Surface that also has Internet access Power User Tip Because direct updating from the Internet ...

Страница 11: ...anual Firmware Updates To manually update your mixer s firmware you will need a computer with Internet access and a method to transfer the file from one computer to another USB Thumb drive SD card etc 1 Log in to your my presonus com account 2 Once you have logged in click the My Products button at the top of the page 3 Click on the Hardware tab to view your registered hardware products 4 Find you...

Страница 12: ... StudioLive Series III console mixers over an AVB network with or without DSP processing engaged While connected to a console mixer either directly or over an AVB network a Series III rackmount mixer supports sending and receiving audio as well as remotely controlling preamp levels and phantom power For complete information on using your StudioLive Series III Rackmount mixer as a stagebox or remot...

Страница 13: ...uts This button is linked with the Mute All button in the Global Settings view of UC Surface software Power User Tip The Mute All button is both latching and momentary When the button is pressed and immediately released it will latch in the on state When the button is pressed and held it will turn on while held and off when released Power User Tip The mute state of each channel and bus is retained...

Страница 14: ...The last two inputs on the StudioLive Series III rackmount mixers also feature RCA inputs for connecting consuming line level devices like DVD players These inputs are summed with their mic line counterparts Mix Outputs Your StudioLive features 16 12 6 Mix Outputs These Mix Outputs may be used to output Aux Subgroup or Matrix mixes depending on how you configure their dedicated mix buses More info...

Страница 15: ...applications only More information about AVB and control networking can be found in Section 2 4 USB Port This female USB B jack provides connection to a computer for audio interfacing control and file transfer duties Power Input and Switch Connect the provided IEC power cable to this input Push the top of the switch to power your StudioLive on and the bottom to switch power off ...

Страница 16: ...e converters will cause digital distortion which has a negative effect on sound quality Your P A and studio equipment should be powered on in the following order 4 4 Sound sources keyboards direct boxes microphones etc connected to the StudioLive inputs 4 4 StudioLive mixer 4 4 Computer if applicable 4 4 Power amplifiers or powered loudspeakers When it is time to power down your system should be t...

Страница 17: ...im in UC Surface while watching the input meter Adjust the input gain until the meter reaches a little more than halfway up The meter should never turn red 9 Raise the Channel 1 fader in UC Surface until it reaches 0 dB unity gain 10 In UC Surface bring up the Main mix level fader until you can comfortably listen to your microphone through your speakers From this point you can use the Fat Channel ...

Страница 18: ...reless in ear keys main speakers drum monitor side fill floor wedges Ch 1 MixOut7 8 MixOut5 6 MixOut3 4 MixOut1 2 wireless in ear bass wireless in ear lead guitar wireless in ear lead vocals Ch 3 Ch 2 Ch 4 Ch 5 Ch 9 Ch 10 Ch 6 Ch 8 Ch 7 music source Laptop running Capture 2 0 Use USB to record up to 32 channels plus the Main mix For more recording options use AVB over the Network Audio connection ...

Страница 19: ... to 16 channels and the Main mix keyboard DI lead vocal DI Box DI Box backup vocal wireless mic acoustic guitar DI bass DI electric guitar amp lead iPad running UC Surface Mobile devices iOS or Android running QMix UC headphones main speakers and subwoofers floor wedges Ch 1 Ch 2 Ch 3 Ch 5 Ch 6 Ch 4 music source MixOut3 4 MixOut1 2 wireless in ear lead guitar wireless in ear lead vocals drum kit ...

Страница 20: ... DI Box lead vocal backup vocal mics wireless mic acoustic guitar DI bass DI electric guitar amp lead podium mic hanging choir mics iPad running UC Surface Mobile devices iOS or Android running QMix UC headphones wireless in ear keys main speakers cry room floor wedges Ch 1 MixOut7 8 MixOut5 6 MixOut3 4 MixOut1 2 wireless in ear bass wireless in ear lead guitar wireless in ear lead vocals Ch 3 Ch ...

Страница 21: ... record up to 16 channels and the Main mix keyboard DI lead vocal DI Box DI Box backup vocal acoustic guitar DI bass DI electric guitar amp lead iPad running UC Surface Mobile devices iOS or Android running QMix UC headphones main speakers and subwoofers floor wedges Ch 1 Ch 2 Ch 3 Ch 5 Ch 6 Ch 4 MixOut1 2 wireless in ear lead vocals drum kit drum monitor Cry Room podium mic piano hanging choir mi...

Страница 22: ...well as for studio recording Grand Piano Place one microphone above the high strings and one microphone above the low strings Experiment with distance the farther back the more room you will capture This technique can be used for live and studio applications Electric Guitar Place a dynamic microphone an inch or two away from the speaker of the guitar amplifier Experiment with exact location If you...

Страница 23: ...ll diaphragm condenser microphones See drum overheads picture on the next page Bass Guitar Direct and Speaker Plug the electric bass guitar into a passive direct box Connect the instrument output from the passive direct box to a bass amplifier Place a dynamic microphone an inch or two away from the speaker and connect it to a StudioLive microphone input Connect the line output from the passive dir...

Страница 24: ...ately 7 or 8 feet above the floor or drum riser Experiment with height This technique can be used in live applications as well Snare Drum top and bottom Point a dynamic microphone at the center of the snare making sure it is placed so that the drummer will not hit it Place a small diaphragm condenser microphone under the drum pointed at the snares Experiment with the placement of both microphones ...

Страница 25: ...ophone a lot It puts the voice in your face THRESHOLD RATIO ATTACK RELEASE 1 1 dB 3 8 1 0 002 ms 38 ms Percussion Snare Kick This setting allows the first transient through and compresses the rest of the signal giving a hard snap up front and a longer release THRESHOLD RATIO ATTACK RELEASE 2 1 dB 3 5 1 78 ms 300 ms Left Right Stereo Overheads The low ratio and threshold in this setting gives a fat...

Страница 26: ...estral Use this setting for string pads and other types of synthesized orchestra parts It will decrease the overall dynamic range for easier placement in the mix THRESHOLD RATIO ATTACK RELEASE 3 3 dB 2 5 1 1 8 ms 50 ms Stereo Mix Stereo Limiter Just as the name implies this is a hard limiter or brickwall setting ideal for controlling the level to a two track mixdown deck or stereo output THRESHOLD...

Страница 27: ...c Guitar 2 3 kHz Tinny 5 kHz and above Sparkle 200 Hz Boomy 125 Hz Full Electric Bass 1 kHz Thin 600 Hz Growl 125 Hz Boomy 80 Hz and below Bottom end String Bass 600 Hz Hollow 2 5 kHz Sharp attack 200 Hz Boomy 125 Hz and below Bottom end Snare Drum 1 kHz Annoying 2 kHz Crisp 150 200 Hz Full 80 Hz Deep Kick Drum 400 Hz Muddy 2 5 kHz Sharp attack 80 Hz and below Boomy 60 125 Hz Bottom end Toms 300 H...

Страница 28: ...tic electric guitar attack lower piano register attack vocal clarity decrease muddiness in vocals and mid range instruments decrease long bass overtones in cymbals enhance background vocal breathiness disguise vocals and guitars that are slightly out of tune adds distance to background instruments softens a thin guitar breathier vocals brighten cymbals string instruments flutes more realistic samp...

Страница 29: ...5 0 6 2 HIGH MID ON OFF HI MID FREQ kHz HIGH MID Q HIGH MID GAIN HIGH ON OFF HIGH SHELF HIGH FREQ kHz HIGH Q HIGH GAIN ON 2 9 0 3 0 ON ON 8 0 N A 4 Kick Drum LOW ON OFF LOW SHELF LOW FREQ Hz LOW Q LOW GAIN LOW MID ON OFF LOW MID FREQ Hz LOW MID Q LOW MID GAIN ON OFF 108 0 4 4 ON 265 2 0 4 HIGH MID ON OFF HI MID FREQ kHz HIGH MID Q HIGH MID GAIN HIGH ON OFF HIGH SHELF HIGH FREQ kHz HIGH Q HIGH GAIN...

Страница 30: ...crophone Preamplifier InputType XLRFemale balanced FrequencyResponsetoMainOutput atunitygain 20 20kHz 0 5dBu InputImpedance 1kΩ THDtoMainOutput 0 005 4dBu 20 20kHz unitygain unwtd S NRatiotoMainOutput Ref 4dB 20kHzBW unitygain A wtd 94dB CommonModeRejectionRatio 1kHzatunitygain 65dB GainControlRange 1dB 0dBto 60dB MaximumInputLevel unitygain 12dBu PhantomPower 2VDC 48VDC switchableperchannel Line ...

Страница 31: ... 1kHzcomingsoon A D ABitDepth 24 ReferenceLevelfor0dBFS 18dBu TotalSystemLatency 1 9ms localrouting analogin analogout allprocessingactive Clock Jitter 20psRMS 20Hz 20kHz JitterAttenuation 60dB 1nsin 1psout Power Environmental Connector IEC Input VoltageRange 90to230VAC 10 PowerRequirements continuous 85W RecommendedAmbientOperatingTemperature 0 to40 Celsius 32 to104 Fahrenheit Physical StudioLive...

Страница 32: ...PreSonus Cost of Coverage Provided at no additional cost Included at no additional cost Who to contact to make a claim The seller PreSonus technical support for your region What This Warranty Covers PreSonus Audio Electronics Inc PreSonus warrants defects in material and workmanship in PreSonus branded products under normal use This Limited Warranty applies only to hardware products manufactured b...

Страница 33: ...replace at our sole and absolute option products covered by this warranty at no charge for labor or materials If the product must be shipped to PreSonus for warranty service the customer must pay the initial shipping charges PreSonus will pay the return shipping charges How to Get Warranty Service USA 1 You must have an active user account with PreSonus and your hardware must be on file with your ...

Страница 34: ...LITY FOR ANY DEFECTIVE PRODUCT IS LIMITED TO THE REPAIR OR REPLACEMENT OF THE PRODUCT AT PRESONUS S SOLE OPTION IF PRESONUS ELECTS TO REPLACE THE PRODUCT THE REPLACEMENT MAY BE A RECONDITIONED UNIT IN NO EVENT WILL PRESONUS BE LIABLE FOR DAMAGES BASED ON INCONVENIENCE LOSS OF USE LOST PROFITS LOST SAVINGS DAMAGE TO ANY OTHER EQUIPMENT OR OTHER ITEMS AT THE SITE OF USE AND TO THE EXTENT PERMITTED B...

Страница 35: ...move the chicken and set aside Discard the onion bay leaves and garlic reserving the liquid 2 In a heavy saucepan heat 1 Tbsp of the oil on medium high heat and brown the andouille until it is cooked through Set aside sausage for later 3 In the same saucepan add and heat remaining oil Slowly add flour 1 2 Tbsp at a time stirring continuously Continue cooking and stirring the roux until it is a dar...

Страница 36: ...011 Grand Bay Ct Baton Rouge Louisiana 70809 USA 1 225 216 7887 www presonus com Part 70 22000062 A StudioLive Series III Rack Mixers Rackmount Digital Mixing and Remote I O System with AVB Owner s Manual ...

Отзывы: