


9.23, 9.27 Treadmill
Page 42
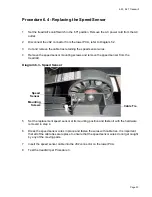
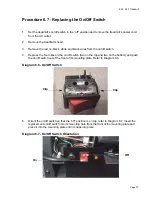
Procedure 6.10 - Replacing the Console with Keypad
Note:
The keypad is furnished as part of the console, the console must be replaced when a
replacement keypad is required.
1.
Set the treadmill’s on/off switch in the “off” position and remove the treadmill’s power cord
from the AC outlet.
2.
A grounded anti-static wrist strap must be worn whenever the upper PCA is being handled.
3.
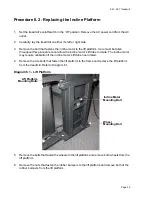
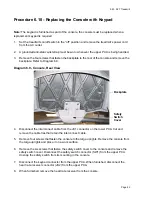
Remove the four screws that fasten the backplate to the rear of the console and remove the
backplate. Refer to Diagram 6.9.
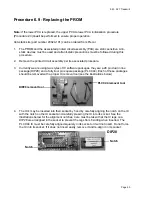
Diagram 6.9 - Console, Rear View
4.
Disconnect the interconnect cable from the JK1 connector on the lower PCA. Cut and
remove the cable ties that retain the interconnect cable.
5.
Remove four screws that fasten the console to the targa uprights. Remove the console from
the targa uprights and place it on a work surface.
6.
Remove the six screws that fasten the safety switch cover to the console and remove the
safety switch cover. Disconnect the safety switch connector (SW1) from the upper PCA.
Unsnap the safety switch from its mounting in the console.
7.
Disconnect the keypad connector from the upper PCA. When furnished, disconnect the
heart rate receiver connector (JK2) from the upper PCA.
8.
When furnished, remove the heart rate receiver from the console.
Backplate
Safety
Cover
Switch
Содержание 9.21
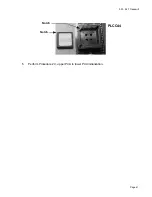
Страница 41: ...9 23 9 27 Treadmill Page 41 5 Perform Procedure 2 3 upper PCA to lower PCA initialization Notch Notch PLCC44...
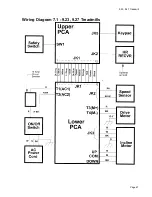
Страница 47: ...9 23 9 27 Treadmill Page 47 Wiring Diagram 7 1 9 23 9 27 Treadmills...
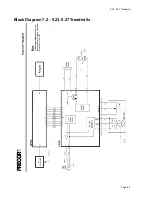
Страница 48: ...9 23 9 27 Treadmill Page 48 Block Diagram 7 2 9 23 9 27 Treadmills...


