


905E, 9.1, 9.10 Treadmills
Page 41
13. Using the soldering iron, melt a small piece of solder onto the junction formed by each wire
and potentiometer terminal. Slide a piece of shrinkable tubing over the soldered connection.
14. Using a new cable tie, secure the three potentiometer wires to the potentiometer bracket.
15. Calibrate the lift assembly as described in Procedure 4.1 of this appendix.
16. Replace the electronic console and crank handle as described in Procedure 6.1 of this
appendix.
17. Check the operation of the treadmill as described in Section Three of this appendix.
Содержание 9.10
Страница 5: ...905E 9 1 9 10 Treadmills Page 5 9 1 Electronic Console 9 10 Electronic Console...
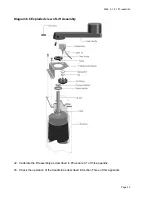
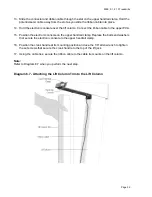
Страница 15: ...905E 9 1 9 10 Treadmills Page 15 Diagram 4 2 Upper Lift Column Assembly...
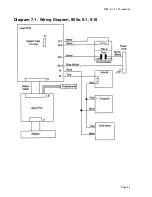
Страница 44: ...905E 9 1 9 10 Treadmills Page 44 Diagram 7 1 Wiring Diagram 905e 9 1 9 10...
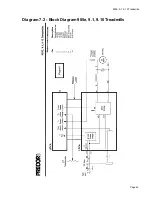
Страница 45: ...905E 9 1 9 10 Treadmills Page 45 Diagram 7 2 Block Diagram 905e 9 1 9 10 Treadmills...


